Author Archives: Angela Liddon

Vegan and Gluten-Free Chocolate Chip Cookies

{“head_note”:”Thin, crisp, and chewy. While these aren’t your typical soft and doughy cookies, we loved them anyways. The almond flour gives them a taffy\/chewy texture and it was hard to eat just one. The cookies firmed up quite a bit by the next day, so I would suggest cooking them a bit less than 12 mins (which was what I did). Adapted from my Vegan Chocolate Chip Cookies.<\/a>“,”instructions”:”

    \r\n \t

  1. Preheat oven to 350\u00b0F and line a baking sheet with parchment paper. In a small bowl, mix together the flax egg and set aside.<\/li>\r\n \t
  2. With an electric mixer or in a stand mixer, beat the Earth Balance and oil until fluffy. Add the sugars and beat for 1-2 minutes until creamy. Beat in the flax egg and vanilla extract.<\/li>\r\n \t
  3. Beat in the remaining ingredients and fold in the chocolate chips.<\/li>\r\n \t
  4. With wet fingers, shape balls of dough and place on the baking sheet. The dough will be very sticky but don\u2019t worry! No need to flatten the balls down! Bake for about 10-11 minutes until slightly golden along edges. Allow to cool for 5-10 mins. on the baking sheet and then transfer to a cooling rack for another 10 minutes.<\/li>\r\n<\/ol>“,”foot_note”:””}

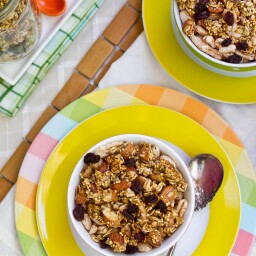
Lightened Up Summer Granola (Oil-Free & Reduced Sugar)

{“head_note”:”I love granola, but I don\u2019t always love its usual oil and sugar heavy profile. This crunchy lightened up version doesn\u2019t contain any oil and is lightly sweetened, resulting in a light tasting granola perfect for those warmer summer months! I love this granola crumbled over a bowl of Vegan Overnight Oats<\/a>, a Green Monster<\/a>, or Raw Buckwheat Breakfast Porridge<\/a>. Adapted from My Favourite Granola<\/a>.<\/em>“,”instructions”:”

    \r\n \t

  1. Preheat oven to 325\u00b0F and line a baking sheet with parchment paper or non-stick mat.<\/li>\r\n \t
  2. In a large bowl, stir together dry ingredients. In a medium sized bowl, mix together the wet ingredients (except for the vanilla beans and extracts). Microwave for about 60 seconds on high. Now stir in the extracts and scraped vanilla beans until combined.<\/li>\r\n \t
  3. Add wet mixture to dry mixture and stir well until everything is coated. Mixture will be a bit dry at first but keep mixing as it will eventually come together! Adjust salt to taste. Scoop onto baking sheet.<\/li>\r\n \t
  4. Bake for 20-25 minutes, stirring once half way through baking. Allow to cool for about 10-15 minutes on the baking sheet. Makes about 5 cups. Store in an air-tight container for 1-2 months.<\/li>\r\n<\/ol>“,”foot_note”:””}

Cheezy Summer Pasta

{“head_note”:”This is a great recipe when you need to clean out your fridge! I just chopped up whatever veggies I had lurking deep in the crisper, mixed it with my go-to cheeze sauce<\/a>, and threw in my fav cooked pasta. Add some chickpeas or beans if you are looking to amp up the protein. I love using Kamut or brown rice pasta because it\u2019s high in protein. I can see this recipe working with many different ingredients, so have some fun and play around with it\u2026you really can\u2019t screw it up. Well, there was that one time when I\u2026oh, never mind.”,”instructions”:”

    \r\n \t

  1. In a food processor, add all cheeze sauce ingredients and process until smooth.<\/li>\r\n \t
  2. In a large skillet, add chopped onion and cook over medium heat for about 6-7 minutes. Add minced garlic and cook for another minute. Next, add the rest of the chopped vegetables and cook for about 10 minutes on medium heat.<\/li>\r\n \t
  3. Meanwhile, cook your desired pasta according to package directions. Drain and rinse with cold water.<\/li>\r\n \t
  4. Add cheeze sauce to cooked veggies in the skillet and stir well. Finally, add drained pasta and stir again until combined. Stir in a tablespoon of Earth Balance if desired (I love doing this!). Heat and serve immediately. Makes about 6-7 cups. Pasta tastes best served immediately warm. If reheating, add a splash of non-dairy milk as the sauce tends to dry out in the fridge.<\/li>\r\n<\/ol>“,”foot_note”:””}
Low-Fat Vegan Cheeze Sauce

{“head_note”:”This is the Lexus of all the cheeze sauces I\u2019ve made to date. It\u2019s extremely smooth, buttery, and comforting!”,”instructions”:”

    \r\n \t

  1. In a skillet or pot, melt the Earth Balance over medium heat.<\/li>\r\n \t
  2. In a medium sized bowl, whisk together the flour and milk until all clumps are gone.<\/li>\r\n \t
  3. Add milk & flour mixture and nutritional yeast to pot and whisk well. Reduce heat to low-medium.<\/li>\r\n \t
  4. Add Dijon, garlic powder, onion powder, salt and pepper to taste and whisk frequently until the sauce thickens up, for about 5 minutes. If it\u2019s still too thin you can add more flour to achieve the thickness you desire. To reheat: reheat in the microwave or on the stove-top (add a splash of milk if it\u2019s too thick) and whisk well. Store in an air-tight container for up to 5-7 days.<\/li>\r\n<\/ol>“,”foot_note”:””}

Roasted Tomato, Garlic, & Onion Coconut Soup

{“head_note”:”This tomato soup is anything but traditional, boring, or bland and it\u2019s definitely one of the best homemade soups I have made to date. The light coconut milk is a great way to add a luxurious creaminess, pairing well with the heat from the garam masala and adding a nice contrast to the rustic quality of the roasted vegetables. I will make this again and again!”,”instructions”:”

    \r\n \t

  1. Preheat oven to 400\u00b0F and line 2 baking sheets with tin foil (note that parchment paper will burn). Grab a small casserole dish to place the garlic in. For how to prepare the garlic, see this tutoria<\/a>l. Lightly drizzle on EVOO onto onions and season onions and tomatoes with S & P. Roast for about 30 minutes and then check on the vegetables. You might have to remove the onions early as they cook the quickest. When the onions are golden and lightly blackened on the edge, you can remove them. Continue roasting the garlic for about 60 minutes or so (check it after 45mins), and the tomatoes for about 1 hour and 20 mins. Your oven times will vary though, so keep an eye on them!<\/li>\r\n \t
  2. Add 3 cups roasted tomatoes, 2 tbsp roasted garlic flesh, and all the onion into a large pot. Add coconut milk, tomato paste, and broth and stir well.<\/li>\r\n \t
  3. Stir in the seasonings and spices to taste. Bring to a boil and then simmer for about 5-10 minutes.<\/li>\r\n \t
  4. Carefully transfer into a blender, processor, or use an immersion blender. Pulse for just a few seconds until chunky. You can also make it smooth, but I liked the texture. Serve immediately and garnish with reserved coconut milk, a sprinkle of garam masala, croutons\/bread, and fresh black pepper.<\/li>\r\n<\/ol>“,”foot_note”:””}

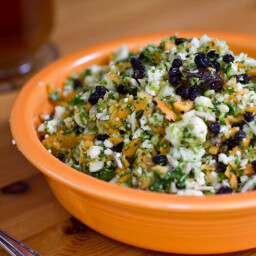
Detox Salad

{“head_note”:”Packing a powerhouse of nutrients, this light & energizing salad will have you bursting with energy. It makes a lot so you can enjoy it all week long for easy, energizing lunches. I wouldn\u2019t recommend skipping the currants and raisins as it adds a much needed sweetness to balance out the vegetables and lemon juice. I loved it drizzled with a touch of maple syrup just before serving. Feel free to use any herbs and spices you wish. I also love it with a sprinkle of cinnamon on top.<\/em>“,”instructions”:”

    \r\n \t

  1. In a food processor (or chop by hand) process the broccoli (no stems) until fine. Add into large bowl.<\/li>\r\n \t
  2. Now process the cauliflower (no stems) until fine and add into bowl. Do the same with the carrots.<\/li>\r\n \t
  3. Stir in the sunflower seeds, currants, raisins, and parsley. Add lemon juice and seasonings to taste.<\/li>\r\n \t
  4. Drizzle with maple syrup to taste.<\/li>\r\n<\/ol>“,”foot_note”:”I save the stems for a stir-fry later on in the week.”}

Chocolate Pumpkin Butter

{“head_note”:”Because we really need another reason to eat more pumpkin. I happen to think that every great recipe should have a chocolate version, don\u2019t you? Adapted from my pumpkin butter<\/a> recipe.”,”instructions”:”

    \r\n \t

  1. Combine pumpkin, apple juice, spices, and sugar in a large pot and stir well. Cover with lid and bring mixture to a boil. Reduce heat to medium-low. Sift in cocoa powder and stir well. Cover with lid (keep ajar) and simmer for about 35-45 minutes, stirring often, until thick & buttery. Be careful as the mixture bubbles and pops!<\/li>\r\n \t
  2. Remove from heat. Stir in maple syrup to taste.<\/li>\r\n \t
  3. Once cool, pumpkin butter can be kept in an airtight container in the fridge for up to 3 weeks. Makes enough to fill one large mason jar or about 3.5 cups.<\/li>\r\n<\/ol>“,”foot_note”:””}

Pumpkin Maple Baked Bean Cornbread Casserole

{“head_note”:”Maple baked beans with a pumpkin twist all topped with a lightly sweetened cornbread. The result is a casserole that kept us coming back for more and more. See my tips & suggestions below on making-ahead, substitutions, and Thanksgiving potluck options.”,”instructions”:”

    \r\n \t

  1. Preheat oven to 400\u00b0F. In a pot, add a splash of oil along with the chopped onion and garlic. Cook over medium heat for 5 minutes.<\/li>\r\n \t
  2. Now add in the rest of the ingredients and mix well. Cook over low heat until thick, about 10-15 mins. You can make this the night before and leave it in the fridge like I did.<\/li>\r\n \t
  3. Cornbread: In a bowl, mix the dry ingredients. In a separate bowl, mix the wet ingredients. Add wet to dry and stir until combined.<\/li>\r\n \t
  4. Grease a casserole dish (I used 2.3 L), spread in the maple beans, and spoon the cornbread mixture over top. Bake at 400\u00b0F for about 35 minutes until golden and a toothpick comes out clean. Serve immediately with a bit of Earth Balance on top if desired.<\/li>\r\n<\/ol>“,”foot_note”:”Does not keep well for leftovers (it dries out a bit). I suggest serving immediately or halving the recipe if needed.”}

Pumpkin Mac ‘n Cheeze Sauce

{“head_note”:”Dear KD & Velveeta, deepest sympathies. xo. <\/em>Adapted from Butternut Mac n Cheeze<\/a>.”,”instructions”:”

    \r\n \t

  1. Add Earth balance in a pot over low-medium heat.<\/li>\r\n \t
  2. In a small bowl, whisk together milk and arrowroot powder (or cornstarch or flour) and garlic powder until clumps are gone. Add into pot and whisk.<\/li>\r\n \t
  3. Stir in nutritional yeast, Dijon, S & P and whisk over low heat until thickened (about 5-7 minutes or so). Lastly, add in 1 cup of canned pumpkin and stir until combined and heated through.<\/li>\r\n \t
  4. Store in an air-tight container in the fridge for up to 7 days.<\/li>\r\n<\/ol>“,”foot_note”:””}

Pumpkin Pie Chia Pudding

{“head_note”:”A healthier alternative to a delicious pumpkin pie filling!<\/em> Feel free to play around with the ingredients to suit your taste buds.<\/em>“,”instructions”:”

    \r\n \t

  1. In a medium-sized bowl, whisk together all ingredients until combined and no clumpy bits remain.<\/li>\r\n \t
  2. Place bowl in the fridge for 1-2 hours or overnight, to thicken and chill.<\/li>\r\n \t
  3. Serve with raisins, walnuts, or crushed ginger cookies if desired.<\/li>\r\n<\/ol>“,”foot_note”:””}