Author Archives: Angela Liddon

Rustic Chocolate Chip Banana Oat Cake with Peanut Butter Banana Glaze

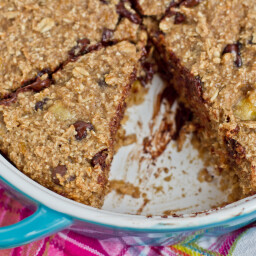
{“head_note”:”This rustic looking banana cake blew our socks off with an intense banana flavour and sweet bites of chocolate. It has a wonderful chewy texture from the oats and a little bit of crunch from the nuts. You\u2019d never guess it has just two tablespoons of oil and it can easily be made gluten-free by using GF oats!”,”instructions”:”

    \r\n \t

  1. Preheat oven to 350\u00b0F (175\u00b0C) and lightly grease a 8 inch (4 cup) casserole dish or 8\u201d cake pan. Take 2 cups of regular oats and process them in a food processor until flour like in consistency.<\/li>\r\n \t
  2. In a large bowl, whisk together the dry ingredients (processed oats, regular oats, sugars, spices, baking powder, and salt).<\/li>\r\n \t
  3. In another bowl, mix together the oil, applesauce, almond milk, and vanilla. Add in the two peeled bananas and smash into the wet ingredients until smooth.<\/li>\r\n \t
  4. Add the wet mixture to the dry and stir until just combined. Now fold in the chips, optional walnuts, and the chopped banana.<\/li>\r\n \t
  5. Spread into prepared pan and bake for 36 minutes at 350\u00b0F (175\u00b0C) or until a toothpick comes out clean. The cake must be cooled for at least 15-20 minutes before attempting to remove.<\/li>\r\n \t
  6. Once fully cooled, slice and top with PB Banana Glaze (see below). Store in the fridge for up to 3 days (without Glaze).<\/li>\r\n \t
  7. PB Banana Glaze:<\/strong>\u00a0Mash banana in a bowl until smooth. Add in peanut butter and mash until combined.<\/li>\r\n \t
  8. Sift in the salt and icing sugar and stir until fully combined. Makes about 2\/3 cup glaze. Store in fridge in a sealed contained for 1-2 days.<\/li>\r\n<\/ol>“,”foot_note”:”The great thing about this recipe is that I used regular oats and processed them into a flour<\/em>, so this recipe can be easily made gluten-free<\/strong> if you use GF oats.”}

Chocolate Chip Cookie Dough ‘Blizzard’

{“head_note”:””,”instructions”:”

    \r\n \t

  1. In a large food processor, add the frozen bananas. I like to cut my bananas into 1 inch chunks before freezing.<\/li>\r\n \t
  2. Process bananas, stopping to scrape down the sides of the bowl as necessary.<\/li>\r\n \t
  3. Finally, add in your cookie dough and process until combined. You should have a soft serve type consistency when done.<\/li>\r\n \t
  4. To make the blizzard simply stir in your desired amount of mini cookie dough balls, pour into a glass, and serve with a spoon.<\/li>\r\n<\/ol>“,”foot_note”:””}

Cookie Dough Balls III

{“head_note”:””,”instructions”:”

    \r\n \t

  1. In a food processor, add the cashews and oats and process until it forms a fine crumble.<\/li>\r\n \t
  2. Now add in the salt, sugar, and flour and process for a few seconds more.<\/li>\r\n \t
  3. Add in the maple syrup and vanilla and process until combined. It will be sticky, but this is normal!<\/li>\r\n \t
  4. Add in your chocolate chips and stir by hand or process. Form into balls. Store in freezer.<\/li>\r\n<\/ol>“,”foot_note”:””}

Strawberry Apple Breakfast Crisp

{“head_note”:”This isn\u2019t your grandma\u2019s apple crisp! It is flourless, all-natural, reduced in sugar, and vegan. I love the chewy topping thanks to the processed almond mixture. If you are looking for a traditional crisp recipe, this probably isn\u2019t the one for you, but we enjoyed it nonetheless. It could also be made gluten-free quite easy by using gluten-free oats.<\/em>“,”instructions”:”

    \r\n \t

  1. Preheat oven to 400\u00b0F and grease a 1.4 L casserole dish. Peel and chop the apples and slice the strawberries. Place in a large bowl and mix with the rest of the filling ingredients. Stir well and set aside.<\/li>\r\n \t
  2. In a food processor, place 1 cup almonds into the bowl and process until chunky (see pic below). Add the rest of the ingredients and pulse for a few seconds until just mixed. You don\u2019t want to over-process this mixture so that it stays chunky. Pour 1\/2 cup of this topping into the apple mixture and stir.<\/li>\r\n \t
  3. Pour the apple filling mixture into the prepared casserole dish and sprinkle on all the remaining topping over top.<\/li>\r\n \t
  4. Cover (with casserole lid or foil poked with holes) and bake for about 40 minutes at 400\u00b0F. If you do not cover it, the topping will burn. Allow to cool for about 15 minutes before serving. Be careful because it will be super hot!<\/li>\r\n<\/ol>“,”foot_note”:””}

Husband’s Healing Stew

{“head_note”:””,”instructions”:”

    \r\n \t

  1. In a large pot over low heat, add 1 tbsp olive oil and the chopped sweet onion, green onion, and minced garlic. Heat over low until translucent, about 5-8 minutes.<\/li>\r\n \t
  2. Stir in coriander, cinnamon, and two bay leaves and heat an additional minute or two. Now, add in the chopped vegetables (zucchini, peppers, carrots) and cook for about 5 more minutes. Add a bit more oil if necessary.<\/li>\r\n \t
  3. Stir in the diced tomatoes, vegetable broth, rinsed buckwheat and pearled barley (or grains of choice). Simmer on low-medium heat (dial 3-4) for 20 minutes, checking often to make sure it doesn\u2019t burn or thin out too much. Add a bit more broth or water if necessary and reduce heat when needed.<\/li>\r\n \t
  4. After 20 minutes, add in the lemon juice and additional seasonings- all to taste (minced parsley, garlic powder, red pepper flakes, and salt & pepper). Cook for another few minutes, remove bay leaves, and serve with fresh bread. Freeze leftovers or store in the fridge.<\/li>\r\n<\/ol>“,”foot_note”:”
      \r\n \t

    • You can have success using a wide range of vegetables, seasonings, and grains of your choice.<\/li>\r\n \t
    • Always adjust the seasonings to taste and add them gradually. My taste buds are quite muted right now, so we made it spicy. 🙂<\/li>\r\n<\/ul>“}

Chilled Double Chocolate Torte: The No-Bake Version

{“head_note”:””,”instructions”:”

    \r\n \t

  1. Crust:<\/strong> Oil a 7-10 inch springform pan and line it with a circle of parchment paper. In a food processor, pulse the pecans until crumbly. Be careful not to over process them as you still want them a bit chunky. Now add in the rest of the crust ingredients and pulse until just mixed. Scoop mixture onto prepared pan and press down firmly and evenly with slightly wet fingers or a spatula. Pop into freezer to set while making the mousse.<\/li>\r\n \t
  2. Chocolate mousse:<\/strong> Place all mousse ingredients (except chocolate chips) into food processor. Process until smooth. In a small bowl, melt your chocolate chips in the microwave and scoop melted chocolate into food processor mixture. Process until smooth.<\/li>\r\n \t
  3. Remove crust from freezer and scoop this mousse on top of crust. Smooth out as much as possible and then place in the freezer for 2 hours to firm.<\/li>\r\n \t
  4. Once firm, remove from freezer and allow to sit on the counter for about 5-10 minutes before serving chilled. Place leftover torte in the freezer wrapped and placed in a seal container.<\/li>\r\n<\/ol>“,”foot_note”:”This torte should be served chilled as it gets soft at room temperature.”}

Cinnamon Sugar Pumpkin Spiced Doughnuts

{“head_note”:””,”instructions”:”

    \r\n \t

  1. Pumpkin Doughnuts<\/strong>: Preheat oven to 350\u00b0F. Grease two mini doughnut pans or two regular sized doughnut pans with Earth Balance (or other butter substitute).<\/li>\r\n \t
  2. In a large bowl, whisk together the vinegar, milk, pumpkin, sugar, applesauce, brown sugar (sift if clumpy), and melted Earth Balance (or other butter sub).<\/li>\r\n \t
  3. Sift in in the dry ingredients (baking powder, baking soda, spices, salt, and flours). Mix until just combined. I didn\u2019t sift as I was lazy.<\/li>\r\n \t
  4. Using a \u2018zip-lock\u2019 baggie or pastry bag, spoon the batter into the bag and then secure it with the zip lock or rubber band. Twist the bag slightly and then cut off a hole at the corner to \u2018pipe\u2019 out the batter. Pipe the dough around the circle and gently flatten down with slightly wet fingers to smooth. Repeat.<\/li>\r\n \t
  5. Bake for 10-12 minutes at 350\u00b0F or until they gently spring back when touched. Cool in the pan for 10 minutes before carefully using a butter knife to remove. Place on cooling rack for another 10-15 minutes.<\/li>\r\n \t
  6. Cinnamon Sugar<\/strong>: Melt Earth Balance in a small bowl and dip the cooled doughnuts into butter one at a time. Transfer the dipped doughnut into a bag with the cinnamon sugar and shake until coated thoroughly. Doughnuts keep for 2-3 days.<\/li>\r\n<\/ol>“,”foot_note”:””}

Peanut Butter and Jam Nanaimo bars

{“head_note”:”Also known as: I Love You bars. Forgive Me bars. Bite Me bars. Anniversary Bars. Ange\u2019s New Favourite Dessert Bars. Or the always popular, Me Time Bars. There\u2019s always a good reason to make these scrumptious bites of peanut butter, chocolate, and jam! Be sure to keep them in the fridge as they will soften at room temperature. Use gluten-free graham crackers and they will be gluten-free to boot.<\/em>“,”instructions”:”

    \r\n \t

  1. Line an 8 inch square pan with parchment paper and grease with butter on all sides.<\/li>\r\n \t
  2. Bottom layer<\/strong>: In a small bowl mix the flax egg together (1 tbsp ground flax + 3 tbsp warm water). Set aside. In a saucepan, whisk together the butter, sugar, and sifted cocoa powder. Heat on medium to low and stir frequently until smooth. Now add in the gelled up flax egg and stir well. Now remove from heat and stir in the coconut, processed almonds, and graham wafer crumbs. Stir well and then mix with your hands. Press this mixture into your prepared pan, ensuring that you press it down very firmly. I used a pastry roller to smooth it out, but this is not necessary. Place in freezer to set.<\/li>\r\n \t
  3. Middle layer<\/strong>: In a medium bowl with an electric mixer, beat together all the middle layer ingredients except the jam<\/strong> until smooth. Spread middle layer over top the bottom layer with a wet spoon as evenly as possible. Now gently spread on the jam over top. Place in freezer to set.<\/li>\r\n \t
  4. Top Layer<\/strong>: Melt your chocolate and oil in a double boiler or in the microwave. Stir well until smooth. Remove the pan from freezer and spread the chocolate quickly over the top. Sprinkle coconut on top. Place back in the freezer for about 1 hour until set. Once set you can transfer it to the fridge to keep until ready or you can place it on the counter for about 10 minutes before cutting it into squares.<\/li>\r\n<\/ol>“,”foot_note”:”The middle layer gets very soft at room temperature. Please keep in the fridge until serving.”}

Chocolate Chunk Toffee Bars

{“head_note”:”Everything I love in a granola bar- a crisp, toffee-like exterior with a chunky and chewy middle. Be sure to allow the bars to cool completely before slicing. If you adapt the recipe, please leave a comment with the changes you made and how it turned out! I\u2019m curious if other flours and nut butters might work.”,”instructions”:”

    \r\n \t

  1. Preheat oven to 350\u00b0F and line an 8-inch pan with 2 pieces of parchment paper (one going each way), so the bars do not stick to pan.<\/li>\r\n \t
  2. In a large bowl, stir together the dry ingredients (oats, flour, chia seeds, cinnamon, salt, walnuts).<\/li>\r\n \t
  3. In a microwavable bowl, stir together the brown rice syrup, Earth Balance, brown sugar, and peanut butter. Microwave on high for 45 seconds. Alternatively you can heat this on the stovetop.<\/li>\r\n \t
  4. Pour wet mixture onto dry and stir well. The mixture will be very tough to stir (it\u2019s a thick dough!) so don\u2019t be alarmed. Allow the dough to cool a bit before mixing in the chocolate (otherwise, if you add in the chocolate too soon, it will melt, and it\u2019s best chunky).<\/li>\r\n \t
  5. Scoop into prepared pan and with a wet spoon spread out the mixture. The dough will be very thick and sticky. I dipped a pastry roller into water and rolled it out. Try to get it as even as possible!<\/li>\r\n \t
  6. Bake for 30-32 minutes at 350\u00b0F. Allow to cool in the pan, on a cooling rack, for at least 15 minutes. Remove carefully from pan and allow to cool on the rack for another 20-30 minutes. If you cut the bars before completely cooling, they will crack, so it\u2019s a good idea to wait as they will firm up.<\/li>\r\n<\/ol>“,”foot_note”:””}

Vegan Chocolate Chip Cookies

{“head_note”:”I\u2019ve made a few vegan chocolate chip cookies on the blog and these are my favourite and easiest cookies to date. Best of all, the dough is thrown together in less than 5 minutes. Adapted from my previous versions here<\/a> and here<\/a>.”,”instructions”:”

    \r\n \t

  1. Preheat oven to 350\u00b0F and line a baking sheet with parchment paper. In a small bowl, mix together the flax egg and set aside.<\/li>\r\n \t
  2. With an electric mixer or in a stand mixer, beat the Earth Balance until fluffy. Add the brown sugar and cane sugar and beat for 1-2 minutes until creamy. Beat in the flax egg.<\/li>\r\n \t
  3. Beat in the remaining ingredients and fold in the chocolate chips.<\/li>\r\n \t
  4. Shape balls of dough and place on the baking sheet. Bake for 10-12 minutes (or up to 14 mins on a Silpat mat<\/a>). Allow to cool for 5 mins. on the baking sheet and then transfer to a cooling rack for another 10 minutes.<\/li>\r\n<\/ol>“,”foot_note”:”
      \r\n \t

    • For a crispier cookie edge, use 7 tbsp Earth Balance and 1 tbsp olive oil. I preferred cooking them this way. They also spread out a bit more. Alternatively, for a softer cookie, use 1\/2 cup Earth Balance and no oil.<\/li>\r\n \t
    • To retain the crispy factor of the cookies place them in the freezer after cooling in a container or baggie. It was the only method I tried that kept the crispiness of the cookies! Simply thaw on the countertop.<\/li>\r\n<\/ul>“}