Category Archives: Uncategorized

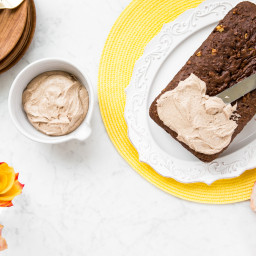
Spiced Vegan Buttercream Frosting

{“head_note”:”If a frosting tasted like your favourite fall or winter day, it would be this one! Generously spiced with cinnamon, ginger, cloves, and nutmeg (also known as Pumpkin Pie Spice<\/a>), this vegan buttercream is the perfect pairing for my Pumpkin Gingerbread Loaf<\/a>, or any of your go-to fall baked goods. It can be made a couple days ahead of time and stored in the fridge too; just be sure to let it sit at room temperature until it softens and stir until fluffy before using.”,”instructions”:”

    \r\n \t

  1. To a large mixing bowl, add the vegan butter. With electric mixers, beat the butter on low speed until light and fluffy, about 30 seconds.<\/li>\r\n \t
  2. To the bowl with the butter, add the pumpkin pie spice (start with 2 teaspoons), vanilla, and a small pinch of salt. Beat again on low speed until well combined, about 15 to 20 seconds.<\/li>\r\n \t
  3. Sift the icing sugar if it\u2019s clumpy. Add it to the bowl along with 1\/2 tablespoon non-dairy milk. Beat on low speed until the frosting is smooth and fluffy, about 30 to 45 seconds. You can add a touch more non-dairy milk if it\u2019s still too thick, and beat again briefly with the electric mixers. Taste, and beat in an additional teaspoon of pumpkin pie spice, if desired.<\/li>\r\n<\/ol>“,”foot_note”:”* You can use any vegan butter you prefer. Note that different brands will have different water and fat ratios so the outcome may be slightly different. You may need to adjust the amount of icing sugar or milk used.\r\n\r\n** I often use a full tablespoon (3 teaspoons) of pumpkin pie spice which is quite strong, but I find it pairs so lovely with my Pumpkin Gingerbread Loaf. You may want to use a bit less spice depending on your preference – add it slowly to taste and you can\u2019t go wrong! Store-bought pumpkin pie spice works great, or for a homemade version of pumpkin pie spice, see my Pumpkin Pie Spice.<\/a>“}
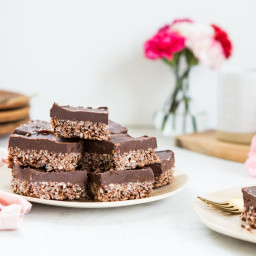
Cloud Nine Chocolate Crispy Squares

{“head_note”:”Chocolate lovers, this one’s for you! This rich and creamy, nut-free chocolate freezer fudge is layered on top of a light and airy chocolate rice crisp crust. It\u2019s the perfect balance of chocolatey, rich flavours and crunchy, melt-in-your-mouth textures. It also stores well in the freezer or fridge so you can satisfy your chocolate cravings whenever they strike (if you\u2019re anything like me, that\u2019s daily)! If you don\u2019t have the ingredients to make the Crispy Chocolate Crust, you can simply make the Chocolate Sunflower Fudge on its own and turn it into an easy (and crazy addictive) freezer fudge! Oh yeah, baby. Get creative with the toppings that you sprinkle on top, too. Large-flake coconut, cacao nibs, flaked sea salt, and chopped nuts or seeds all work well. Sit back, enjoy a piece (or two\u2026or three), and transport yourself to cloud nine!”,”instructions”:”

    \r\n \t

  1. Grab a 9×5-inch loaf pan. Cut a piece of parchment paper that is the same length as the loaf pan cavity. Place the parchment inside the pan and allow the ends to overhang. This overhang will make it easy to lift out after freezing.<\/li>\r\n \t
  2. Make the Crispy Chocolate Crust: To a medium pot, add the coconut oil and brown rice syrup. Heat over low until the oil is melted and the brown rice syrup just begins to bubble. (You can also use a microwave to do this – about 30 to 45 seconds on high.) Stir well to combine and remove the pot from the heat. Now, add the rice crisp cereal and cocoa powder and stir well until combined. You don\u2019t want any \u201cdry\u201d pieces of cereal left.<\/li>\r\n \t
  3. Spoon the crust mixture into the prepared pan and spread it out evenly with a spoon. It will be very sticky! Place a small piece of parchment paper on top of the cereal mixture and press down on the cereal until it\u2019s packed in and level. I like to use my small pastry roller as it packs it down nicely.<\/li>\r\n \t
  4. Make the Chocolate Sunflower \u201cFudge\u201d: To a medium mixing bowl, add the melted coconut oil, maple syrup, sunflower seed butter, cocoa powder, and a generous pinch of salt. Whisk vigorously until very smooth and silky.<\/li>\r\n \t
  5. Using a spatula, spoon the chocolate \u201cfudge\u201d on top of the crust and smooth it out evenly. If desired, sprinkle on your desired topping(s) such as flaked sea salt, chopped walnuts, cacao nibs, or large-flake coconut. Toppings are totally optional and it still tastes incredible without any.<\/li>\r\n \t
  6. Transfer the pan to the freezer on a flat, even surface. Chill, uncovered, for 40 to 45 minutes, or until the fudge is solid. Let it sit on the counter for a few minutes before slicing. Using a butter knife, slide the knife between the pan and the slab at each end to loosen. Lift up the slab using the parchment overhang and place it onto a cutting board. Slice with a sharp knife and serve. Return any leftovers to the fridge or freezer as they will soften fairly quickly. I like to store this dessert in the fridge as it remains firm, but not too firm.\u00a0Storage tip: Leftover fudge squares will keep in the freezer in an airtight container for up to 4 weeks. You can also store it in the fridge for a\u00a0week. It will have a softer, ready-to-eat texture straight from the fridge. When I\u2019m serving it to guests, I make it ahead and then store it in the fridge until ready to serve.<\/li>\r\n<\/ol>“,”foot_note”:”* Brown rice syrup is used in the crust for its amazing binding powers. Using a swap like maple syrup won\u2019t hold the crust together very well.\r\n\r\n** I like the texture of 365 Organic Brown Rice Crisps Cereal or President\u2019s Choice Crispy Rice Cereal. Both have a texture very similar to that of the classic Rice Krispies Cereal. Nature\u2019s Path Crispy Rice Cereal has a thick and firm shape and texture and it was my least favourite result as it was a bit hard to chew in these.\r\n\r\n*** It\u2019s important to use natural sunflower seed butter (it should only have roasted sunflower seeds on the ingredient list) as I\u2019m not sure whether ones with added oils or emulsifiers will work. I love Sunbutter Organic Sunflower Butter. Be sure to stir it well before measuring and avoid using the dry, hard sunflower seed butter that collects at the bottom of the jar as we want it to incorporate easily into the other ingredients. Also, you can get creative and experiment using different butters like almond or peanut butter, too!\r\n\r\nThis recipe\u00a0is\u00a0gluten-free and soy-free\u00a0as long as the cereal\u00a0and other products you use are.\u00a0If in doubt, check the labels.”}

Roasted Garlic Basil Pesto Potatoes

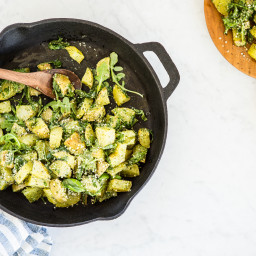
{“head_note”:”This is one of those comforting side dishes that disappears incredibly fast! It\u2019s an irresistible recipe that is sure to impress special guests. If you\u2019ve been skeptical about arugula in the past, I encourage you to give this recipe a try; the spicy, peppery-tasting green pairs beautifully with my bold and bright hemp heart pesto. Hemp hearts add a kick of protein and omega-3 fatty acids for a nutritional boost (and it’s nut-free, to boot). This dish is so cozy served warm, but the chilled leftovers taste great as well.\u00a0This recipe is lightly adapted from\u00a0Oh She Glows Every Day<\/em><\/a> (2016).”,”instructions”:”

    \r\n \t

  1. Preheat the oven to 400\u00b0F (200\u00b0C). Line an extra-large baking sheet (about 15\u00d721-inches) with parchment paper.<\/li>\r\n \t
  2. For the potatoes: Place the chopped potatoes on the baking sheet and toss with 1 1\/2 tablespoons of olive oil until thoroughly coated. Spread the potatoes into an even, single layer. Season with a couple of pinches of salt and pepper.<\/li>\r\n \t
  3. For the roasted garlic: Slice the top off the garlic bulb so all of the individual garlic cloves are trimmed and exposed. Place the garlic bulb on a 6-inch square of aluminum foil and drizzle the top of the cloves with 1\/2 teaspoon of olive oil. Wrap the garlic bulb entirely in the foil and place it on the baking sheet next to the potatoes.<\/li>\r\n \t
  4. Roast the potatoes and garlic for 20 minutes, then remove from the oven and flip the potatoes with a spatula. Spread into a single layer. Return the potatoes and tinfoil-wrapped garlic to the oven and continue roasting for 15 to 25 minutes more, until the potatoes are golden and fork-tender.\u00a0You want the potatoes to be\u00a0lightly\u00a0browned so they\u00a0hold up well when\u00a0mixing with the pesto later on. If your potatoes are not ready after\u00a040 minutes of cook time, remove the\u00a0garlic from the oven and continue roasting the potatoes a bit longer.<\/li>\r\n \t
  5. While the potatoes roast, start making the pesto. In a food processor, add the basil leaves, hemp hearts,\u00a0olive oil, lemon juice, salt, and pepper.\u00a0Process until mostly smooth, stopping to scrape down the bowl as necessary. Leave the pesto in the processor bowl because we will soon add the roasted garlic as the final step.<\/li>\r\n \t
  6. If needed, wash and dry the baby arugula. Place it into a large serving bowl. I like to break up the arugula with my hands a bit to ensure the pieces are bite-sized. Now it\u2019s time to enjoy a tea or coffee while you wait for the potatoes and garlic to finish roasting!<\/li>\r\n \t
  7. Remove the potatoes and garlic from the oven. Carefully unwrap the garlic bulb and let cool for about 5 minutes, until it\u2019s cool enough to handle.<\/li>\r\n \t
  8. Turn off the oven and return the potatoes to the oven with the door ajar so the potatoes stay warm while you finish the pesto. Squeeze the roasted garlic cloves out of the bulb. You should have 2 packed tablespoons of roasted garlic. Add it to the food processor with the pesto. Process until mostly smooth\u2014you can add a touch more oil if necessary to get it going.<\/li>\r\n \t
  9. Assemble the salad: I like to assemble the salad as quickly as possible so that it\u2019s warm when I serve it. Spoon the warm potatoes on top of the arugula. This will help the arugula wilt. Gently toss the potatoes and arugula with all of the pesto until thoroughly combined. Taste and season with salt and pepper, and a drizzle of lemon juice to make the flavours pop (I usually add an extra tablespoon of lemon juice and a couple pinches of salt). Toss to combine. Sprinkle on the hemp hearts and serve immediately.<\/li>\r\n<\/ol>“,”foot_note”:”*If you can\u2019t find baby<\/i> arugula, you can use regular arugula. Just be sure to chop regular arugula into bite-size pieces. Discard any overly thick\u00a0stems.\r\n\r\nOn the rare chance that\u00a0you have any leftovers,\u00a0this dish\u00a0works\u00a0great served as a cold potato salad. Just serve it straight from the fridge!”}

Chili Cheese Nachos

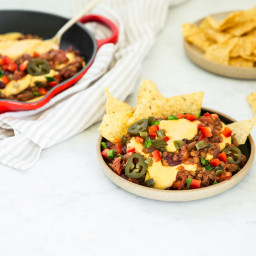
{“head_note”:”Growing up, I was a fan of a fast food chain\u2019s popular chili and cheese nacho dish. While it\u2019s been a couple decades since I\u2019ve had it (wow, I feel old!), I knew I had to come up with a crave-worthy plant-based version that\u2019s free of processed foods and packed with nutrition. This dish uses my delightful and versatile\u00a0All Purpose Vegan Cheese Sauce<\/a>. These Chili Cheese Nachos\u00a0make a perfect appetizer or you can serve it for dinner like we often do. If you want to serve it to a crowd, try serving it in a warmed cast iron pot or in a food warmer to retain the heat. I like these nachos with a spicy kick so I serve the dish with pickled sliced jalape\u00f1o peppers on top. You can also try layering the chili and cheese sauce overtop baked potatoes for a fun, comforting twist. This recipe is\u00a0from my New York Times Bestselling cookbook, Oh She Glows Every Day<\/a> (2016).”,”instructions”:”

    \r\n \t

  1. Prepare a double batch of my All-Purpose Vegan Cheese Sauce<\/a>. Set aside in a bowl.<\/li>\r\n \t
  2. To a large pot, add the oil, diced onion, and minced garlic. Add a pinch of salt, stir, and saut\u00e9 over medium heat, stirring occasionally, for about 5 minutes until the onion softens.<\/li>\r\n \t
  3. Add the finely chopped jalape\u00f1o and 1 cup of the diced red pepper. Saut\u00e9 for a few minutes.<\/li>\r\n \t
  4. Stir in the chili powder, cumin, oregano, and smoked paprika and cook for another couple minutes, until fragrant.<\/li>\r\n \t
  5. Add the can of diced tomatoes (with juices) and stir to combine. Increase the heat to medium-high and simmer the mixture for a few minutes.<\/li>\r\n \t
  6. Next, add the tomato paste and drained lentils and kidney beans. Stir. With a potato masher, roughly mash 1\/3 of the mixture to thicken the chili slightly. Be sure not to mash more than 1\/3 of the mixture as we still want lots of texture in the chili.<\/li>\r\n \t
  7. Add the apple cider vinegar, salt, pepper, and Sriracha (or other hot sauce), all to taste. Continue to cook, uncovered, over medium heat for about 5 to 10 more minutes, until the chili is thickened to your liking.<\/li>\r\n \t
  8. To assemble: In individual bowls (or using a 2 1\/2 to 3 quart\/litre cast-iron pot or glass dish), ladle a layer of chili. Top with a layer of the cheese sauce. Keep layering until the chili is used up and you\u2019ve added as much cheese sauce as you prefer. Garnish with the leftover diced red pepper, pickled jalape\u00f1o (as much or as little as you desire), and a sprinkle of salt, if desired.<\/li>\r\n \t
  9. Serve immediately with tortilla chips for scooping into the chili mixture. Cool leftovers completely before transferring to an airtight container in the fridge for up to 5 days. Leftovers can be reheated in the microwave or in a pot on the stovetop over medium heat for a few minutes, as needed. When reheating in a pot, the cheese and chili layers will mix together, but it\u2019s still delicious!<\/li>\r\n<\/ol>“,”foot_note”:””}

Chewy Triple Coconut Oatmeal Cookies

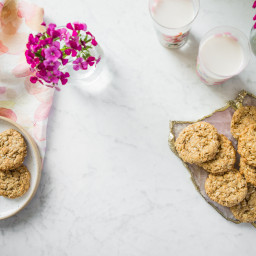
{“head_note”:”Well, well, well, if these aren\u2019t the perfect vegan oatmeal coconut cookies! They have a crispy outer shell and delightful chewy and tender middle\u2026not to mention, the best flavour. Coconut and rolled oats lend a hearty texture and the vegan butter and coconut oil make them tender, buttery and downright irresistible. Coconut sugar gives them a slight caramel flavour. Bake up a batch and the tempting aroma will have everyone running to the kitchen! They are a great recipe to whip up before guests come over. My kids go wild for these cookies and they are also adult-approved, hangry-nursing-mama-approved, and lunchbox-friendly (as long as your school allows coconut). Be sure to\u00a0see my\u00a0Tips section for how to swap\u00a0all-purpose white flour\u00a0if you don’t have spelt on hand.”,”instructions”:”

    \r\n \t

  1. Preheat the oven to 350\u00b0F (180\u00b0C) and line a large baking sheet with parchment paper.<\/li>\r\n \t
  2. To a small bowl, add the ground flax seed and water. Stir to combine and set aside.<\/li>\r\n \t
  3. To an extra-large mixing bowl, add the cane sugar, coconut sugar, vegan buttery spread, and coconut oil. With electric beaters, beat the ingredients on low-medium speed for about 45 seconds, until the mixture resembles a wet, clumpy sand.<\/li>\r\n \t
  4. Add the flax mixture and vanilla to the bowl and beat again on low-medium speed for 30 seconds or so, until the wet mixture becomes smooth.<\/li>\r\n \t
  5. To the wet mixture, add the spelt flour, baking powder, salt and baking soda. Beat on low speed for 20 to 30 seconds until just combined and no dry flour patches remain.<\/li>\r\n \t
  6. Add the rolled oats and shredded dried coconut. Beat on low speed for 15 to 20 seconds just until a uniform cookie dough forms. Avoid overmixing the dough.<\/li>\r\n \t
  7. Shape the dough into about 16 balls, just smaller than the size of golf balls (about 2 tablespoons each). The dough will be quite sticky. If it\u2019s too sticky to shape into balls, scoop dough mounds using a 2-tablespoon (30 mL) cookie dough scoop. Place the balls on the lined baking sheet, at least a couple inches apart.\u00a0There is no need to\u00a0flatten the balls before baking.<\/li>\r\n \t
  8. Bake for 10 to 12 minutes (I bake for 10.5 to 11\u00a0minutes) until the cookies are spread out and just<\/i> starting to become lightly golden (avoid baking them until golden or they will become super crispy after cooling). Cool the cookies for 5 minutes on the baking sheet before transferring to a cooling rack. At this point, they are delicious served warm. Or, continue cooling for a chewier and crispier cookie (my fave!). Store the fully cooled leftovers in an airtight container in the fridge for up to 3 to 4 days or freeze for up to 3 to 4 weeks.<\/li>\r\n<\/ol>“,”foot_note”:”* I use Melt Organic Buttery and Creamy Spread. Other vegan buttery spreads may work too, though I haven\u2019t tested any others yet.\r\n\r\n** To scoop my flour, I scoop into the bag of flour using a measuring cup\/spoon and then shake it side-to-side until the flour is level. For the most accurate replication of this recipe, weigh your flour until you have around 123 grams of whole spelt flour. You can swap all-purpose white flour for the spelt. Simply use 3\/4 cup plus 1 tablespoon (123 grams) all-purpose white flour in lieu of the spelt flour. I recommend weighing the flour for the most accurate results. I also tested this recipe using light\/white spelt flour which worked well, however I prefer the flavour of whole spelt in this recipe (and it\u2019s a bit more nutritious as an added bonus!).”}

Irresistible Secret Ingredient Quinoa

{“head_note”:”Plain cooked quinoa can taste a bit, well, plain<\/i> and even slightly bitter. This is my delicious method of creating a simple quinoa so irresistible you won\u2019t be able to stop eating it! At least I never can. My secret is adding a bit of coconut oil after cooking the quinoa. Any bitterness of the quinoa vanishes once your stir in some coconut oil and the quinoa takes on a buttery rich texture. Virgin coconut oil also offers immune-boosting and anti-inflammatory properties as well. Pink Himalayan salt, Herbamare, and garlic powder make it all come together and give it life! “,”instructions”:”

    \r\n \t

  1. To a medium pot, add the quinoa and water. Stir to combine. Set the heat to high and bring to a low boil. Immediately reduce the heat to medium-low (I use heat setting 3.5-4 out of 9, but yours may differ) and cover with a tight-fitting lid. Cook for about 13 minutes until the water has just absorbed. Remove from the heat. Steam the quinoa with the lid on for an additional 5 minutes, off the heat.\u00a0<\/li>\r\n \t
  2. After steaming, add the coconut oil, teaspoon of lemon juice (if using), and pink salt (you can start with a 1\/4 teaspoon and add more from there if you\u2019d like), and stir until the oil is melted. Season with garlic powder and Herbamare, to taste. Add any optional garnishes you\u2019d like on top, such as fresh lemon zest or fresh minced dill. Serve immediately. <\/li>\r\n<\/ol>“,”foot_note”:”* The coconut oil flavour is very subtle in this recipe, however if the flavour of virgin coconut oil bothers you, you can substitute refined<\/i> coconut oil which is flavourless.\u00a0\r\n\r\n** Herbamare is a popular herb and veggie sea salt brand that contains ingredients like celery, leek, onion, chives, garlic, basil, kelp, and more. You can use any kind of herbed sea salt you enjoy! If you don\u2019t have any on hand, simply use Pink Himalayan salt or your desired salt. It\u2019s all good!”}

Snackable Peanut Butter and Maple Granola

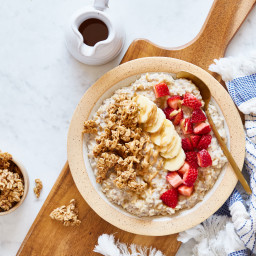
{“head_note”:”This fragrant peanut butter-maple granola is so fast to whip up (less than 10 minutes prep!) and it\u2019s super addictive. It\u2019s perfect for snacking, for sprinkling on oatmeal, smoothie bowls, and yogurt, and used as a hearty cereal with milk poured on top (my favourite way to enjoy it). Mmm! This recipe makes a \u201csmall batch\u201d (about 3 1\/2 cups of clusters), but if you want to double the yield to 7 cups, rest assured the recipe doubles beautifully (you may not need to double the salt, though – add it slowly, to taste, just to be sure). This recipe is adapted from my recipe called \u201cThe Perfect Granola\u201d. Be sure to see my Tips section for a fun chocolate chip version!”,”instructions”:”

    \r\n \t

  1. Preheat the oven to 325\u00b0F (160\u00b0C) and line a medium-size baking sheet with parchment paper.<\/li>\r\n \t
  2. To a medium pot, add the maple syrup, coconut oil, and peanut butter. Heat over low, stirring occasionally, until smooth and combined. Remove from the heat and stir in the vanilla.<\/li>\r\n \t
  3. To a large bowl, add the rolled oats, coconut sugar, ground flaxseed, cinnamon, and salt. Stir to combine.<\/li>\r\n \t
  4. Pour the warm melted maple syrup mixture over top the dry oat mixture (I use a spatula to scrape every last bit of liquid from the pot) and stir until the oats are completely coated in the wet mixture.<\/li>\r\n \t
  5. Spoon the oat mixture onto the prepared baking sheet and spread it out until it\u2019s just bigger than the size of a piece of letter paper (8.5- x 11-inches).<\/li>\r\n \t
  6. Bake for 18 to 22 minutes (I bake for 20-21 minutes), rotating the pan halfway through baking, until the granola is firm and golden. Cool the granola on the pan for at least 15 minutes before breaking it apart into clusters. Completely cool the granola before storing. Store leftovers in an airtight container in the fridge for 2 weeks or on the counter for a week. Or, freeze it in an airtight container for up to 1 month.<\/li>\r\n<\/ol>“,”foot_note”:”* I use unsalted<\/i> natural peanut butter. If you use salted peanut butter, you may need to omit the 1\/4 teaspoon salt called for, or at least scale it down a bit, to taste.\r\n\r\n \r\n\r\nLove the combo of peanut butter and chocolate? Try sprinkling a couple tablespoons of mini chocolate chips (I love Enjoy Life brand) on top of the granola as soon as it comes out of the oven. After the chocolate chips melt on top of the granola, refrigerate the\u00a0entire baking sheet of granola until the chocolate hardens up again (otherwise if you break up the granola while the chocolate is melted it\u2019ll make a big \u2018ol mess). Once the chocolate is firm, break apart the granola into clusters.”}

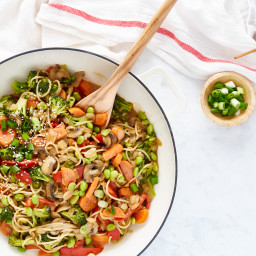
Creamy Almond-Tahini Stir-Fry Noodle Bowl

{“head_note”:”If you\u2019ve ever been disappointed by a stir-fry because it was plain-tasting (I sure have), well, fear not my friends! This stir-fry noodle bowl is generously coated with an incredible umami-packed, creamy, sweet, and tangy Almond-Tahini Dressing that will have you coming back for more and more. This noodle bowl is \u201clight on the noodles\u201d and \u201cheavy on the veggies\u201d so it won\u2019t weigh you down and you\u2019ll get an impressive amount of veggies per serving! I like to use brown rice spaghetti noodles in this stir-fry because they are sturdy noodles and hold up well in the mixture, with a bit of chewiness. The brown rice noodles I use have a suggested cook time of 8 to 10 minutes, but I find they actually need about 12 to 13 minutes cook time. Just something to keep in mind in case yours take longer than expected, too.”,”instructions”:”

    \r\n \t

  1. Thinly slice the carrots, red pepper and mushrooms. Chop the broccoli into small 1\/2- to 3\/4-inch florets (it\u2019s important to chop them very small so they cook in the correct amount of time), being sure to halve any broccoli stems that are a bit on the thick side (any larger than 1\/4-inch width should be thinned). Place the veggies in a large bowl and set aside.<\/li>\r\n \t
  2. Place a large wok (or pot) on the stovetop. Chop the onion. Add the sesame oil and onion to the wok. Stir to combine. Saut\u00e9 over medium-low heat for 4 to 5 minutes until softened, stirring occasionally.<\/li>\r\n \t
  3. Meanwhile, bring a medium pot of water to a boil. Cook the noodles according to the package directions. I break the noodles in half before throwing them into the pot and I also like to stir them a few times with a fork during cooking to make sure the noodles aren\u2019t sticking together.<\/li>\r\n \t
  4. To the wok, add the carrots, bell pepper, mushrooms, and broccoli along with a pinch of salt. Stir to combine. Saut\u00e9, uncovered and stirring occasionally, over medium-high heat for 10 to 12 minutes until tender. Reduce the heat if needed to avoid burning.<\/li>\r\n \t
  5. To a medium bowl, add the dressing ingredients (rice vinegar, tahini, almond butter, tamari, and maple syrup) and whisk vigorously until very smooth and uniform. The dressing makes 3\/4 cup (180 mL). Set aside. Measure 1 cup of shelled edamame.<\/li>\r\n \t
  6. A few minutes before the veggies are tender, add the edamame to the wok and saut\u00e9 for three minutes, or until heated through. Chop the green onion garnish, if using.<\/li>\r\n \t
  7. When the noodles are cooked, drain them and rinse well. Add the drained noodles to the wok. Pour all of the dressing onto the veggies\/noodles and stir well to combine. Toss everything until it\u2019s all coated in the dressing. Taste and add more salt, if desired. Heat on low until everything is warmed to your liking, then portion into shallow bowls. Top with chopped green onion and a sprinkle of sesame seeds, if desired. This dish is best served immediately, however leftovers are lovely chilled. Refrigerate leftovers in an airtight container for up to a few days.<\/li>\r\n<\/ol>“,”foot_note”:”* Feel free to use orange or yellow bell peppers, too!\r\n\r\n** I don\u2019t recommend adding more than 4-ounces of cremini mushrooms. I originally tested the recipe using 8-ounces mushrooms and found that the mushrooms diluted the dressing flavours a bit.\r\n\r\n*** Be sure to use \u201crunny\u201d tahini and almond butter as they will mix with the dressing ingredients effortlessly!\r\n\r\n \r\n\r\nWe used a large stainless steel pot when testing this recipe. If you use a wok, your vegetable cook time may differ slightly.\r\n\r\n \r\n\r\nThe total time of this recipe from start to finish is 35 to 40 minutes.”}

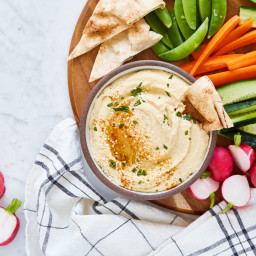
My Go-To Hummus

{“head_note”:”This is the creamy hummus I make time and time again…it never fails me! It stores well in the fridge all week and it\u2019s a good one to make on a Sunday so you have a protein-rich spread on hand for the work or school week. To achieve a luxurious texture, one of my tips is to use a really runny tahini (my favourite tahini brand is Soom\u2026.it\u2019s simply to die for) – avoid using the thick\/dry tahini often found at the bottom of a jar as it will create an overly thick and dense hummus texture. My other tip, which my sister\u2019s friend Christine taught us, is to drizzle in a couple tablespoons of pure olive oil (also called \u201clight\u201d or \u201crefined\u201d olive oil) while processing. Refined olive oil has a much lighter flavour than extra-virgin olive oil (which can be too pronounced in hummus) and using this lighter olive oil lets the other flavours shine.”,”instructions”:”

    \r\n \t

  1. To a large food processor, add the garlic cloves and process until minced.<\/li>\r\n \t
  2. Place a sieve over a medium bowl and drain the can of chickpeas, setting aside the chickpea brine (the liquid found in the chickpea can) for later.<\/li>\r\n \t
  3. To the processor, add the drained chickpeas, lemon juice, tahini, and 1\/2 teaspoon of salt. Process for about 30 seconds until coarsely chopped.<\/li>\r\n \t
  4. While the processor is running, slowly pour in the oil and chickpea brine (or water) through the chute, until your desired consistency is achieved. Let the processor run for a good minute or longer until very creamy and whipped in texture.<\/li>\r\n \t
  5. Taste the hummus and add more salt, if desired (I add another 1\/4 teaspoon pink salt), and process again to combine. You can also add more lemon juice if you\u2019d like a more pronounced lemon flavour (I tend to add another 1 tablespoon lemon juice as I like it lemony).<\/li>\r\n \t
  6. Spoon the hummus into a dish for serving or into a container for refrigerating. Homemade hummus thickens quite a bit when refrigerated. If this hummus is going to sit in the fridge for a while before serving, you can add the chilled hummus to the food processor and process it for about 30 seconds until it\u2019s whipped in texture, just before serving. Refrigerate leftover hummus in an airtight container for up to 1 week.<\/li>\r\n<\/ol>“,”foot_note”:”* Avoid using a thick\/firm\/dry tahini and instead opt for one with a runny consistency. This will help prevent the hummus from being too thick.\r\n\r\n** I use pure olive oil (also called \u201crefined\u201d or \u201clight\u201d) in hummus since its flavour is much milder than extra-virgin olive oil.”}

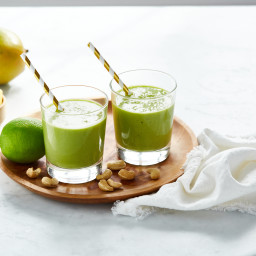
Wakey Wakey Mango-Lime Kale Smoothie

{“head_note”:”This green smoothie is going to have tongues waggin\u2019! Is that a weird thing to say? Probably, but I have to say, this incredibly delicious and fresh-tasting green smoothie is sure to win over even the biggest green smoothie critic. It\u2019s pleasantly sweet so it\u2019s a good one for kale smoothie beginners. Raw cashew butter (or soaked cashews), banana, and mango make this smoothie decadent, sweet, and ultra creamy while the fresh lime juice makes everything pop and lends a citrusy morning flavour that will have you awake, refreshed, and ready to tackle the day! Planning a special brunch? This crowd-pleasing smoothie is also a nice one to scale up and serve to a group.”,”instructions”:”To a high speed blender, add the water, raw cashew butter, frozen mango chunks, chopped banana, frozen kale, and lime juice. Blend on high speed until super smooth. I let it run for a good minute in my Vitamix. Taste and adjust the flavours, such as adding maple syrup if it\u2019s not sweet enough or more lime juice if you want more tang, if desired.”,”foot_note”:”* The raw cashew butter can be swapped for 2 tablespoons raw cashews (soaked). Place the cashews in a bowl, cover with boiling water, and let them soak for a minimum of 1 hour before beginning. Drain before use. If your blender isn\u2019t great at blending nuts smooth, I\u2019d suggest sticking with the raw cashew butter option.\r\n\r\n \r\n\r\n** One 170-gram medium banana makes roughly 3\/4 cup chopped banana.\r\n\r\n \r\n\r\n*** Use the bagged frozen kale found in the freezer section of the grocery store. The brands I use are chopped into small 1\/2- to 1-inch pieces so it really packs well into the measuring cup. If you only have fresh kale on hand you can use that in lieu of frozen kale. Make sure to discard the stems before chopping and measuring 1\/2 cup packed fresh kale. If using fresh kale, swap the room temperature banana chunks for 3\/4 cup frozen<\/i> banana chunks to ensure the smoothie turns out cold enough. When I make this version I need to use the Tamper to push the ingredients down into the blender to get it whirling away. I haven’t tried it yet, but I expect frozen baby spinach also works in place of the kale!”}