Category Archives: Uncategorized

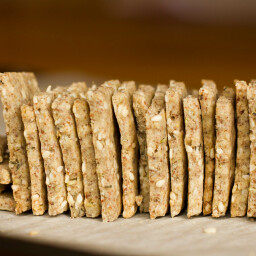
Easy Vegan & Gluten-Free Crackers

{“head_note”:”Easy, delicious, easy to roll, and endlessly customizable. Doubling the batch is recommended!<\/em>“,”instructions”:”

    \r\n \t

  1. Preheat oven to 350\u00b0F and line a baking sheet with parchment. In a high-speed blender or processor, grind almonds into a flour. Do not over process or almonds will release oils. Sift flour before using to remove larger pieces. OR you can use store-bought almond flour.<\/li>\r\n \t
  2. In a large bowl, mix together the dry ingredients. Add wet ingredients and mix well with spoon. Knead dough with hands until it comes together. Shape into a ball.<\/li>\r\n \t
  3. Place ball of dough on parchment paper or a non-stick mat. Roll out dough until it\u2019s about 1\/8th inch thick, or as thin as you can get it without ripping. With a pastry wheel or pizza slicer, slice into crackers.<\/li>\r\n \t
  4. Bake at 350\u00b0F for 18-20 minutes until slightly golden in colour. I baked mine about 18 mins. and next time I will bake them for a couple mins. longer to get them crisper.<\/li>\r\n \t
  5. Cool on baking sheet for 10 mins. Store in air-tight container once fully cool.<\/li>\r\n<\/ol>“,”foot_note”:”* Other flours might work in substitution for brown rice flour and almond flour, although keep in mind the flavour will change.”}
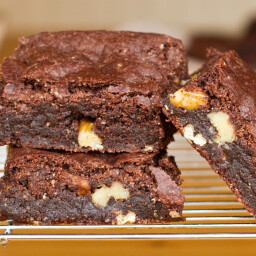
Oh She Glows Vegan and Gluten-Free Brownies

{“head_note”:”Ridiculously good.\u00a0<\/em>Dense, nutty, with a crispy crust. Our favourite vegan brownie to date and gluten-free too. No one will ever guess these are vegan and gluten-free!”,”instructions”:”

    \r\n \t

  1. Preheat oven to 350\u00b0F. Line a 9 inch square pan with parchment and grease all sides. In a small bowl, whisk together the ground flax and water and set aside.<\/li>\r\n \t
  2. In a blender or processor, process almonds into a meal\/flour. Sift out large pieces. In a large bowl, whisk together the dry ingredients (flours, arrowroot, cocoa, salt, baking soda).<\/li>\r\n \t
  3. In a large microwave safe bowl, add chocolate and Earth Balance and melt in microwave for about 30-45 seconds until melted. Stir well and add in flax egg, sugar, vanilla, and milk. Whisk.<\/li>\r\n \t
  4. Pour wet mixture over dry mixture and stir well. The mixture will be VERY dry, but not to worry keep mixing! Now fold in the walnuts and remaining 1\/4 cup chocolate chips.<\/li>\r\n \t
  5. Scoop thick batter into prepared pan and place a piece of parchment on top. Spread with hands or a pastry roller until smooth and even.<\/li>\r\n \t
  6. Bake for 35-37 minutes at 350\u00b0F and allow brownies to cool in pan for about 1.5 hours.<\/li>\r\n \t
  7. DO NOT REMOVE BROWNIES (uh oh I\u2019m screaming!) until completely cool or they will crumble\u2026you were warned! After an hour or so, separate edge of brownie from pan with a butter knife and place on a cooling rack. Cool completely. I like to leave my brownies out overnight (uncovered) and cut them in the morning.<\/li>\r\n \t
  8. Store in an air-tight container. Will stay fresh for up to 3 days.<\/li>\r\n<\/ol>“,”foot_note”:””}

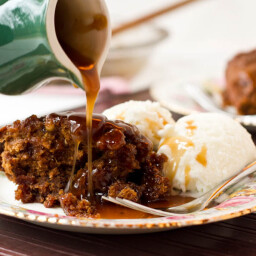
Sinless Sticky Toffee Pecan Pudding

{“head_note”:”This sticky pudding cake has the perfect amount of sweetness, remaining true to the original classic dessert, without going overboard. The cake is fantastic; once the sauce is poured on, it turns into a gooey, moist, and dense cake. The toasted pecans add a lovely texture to this dish and I don\u2019t recommend skipping them unless necessary. Whatever you do\u2026serve this dish WARM!<\/em>“,”instructions”:”

    \r\n \t

  1. Preheat oven to 325\u00b0F and toast the pecans for about 8-10 mins. Now, preheat oven to 375\u00b0F. Grease a 9-inch pie dish or an 8-inch square pan with Earth Balance.<\/li>\r\n \t
  2. In a medium sized pot, bring 1.5 cups of almond milk to a low boil. Add in the chopped and pitted dates and reduce heat to low. Cook for 1 minute, remove from heat, and stir in baking soda. It will froth up a bit.<\/li>\r\n \t
  3. In a large bowl, whisk together the softened Earth Balance and brown sugar until no clumps remain. You can also use an electric mixer if desired. Now add in the date & almond milk mixture and stir.<\/li>\r\n \t
  4. Add the dry ingredients (cinnamon, salt, 1\/2 cup of pecans, and whole wheat pastry flour) into the wet and stir until just combined. Spoon the mixture into the prepared dish.<\/li>\r\n \t
  5. Bake at 375\u00b0F for 27-28 minutes, or until the cake gently springs back when you touch it.<\/li>\r\n \t
  6. Toffee sauce:<\/strong> About 10 mins before the cake is done, make your toffee sauce by whisking together the sauce ingredients in a pot (use the same one). Bring to a low simmer over medium heat, and then reduce heat to low, whisking frequently making sure it doesn\u2019t burn. Heat for about 5 minutes while standing over the pot to stir & watch. Remove from heat and set aside.<\/li>\r\n \t
  7. Remove cake from oven, let it cool for a few minutes, and then prick with a fork or toothpick all over. I made about 100 holes. Pour 2\/3 of the toffee sauce over the top of the cake (reserving the other 1\/3 of the sauce for later) and smooth out with a spoon.<\/li>\r\n \t
  8. Scoop out your portions onto plates, drizzle with remaining sauce, and top with toasted pecans. Serve with a side of your favourite vegan ice cream (I love coconut bliss).<\/li>\r\n<\/ol>“,”foot_note”:”Other liquid sweeteners may work instead of brown rice syrup (you can use honey if you eat it), however the taste and consistency will change slightly. Maple syrup would also work, although it won\u2019t get quite as thick.”}

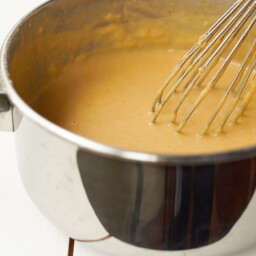
Low-Fat Vegan Cheeze Sauce (double batch)

{“head_note”:””,”instructions”:”

    \r\n \t

  1. In a skillet or pot, melt the Earth Balance over medium heat.<\/li>\r\n \t
  2. In a medium sized bowl, whisk together the flour and 1\/4 cup milk until all clumps are gone.<\/li>\r\n \t
  3. Whisk in the remaining milk (1.25 cups) as well as the milk and flour mixture into the pot. Now whisk in the nutritional yeast. Reduce heat to low-medium.<\/li>\r\n \t
  4. Add Dijon, garlic powder, onion powder, salt and pepper to taste and whisk frequently over low heat until the sauce thickens up, for 3-5 minutes. Be careful not to burn it. Remove from heat once thick.<\/li>\r\n \t
  5. Set aside the cheeze sauce, and carefully transfer the soup in a blender in two batches (or just use an immersion blender!) and blend until almost smooth. I left it a bit chunky, but you can blend as much or as little as you wish.<\/li>\r\n<\/ol>“,”foot_note”:””}

Broccoli & Cheeze Soup

{“head_note”:”Healthy comfort food at its finest!<\/em> This soup combines my love for broccoli and cheeze sauce, while doing without the cream or cheese. The prep is quite lengthy due to all the chopping, so I suggest using an electric chopper or processor if you want to speed things up. I finished the soup with a sprinkle of smoked paprika and Daiya cheese. Enjoy with your favorite croutons or even some breadsticks for dipping would be lovely. I didn\u2019t have any croutons so I just double toasted some bread, spread it with Earth Balance<\/a>, and a sprinkle of garlic powder. Yum!<\/em>“,”instructions”:”

    \r\n \t

  1. In a large skillet, heat the oil, onion, and garlic over medium-low heat, stirring frequently. Cook for about 5-6 mins.<\/li>\r\n \t
  2. Add in the celery, broccoli, and potatoes and cook for about 5 minutes. Now, add the broth, nutritional yeast, and cayenne pepper and simmer for another 15 mins or so until the potatoes are just fork tender.<\/li>\r\n \t
  3. Meanwhile, prepare your cheeze sauce<\/a>\u00a0while the soup simmers.<\/li>\r\n \t
  4. Carefully transfer the soup (in two batches) into a blender. Blend until almost smooth (I left it a bit chunky, but you can blend as much as you wish) and place back into the pot. Stir in the cheeze sauce, reserving 1\/3 cup<\/strong> for later.<\/li>\r\n \t
  5. Stir in optional lemon juice, salt, pepper, and optional herbamare all to taste. Finally, stir in the minced parsley and spoon into bowls.<\/li>\r\n \t
  6. Top the soup with croutons, Daiya cheese, remaining cheeze sauce, and smoked paprika.<\/li>\r\n<\/ol>“,”foot_note”:””}

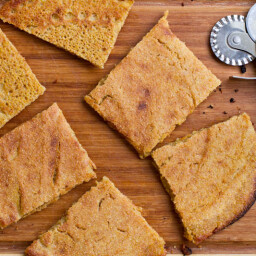
Flat & Crispy Cornbread

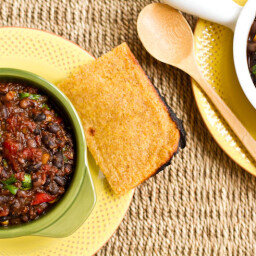
{“head_note”:”Flat, chewy, crispy, \u201cbuttery\” and lightly sweet tasting, this cornbread is the perfect vehicle for chili or other winter soup. You can also eat it on its own or with your favourite spread for breakfast or a snack.<\/em>“,”instructions”:”

    \r\n \t

  1. Preheat oven to medium broil<\/strong> (#3 on my oven). Place an 8-10 inch cast-iron skillet in the oven to pre-heat. In a microwave-safe bowl, whisk together the dry ingredients (cornmeal, flour, salt, sugar). Now whisk in the water and melted 1\/2 tbsp coconut oil.<\/li>\r\n \t
  2. Microwave batter on high for 60 seconds. Batter will have thickened up a bit and cooked around the edges. Whisk vigorously until all clumps are gone. Place back in microwave and heat on high for another 20 seconds. Remove and whisk well until no clumps remain.<\/li>\r\n \t
  3. Carefully remove the cast iron skillet from the oven. Add 1\/2 tbsp of coconut oil. Move it back and forth to coat bottom and edges.<\/li>\r\n \t
  4. Pour batter into the skillet and quickly spread it around with the back of a large spoon. It\u2019s ok if it doesn\u2019t touch the edges perfectly. This will depend on the size of your skillet.<\/li>\r\n \t
  5. Place skillet in the oven and broil over medium heat for 10 minutes, watching it very closely as oven temperatures will vary! I kept an eye on it the entire time. When edges start to blacken (for me, after 10 minutes) remove carefully and gently flip it over using a flat metal spatula. Bake for an additional 2 minutes on the other side watching very closely.<\/li>\r\n \t
  6. Remove and let it sit in the skillet for 3-5 minutes. Place on cutting board and slice into 4-6 pieces. You can slice off any blackened edges if necessary, but a little bit adds to the fun.<\/li>\r\n<\/ol>“,”foot_note”:””}

New Year’s Smoky BBQ Chili

{“head_note”:”I almost forget the black eyed peas were in there. If you\u2019re like me, that\u2019s never a bad thing. Here\u2019s to a lucky 2012!<\/em>“,”instructions”:”

    \r\n \t

  1. Soak the beans in water overnight or for at least 3-4 hours. This part is optional, but it helps reduce cook time and makes the beans more digestible. Rinse and drain beans before using. In a large pot, add the oil and saut\u00e9 the onion and garlic over medium-low heat for about 5-6 minutes, until translucent.<\/li>\r\n \t
  2. Add in the pepper and optional jalapeno and saut\u00e9 for another 3-5 minutes.<\/li>\r\n \t
  3. Stir in the spices (chili powder, cumin, smoked paprika, cayenne) and saut\u00e9 on low another couple minutes. If you want, you can add just a bit for now and then add the rest to taste after it has cooked.<\/li>\r\n \t
  4. Add the dry black beans and black eyed peas, broth, and drained diced tomatoes. Stir well. Now stir in the tomato paste. Simmer on low with the lid ajar for about 2.5 hours, checking often to make sure it doesn\u2019t dry out. If it does, add a bit more broth to thin out.<\/li>\r\n \t
  5. About 15 minutes before it\u2019s done cooking, stir in the chia seeds, corn, and chopped greens. The chia helps thicken the chili. Also stir in the BBQ sauce, starting with 1 tbsp at a time and tasting as you go. Season with salt and pepper to taste. Can be made 2-3 days in advance and frozen if preferred.<\/li>\r\n<\/ol>“,”foot_note”:”You can probably use canned beans, but you won\u2019t need as much broth. I would add it slowly.”}

Double Cookie Dough Balls

{“head_note”:””,”instructions”:”

    \r\n \t

  1. Mix all cookie dough ingredients together in a bowl. My mixture was very sticky, but if yours is too dry, add a touch of almond milk and stir again until it comes together.<\/li>\r\n \t
  2. Place dough into freezer to firm it up for 5 minutes or a bit longer. If mixture is still too sticky you can add a bit more flour. Shape small balls with lightly wet fingers. Place on plate or cookie sheet lined with parchment paper and place back into the freezer while you melt the chocolate coating.<\/li>\r\n \t
  3. Melt 1\/4-1\/3 cup of dark chocolate chips with a teaspoon of coconut oil over low heat. When two thirds of the chips are melted, remove from heat and stir until completely smooth. With a fork, dip the balls, one at a time into the chocolate, covering the bottom half of the ball. Tap off excess chocolate and place ball back on parchment lined plate. Repeat for the rest. Freeze balls for another 10 minutes to set the chocolate.<\/li>\r\n \t
  4. Poke with toothpicks and pop into mouth. Repeat as necessary.<\/li>\r\n<\/ol>“,”foot_note”:”
      \r\n \t

    • You can probably sub raw cashew butter for the cookie dough butter if desired. Other nut butters will also work (like peanut or almond), but their flavour will be less like cookie dough.<\/li>\r\n \t
    • You can also sub the coconut sugar for another granulated sugar of your choice. Add it to taste as you might not need as much, especially if using cane sugar which tends to be sweeter.<\/li>\r\n \t
    • To make this recipe gluten-free, use gluten-free rolled oats and a gluten-free flour of your choice. Be sure to check all other ingredients.<\/li>\r\n<\/ul>“}

Roasted Spiced Chickpeas

{“head_note”:””,”instructions”:”

    \r\n \t

  1. Preheat oven to 400\u00b0F and line a medium baking sheet with a couple pieces of paper towel.<\/li>\r\n \t
  2. Rinse and drain the chickpeas and place onto paper towel. Add a couple paper towels on top and roll the chickpeas around until completely dry. This helps them crisp up in the oven.<\/li>\r\n \t
  3. Add the chickpeas into a medium mixing bowl and stir in the oil until coated. Now stir in the rest of the seasonings.<\/li>\r\n \t
  4. Discard paper towel and line baking sheet with parchment paper. Add chickpeas back onto the baking sheet.<\/li>\r\n \t
  5. Roast at 400\u00b0F for 20 minutes. Give the pan a gentle shake to stir the chickpeas and roast for another 15-20 minutes, until golden and lightly charred on the bottom. I roast for a full 40 minutes because I like them on the crispy side, but keep an eye on them as oven temps vary.<\/li>\r\n \t
  6. Cool for 5 minutes or so and then top on your salad. They will lose their crispness quickly so these are best enjoyed immediately. You can also freeze the chickpeas once fully cooled and reheat them in the oven for 5 minutes or so to bring back the crispness.<\/li>\r\n<\/ol>“,”foot_note”:””}

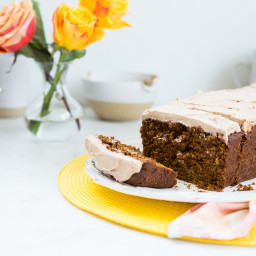
Pumpkin Gingerbread Loaf with Spiced “Buttercream”

{“head_note”:”When I bite into a slice of this loaf, I\u2019m flooded with fond memories of the holidays, cozied up by the fire, kids running around shrieking and causing havoc (it can’t just be our house!). This loaf is the perfect \u201cbake it all fall and winter long\u201d vegan treat and it\u2019s been a holiday tradition in my house for the past decade. You can serve it for dessert or simply enjoy a gingery, cozy slice alongside a cup of coffee or tea with friends. I also love it served for breakfast, swapping the frosting for vegan butter. The blackstrap molasses makes it iron, calcium, and magnesium rich, too! The second best part about this recipe, aside from the delicious flavour, is that it fills the house with the most wonderful pumpkin pie aroma. This recipe was originally published on ohsheglows.com in 2010. The recipe has now been revised and\u00a0rewritten\u00a0complete with fresh photos and new tips. I recommend weighing the flour for best results and to read through the Tips section before you begin.”,”instructions”:”

    \r\n \t

  1. Preheat the oven to 350\u00b0F (180\u00b0C). Line a 9- by 5-inch loaf pan with parchment paper cut to fit the length of the pan cavity. Allow the ends to overhang the pan as this will help you lift out the loaf later.<\/li>\r\n \t
  2. If using the walnuts, spread the chopped walnuts onto a baking sheet and toast at 350\u00b0F (180\u00b0C) for 5 to 8 minutes until lightly golden. Remove from the oven and set aside.<\/li>\r\n \t
  3. For the wet ingredients: To a medium mixing bowl, add the chia seeds and water. Stir to combine and let sit for a couple minutes. Meanwhile, gather the rest of the wet ingredients. Now, add the pumpkin pur\u00e9e, maple syrup, sugar, oil, blackstrap molasses, and vanilla. Stir well until smooth.<\/li>\r\n \t
  4. For the dry ingredients: To a large mixing bowl, add the flour, pumpkin pie spice, baking soda, baking powder, salt, and ground cloves. Whisk to combine.<\/li>\r\n \t
  5. Using a spatula, spoon the wet ingredients on top of the dry ingredients, making sure to scrape all of the wet ingredients out of the bowl. Stir well to combine just until there are no dry patches of flour left. Be sure not to overmix the batter. If using, add the\u00a0walnuts and stir until just incorporated.<\/li>\r\n \t
  6. Spoon the batter into the prepared loaf pan and smooth it out as evenly as possible. Bake in the preheated oven for for 45 to 55 minutes, until the loaf slowly springs back when pressed in a few spots and when a toothpick inserted into the centre comes out clean.<\/li>\r\n \t
  7. While the loaf bakes, prepare the Spiced Vegan \”Buttercream\” Frosting<\/a>.<\/li>\r\n \t
  8. Allow the loaf to cool for at least 30 minutes in the pan. After 30 minutes, carefully lift out the loaf using the parchment paper overhang as handles, and transfer it to a cooling rack to fully cool.<\/li>\r\n \t
  9. Once fully cooled, frost the top of the loaf with the buttercream. Slice and serve. Store leftovers in an airtight container in the fridge for up to 1 week, or in the freezer for up to 1 month. If freezing a frosted loaf, chill the loaf in the freezer (uncovered) just until the frosting is firm to the touch, then remove it from the freezer. Next, wrap the loaf in plastic wrap before placing it into a large freezer-safe zip bag or airtight container.<\/li>\r\n<\/ol>“,”foot_note”:”* If using the melted coconut oil option, keep in mind that the loaf will firm up if chilled in the fridge (due to the coconut oil solidifying when chilled). I recommend letting the loaf sit at room temperature for 10 to 15 minutes before serving so it can soften up a bit.\r\n\r\n** I recommend weighing the flour for best results. If you don\u2019t own a kitchen scale, I use the \u201cscoop-and-shake-until-level\u201d method of scooping my flour out of the bag. This simply means that I briefly stir the flour in the bag, insert a measuring cup into the bag, scoop a heaping amount of flour using the measuring cup, and then shake the cup side-to-side until the flour is level. You can substitute 2 cups plus 2 tablespoons (284 grams) white\/light spelt flour in place of the all-purpose flour, if desired. I highly recommend Hockley Valley Premium Light Spelt Flour for my Canadian friends if you can find it as it is very smooth and similar to all-purpose flour in terms of its refined texture. Our family also prefers the flavour of this loaf made with white\/light spelt flour compared to all-purpose flour, but they are both great. I don’t recommend using whole spelt\u00a0flour as it\u00a0creates\u00a0a dense loaf.\r\n\r\n*** Instead of using a store-bought pumpkin pie spice, you can make it at home using my Pumpkin Pie Spice<\/a> recipe.\r\n\r\n \r\n\r\nNut-free tip: This recipe is\u00a0naturally nut-free as long as you don’t include the\u00a0optional walnuts.\r\n\r\n \r\n\r\nHigh altitude baking tips: If baking at a high altitude, bake the loaf at 375\u00b0F (190\u00b0C) instead of 350\u00b0F (180\u00b0C). Loaves baked at a high altitude will probably have some sinking in the middle of the loaf, but this is normal. Be sure to test for doneness by inserting a toothpick in the middle of the loaf and also making sure the loaf slowly springs back when touched in a few areas.”}