Category Archives: Uncategorized

Addictive Granola Chips

{“head_note”:”I love granola, but I don\u2019t always love its usual oil and sugar heavy profile. This crunchy lightened up version is lightly sweetened and very low in oil, resulting in a light tasting granola perfect for every day use.”,”instructions”:”

    \r\n\t

  1. Preheat oven to 325F and line a baking sheet with parchment paper or non-stick mat.<\/li>\r\n\t
  2. In a large bowl, stir together dry ingredients.In a medium sized bowl, mix together the wet ingredients (except for the vanilla beans and extracts). Microwave for about 60 seconds on high. Now stir in the extracts and scraped vanilla beans until combined.<\/li>\r\n\t
  3. Add wet mixture to dry mixture and stir well until everything is coated. The mixture will be a bit dry at first but keep mixing as it will eventually come together! If it is still too dry, add some applesauce, a tablespoon at a time, and stir until combined. Scoop onto baking sheet and spread it out into a thin layer.<\/li>\r\n\t
  4. Bake for 10-15 minutes, rotating the pan once half-way through baking. Allow to cool for about 10-15 minutes on the baking sheet before breaking it apart into clusters. Makes about 5 cups. Store in an air-tight container for 1-2 months.<\/li>\r\n<\/ol>“,”foot_note”:””}
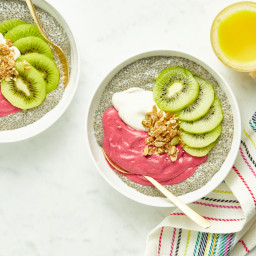
Raspberry Mousse Chia Bowl

{“head_note”:”These raspberry mousse bowls make the perfect snack, dessert, or special breakfast! I got the idea to make a raspberry mousse from one of my recipe testers who was testing my chocolate avocado mousse. She said, \”A chocolate raspberry mousse would be amazing, or just leave out the cocoa and create a bright pink raspberry mousse!\” I knew I had to try it, and I’m so happy with the outcome! The chia pudding and toppings are optional, so you can enjoy the mousse\u00a0all on its own if desired.”,”instructions”:”

    \r\n \t

  1. For the chia seed pudding: In a medium bowl, whisk together the milk, chia seeds, maple syrup, and vanilla until combined. Cover and chill in the fridge for an hour, or until thickened. Whisk the mixture a few times during the chill time if you can.<\/li>\r\n \t
  2. For the raspberry mousse: In a food processor, add the frozen raspberries, coconut cream, avocado, maple syrup, and vanilla. Process until super smooth, stopping to scrape down the bowl as needed. Spoon into a bowl, cover, and chill in the fridge while the chia seed pudding thickens.<\/li>\r\n \t
  3. To assemble: In a small bowl, add your desired amount of chia pudding, mousse, fruit, granola, and coconut whipped cream (if using). You can also serve this small parfait jars. Serve immediately.<\/li>\r\n<\/ol>“,”foot_note”:”
      \r\n \t

    • * Be sure to chill the can of coconut milk for at least 24 hours prior to making this recipe. This allows the white cream to solidify, making it easier to scoop it out of the can.<\/li>\r\n<\/ul>“}

My Perfect Matcha Latte

{“head_note”:””,”instructions”:”

    \r\n\t

  1. Add the Matcha powder into a mug.<\/li>\r\n\t
  2. Whisk the 1\/3 cup of very hot water into the Matcha powder until no clumps remain. I like to use my mini OXO stainless steel whisk – it works perfectly.<\/li>\r\n\t
  3. In a small pot on the stove-top, heat the almond milk until it comes to a simmer. Remove from heat.<\/li>\r\n\t
  4. Pour the almond milk into a 2 to 4 cups French press. Using the plunger, rapidly plunge the milk for about 45 to 60 seconds, until the milk gets nice and frothy. If you don’t have a French press you can use a milk frother, or simply whisk the milk rapidly in the pot. Be careful not to splatter the hot milk on your skin.<\/li>\r\n\t
  5. Slowly pour the frothed almond milk into the Matcha latte. Gently stir once or twice to incorporate, if desired. Serve and enjoy!<\/li>\r\n<\/ol>“,”foot_note”:””}

Jumbo Carrot Cake Muffin Tops

{“head_note”:””,”instructions”:”

    \r\n\t

  1. Preheat oven to 350\u00b0F and grease a muffin top tin. If you don’t have one simply use a standard muffin tin.<\/li>\r\n\t
  2. Grate the carrots and set aside.<\/li>\r\n\t
  3. In a large bowl, mix together the dry ingredients (flour, sugar, baking powder, cinnamon, salt, and baking soda). Set aside.<\/li>\r\n\t
  4. In a medium bowl, mash banana and measure out 1\/2 cup. If you have any leftover mashed banana you can freeze it for a smoothie.<\/li>\r\n\t
  5. Place mashed banana into medium bowl along with the grated carrot, milk, vinegar, maple syrup, vanilla, and lemon zest. No need to stir it yet.<\/li>\r\n\t
  6. Melt the coconut oil in a small pot over low heat.<\/li>\r\n\t
  7. Stir coconut oil into the wet mixture. Pour the wet ingredients onto the dry ingredients and stir until just combined. Do not overmix as spelt is a fragile flour.<\/li>\r\n\t
  8. Gently fold in the walnuts or raisins (if using), being sure not to overmix.<\/li>\r\n\t
  9. Spoon about a heaping 1\/4 cup of batter into each muffin top tin. If using a standard-sized muffin tin, fill each tin about 3\/4 full (they will be\u00a0almost full, but this is normal).<\/li>\r\n\t
  10. Bake at 350\u00b0F for 23-27 minutes until a toothpick comes out clean. I bake them for 25 minutes in my oven.<\/li>\r\n\t
  11. Cool in the pan for 5-8 minutes and then transfer muffins to a cooling rack and cool for another 15 minutes.<\/li>\r\n<\/ol>“,”foot_note”:””}
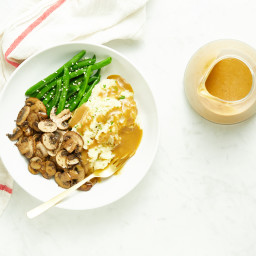
Cauliflower Garlic Mashed Potatoes

{“head_note”:”These are my all-time favourite garlic mashed potatoes! Our toddler even loves them. The Yukon Gold potatoes balance out the cauliflower, creating a believable healthy spin on mashed potatoes. I love adding some vegan butter and minced garlic for tons of comforting flavour.”,”instructions”:”

    \r\n \t

  1. Add water into a large pot and bring it to a boil.<\/li>\r\n \t
  2. While the water is heating up, chop the cauliflower and potatoes into small 1- to 2-inch pieces (this helps it cook faster).<\/li>\r\n \t
  3. Carefully, add the cauliflower and potatoes into the pot by dropping them in with a slotted spoon. Boil uncovered, until very tender, about 13 to 22 minutes. You want the potatoes and cauliflower to be very soft so they mash easily. Drain well.<\/li>\r\n \t
  4. Add the vegan butter (or oil) into the pot, and increase heat to medium. Saute the garlic for a couple minutes, being careful not to burn.<\/li>\r\n \t
  5. Add the cooked and drained cauliflower and potatoes into the pot, and remove from heat. Mash until smooth, adding a splash (or two or three)\u00a0of milk, if desired to thin.<\/li>\r\n \t
  6. Add sea salt and pepper, to taste, and mash again to combine.<\/li>\r\n<\/ol>“,”foot_note”:”
      \r\n \t

    • * Instead of boiling the cauliflower and potatoes, you can steam them in a steamer basket placed over top the boiling water. I like to cover the basket with a lid so it cooks faster.<\/li>\r\n<\/ul>“}

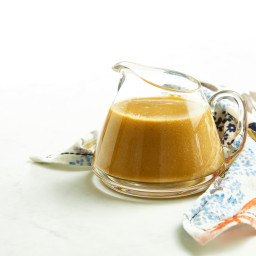
All-Purpose Vegan Gravy

{“head_note”:”This easy vegan gravy has an incredible savoury flavour, and it’s the perfect topping on my Cauliflower Mashed Potatoes, roasted sweet potatoes, and more!”,”instructions”:”

    \r\n \t

  1. In a medium pot, heat the oil over medium.<\/li>\r\n \t
  2. Stir in the onion and garlic. Saut\u00e9 over medium heat until the onion softens, about 4 to 5 minutes.<\/li>\r\n \t
  3. In a medium bowl, whisk together the broth and all of the flour until smooth. Pour the broth\/flour mixture into the pan with the onion. Stir to combine.<\/li>\r\n \t
  4. Stir in the tamari, nutritional yeast, and pepper. Bring the mixture to a simmer over medium heat, whisking frequently, until the gravy starts to thicken. Reduce heat if necessary if the gravy starts to stick to the pot.<\/li>\r\n \t
  5. Once the gravy has thickened, remove it from the heat. Pour the gravy into a blender. With the lid ajar (so steam can escape), blend on low to medium speed until the gravy is smooth.<\/li>\r\n \t
  6. Transfer the gravy back into the pot and increase the heat to medium. Add in the salt and vinegar (if using). Keep simmering over low to medium heat until the gravy thickens to your liking. If the gravy is still too thin, whisk together 1 tablespoon of flour with 1 tablespoon of broth in a small bowl and then whisk this into the broth. If it’s too thick, thin the gravy with a touch of broth. The gravy thickens a bit as it cools.<\/li>\r\n \t
  7. Store cooled leftover gravy in an air-tight container in the fridge for up to 3 days.<\/li>\r\n<\/ol>“,”foot_note”:”
      \r\n \t

    • * Make it soy-free: Feel free to replace the tamari with salt, and add to taste.<\/li>\r\n<\/ul>“}

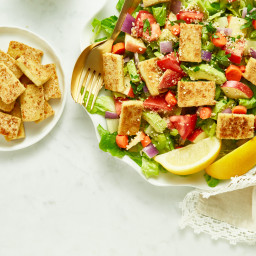
Pan-Fried Garlic Tofu

{“head_note”:”This crispy garlic tofu is so easy, you’ll find yourself making it again and again! I love to use it as a topper for kitchen-sink salads and stir-fry recipes, such as my Speedy Teriyaki Veggie Noodle Bowl<\/a>.”,”instructions”:”

    \r\n \t

  1. Rinse and drain tofu. Place it into a tofu press and press it for 30 minutes. Alternatively, you can press the tofu with books and towels. To do this, slice the tofu into eight slabs. Add a cutting board onto the counter and cover it with 2\u20133 thick tea towels. Place a few pieces of paper towel on top of the tea towels and now lay out all of the tofu slabs on top. Place a couple paper towels on top of the slabs, and cover with 2\u20133 tea towels. Finally, stack several heavy cookbooks on top of the towels. The weight of the books will help press out the water. Let this sit for 45 minutes or so. <\/li>\r\n \t
  2. Add a tablespoon of oil into a large skillet and turn it to coat all sides. Preheat the skillet over medium to high heat. <\/li>\r\n \t
  3. Slice the tofu into tiny, bite-sized pieces (about 1 inch in length by 1\/2 inch in width). <\/li>\r\n \t
  4. Place the chopped tofu into a bowl. Add 1 teaspoon of oil and toss until coated. Now sprinkle on the garlic powder and salt and toss again to coat. <\/li>\r\n \t
  5. Place the tofu onto the skillet (being careful in case the oil splatters) and spread it out into an even layer. Cook the tofu over medium to high heat for about 5 minutes on this side. Now flip each piece over using a fork (yes, this is tedious), and fry the other side for another 3 to 5 minutes, until a golden crust forms.<\/li>\r\n \t
  6. Serve immediately. The tofu’s crispy shell will soften as it sits.<\/li>\r\n<\/ol>“,”foot_note”:””}
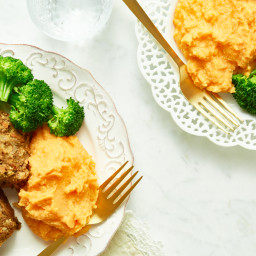
Cauliflower Carrot Mash

{“head_note”:”This beautiful veggie mash is so healthy while still retaining the \”comfort food\” feeling of traditional potatoes. Best of all, it leaves you feeling light and energized!”,”instructions”:”

    \r\n \t

  1. Add cauliflower, carrots, and potato into a large pot. Cover with an inch or two of water. Increase the heat to high and bring to a boil. Reduce heat to medium-high and simmer, uncovered, for 12 to 15 minutes, until fork tender. You want the veggies nice and soft so they pur\u00e9e smooth. <\/span><\/li>\r\n \t
  2. Drain the veggies in a colander. Allow them to cool for a few minutes.<\/span><\/li>\r\n \t
  3. Add the veggies, minced garlic, butter, salt (start with 1\/2 teaspoon), and pepper into a food processor and process until your desired texture is achieved. Taste and adjust the salt, if desired. Serve immediately.<\/li>\r\n<\/ol>“,”foot_note”:”
      \r\n \t

    • If you prefer a coarse texture to your mash, feel free to mash the veggies with a potato masher rather than processing them smooth. It’s great both ways!<\/li>\r\n<\/ul>“}

Energizing Broccoli Dal

{“head_note”:”This unique spin on dal packs in a ton of green broccoli power! You’ll feel energized by this light, and incredibly flavourful dish. This recipe is inspired by the Vegan Yum Yum Cookbook by Lauren Ulm.”,”instructions”:”

    \r\n \t

  1. Add the oil into a large saucepan and increase the heat to low-medium so the oil can preheat. <\/span><\/li>\r\n \t
  2. Add the broccoli into a food processor and process until very finely chopped (about the size of rice grains). <\/span><\/li>\r\n \t
  3. Add the cumin and mustard seeds into the saucepan with the oil. The seeds should sizzle and begin popping in the oil right away. As soon as the seeds start to pop, cover the saucepan immediately with a lid, and remove the saucepan from the heat source. Let sit until the seeds stop popping, then remove the lid and stir. <\/span><\/li>\r\n \t
  4. Stir in the onion, and place the saucepan back over medium heat. Cook for 3 to 4 more minutes until the onion softens. <\/span><\/li>\r\n \t
  5. Now, add the finely chopped broccoli, broth, entire can of coconut milk, lentils, 1\/2 teaspoon salt, garam masala, turmeric, and red pepper flakes. Stir to combine. <\/span><\/li>\r\n \t
  6. Increase heat to high and bring to a low bowl. Reduce heat to medium, cover with lid, and simmer for about 10 minutes. Now remove the lid and stir, and continue simmering, uncovered, for another 10 minutes, until the lentils soften and the mixture thickens. Stir every now and then to make sure it doesn’t stick. <\/span><\/li>\r\n \t
  7. Stir in the lemon juice to taste.<\/span><\/li>\r\n \t
  8. Ladle the dal into bowls and serve with naan bread or pita bread. Garnish with paprika and a lemon wedge, if desired.<\/li>\r\n<\/ol>“,”foot_note”:””}

No Bake Raspberry Crumble Bars

{“head_note”:”These no-bake oat bars are absolutely addictive! One day I was about to make my no-bake date squares, and I realized I didn’t have enough dates. I decided to use my chia seed jam instead, and wow did it ever turn out lovely! These bars are lightly sweet, and they make a great snack or breakfast.”,”instructions”:”

    \r\n\t

  1. Line an 8×8-inch square pan with parchment paper so there’s overhang (this makes it easier to lift out).<\/li>\r\n\t
  2. For the chia jam:<\/li>\r\n\t
  3. For the crust:\u00a0In a food processor, process the almond, salt, and oats until a fine crumble forms. Now add in the dates and process until crumbly again. Melt the coconut oil and add to the mixture and process until sticky. You can add a tiny bit of water\u00a0if the dough is too dry, a teaspoon at a time.<\/li>\r\n\t
  4. Remove the crust dough from processor, and set aside 1 cup of the mixture for later. Press the rest of the mixture very firmly and evenly into the pan to form the crust.<\/li>\r\n\t
  5. Once the jam has cooled, spread 1 cup of it over top of the crust until it covers the entire top.<\/li>\r\n\t
  6. Sprinkle the remaining 1 cup of crust all over the top of the jam. Lightly press down with your fingers to help it adhere.<\/li>\r\n\t
  7. Cover the pan with plastic wrap or tin foil and place into the freezer for 30 minutes to set. Remove and slice into bars. Store leftovers in an air-tight container in the fridge for up to 1 week. You can also freeze them for up to 1 month. I like to wrap each bar individually, and then place them into a freezer zip bag.<\/li>\r\n<\/ol>“,”foot_note”:”
      \r\n\t

    • * Instead of chia seed jam, you can use 1 cup of your favourite store-bought jam.<\/li>\r\n<\/ul>“}