Category Archives: Uncategorized

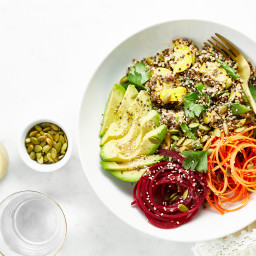
Summer Glow Buddha Bowl with House Vinaigrette

{“head_note”:”Like most plant-based bowl recipes there are a few different components that need to be prepped for this Buddha Bowl, but I’m happy to say they’re all incredibly easy to whip up. I like to prepare the House Vinaigrette and quinoa in advance, maybe the day before or the morning of. This way, the bowls come together incredibly fast. While I created this bowl with summer in mind, rest assured that you can swap out the summer veggies for seasonal veggies all year long. You can also boost the protein by adding your favourite beans\/legumes. This bowl is inspired by Kerr Street Cafe’s Buddha Bowl.”,”instructions”:”

    \r\n \t

  1. For the House Vinaigrette: In a small (1-cup\/250 mL) mason jar, add the vinegar, lemon juice, Dijon, garlic, maple syrup, salt, and pepper. Secure lid and shake vigorously to combine. Remove the lid and add in the olive oil. Secure the lid once again and shake vigorously until the oil is emulsified. Taste, and add additional maple syrup or oil if desired.<\/li>\r\n \t
  2. Cook the quinoa: In a medium saucepan, add the quinoa along with 2 1\/4 cups (560 mL) water. Stir to combine. Increase heat to high and bring to a low boil. Immediately reduce the heat to medium-low, and cover with a tight-fitting lid. Cook for 13 to 16 minutes, until the water is absorbed and the quinoa is fluffy. Remove the lid and season the quinoa with salt and pepper.<\/li>\r\n \t
  3. Saut\u00e9 the vegetables: Meanwhile, in a large skillet or wok, add the olive oil, green beans, snap peas, and zucchini. Stir to combine and season with salt. Saut\u00e9 the veggies over medium-high heat for about 10 minutes, until tender but not overcooked. You still want the veggies to have a light crispness to them. At the end of cooking, stir in the spinach and cook for a couple minutes until it wilts. Turn off the heat.<\/li>\r\n \t
  4. Peel and spiralize the carrot and beet, and slice the avocado.<\/li>\r\n \t
  5. To assemble: Stir all of the cooked quinoa into the skillet veggie mixture. Increase heat to medium, and cook until warmed throughout. Taste and add more salt and pepper if desired. Portion the quinoa-veggie mixture into large shallow bowls. Top the bowls with the carrot, beet, avocado, and a generous amount of toasted pepita seeds. Lastly, shake the House Vinaigrette and drizzle about 3 to 4 tablespoons all over the top of each bowl. Any leftover Buddha Bowl mixture will keep in the fridge for up to 3 days, and the leftover House Vinaigrette will keep for at least two weeks. The olive oil in the dressing tends to solidify when chilled, so be sure to allow it to sit on the counter for a bit (or warm the sealed jar\u00a0in a bowl of hot water), and shake well before using.\u00a0A great way to serve leftovers is to toss some baby mixed greens with House Vinaigrette and stir in some warmed quinoa-veggie mixture. Top it with sliced avocado and toasted pepitas for a quick meal.<\/li>\r\n<\/ol>“,”foot_note”:”
      \r\n \t

    • * If you own a spiralizer, be sure to use a very thick carrot for spiralizing (the smaller ones won’t work). Or you can simply julienne the carrot with a julienne peeler, which is what I usually do.<\/li>\r\n \t
    • ** To avoid staining your hands, try wearing kitchen gloves while handling the beet.<\/li>\r\n \t
    • *** To toast the pepita seeds: Spread the seeds onto a baking sheet and toast them for 8 to 12 minutes at 325\u00b0F (160\u00b0C), until golden.<\/li>\r\n<\/ul>“}
Mighty Matcha Wheatgrass Protein Smoothie

{“head_note”:”This protein-packed smoothie is incredibly fast to throw together, and it’s super energizing thanks to the matcha green tea powder and wheatgrass juice! I like to think of it as my early morning \”jump-start\” during the hot summer months. The matcha powder provides a small amount of caffeine (jitter-free!) to power you through the morning. It’s filling, too, packing more than 25 grams of protein into just one glass (depending on the protein powder that you use). If you can’t get your hands on wheatgrass juice, feel free to swap it with fresh green juice (see my tips below).”,”instructions”:”

    \r\n \t

  1. Add all the smoothie ingredients into a high-speed blender, and blend on high until smooth. Serve and enjoy!<\/li>\r\n<\/ol>“,”foot_note”:”
      \r\n \t

    • * I\u00a0use Evergreen frozen wheatgrass juice. You can find it in the freezer section of grocers like Whole Foods or other natural food stores. Each cube contains about 1 1\/2 tablespoons of juice.<\/li>\r\n \t
    • ** I use Sunwarrior Warrior Blend Natural Protein Powder in this smoothie. Feel free to use your favourite protein powder!<\/li>\r\n \t
    • Try freezing fresh green juice into ice cubes, as a fun swap for the frozen wheatgrass!<\/li>\r\n<\/ul>“}

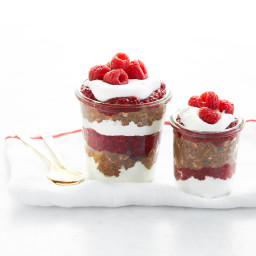
Chocolate Raspberry Dreams Breakfast Parfait

{“head_note”:”This summer-friendly breakfast can be made the night before and assembled so it’s ready to go in the morning! (And trust me when I say that you’ll be dreaming of this while you sleep!) The batch\u00a0makes enough for about 4 servings so you can enjoy it on several occasions. The chocolate overnight oats are mild-tasting and slightly bitter (depending on how much sweetener you use), so the zingy raspberry jam and lightly sweet coconut whip are essential when serving to boost the flavours. To highlight a contrast of textures, add some fresh or frozen raspberries and toasted nuts, too.”,”instructions”:”

    \r\n \t

  1. For the Raspberry Chia Seed Jam: Add the frozen raspberries, chia seeds, and maple syrup into a medium pot. Stir to combine. Cook uncovered over medium heat, stirring frequently, for about 7 to 9 minutes, until the raspberries break down. (It will still look a bit runny, but it will thicken as it cools.) Remove from heat and stir in the vanilla, if using, and additional maple syrup, if desired. Allow the jam to cool on the counter, uncovered, for about a half hour before covering\u00a0and chilling in the fridge.<\/li>\r\n \t
  2. For the Chocolate Overnight Oats: In a large container with a lid, whisk together\u00a0the oats, chia seeds, maple syrup, and cocoa powder until combined. Add the milk, and whisk until no clumps of cocoa powder remain. Secure lid and let it sit on the counter for 2 to 3\u00a0minutes. After sitting briefly, shake the mixture (or stir) again to combine. This just helps prevent the chia seeds from clumping up. Chill in the fridge for a couple hours, or overnight.<\/li>\r\n \t
  3. Prepare the Coconut Whipped Cream, or if using, thaw the store-bought coconut whipped cream in the fridge or on the counter. Store in the fridge until ready to use.<\/li>\r\n \t
  4. When the chia jam and oats are ready, layer them into jars or bowls along with the coconut whipped cream. Add your desired toppings, and enjoy! The parfaits can be made in advance and enjoyed for a few days.<\/li>\r\n<\/ol>“,”foot_note”:”
      \r\n \t

    • * To change up this recipe, feel free to swap the Coconut Whipped Cream for Banana Soft Serve.<\/li>\r\n \t
    • Make it nut-free: Swap the almond milk for a nut-free non-dairy milk, and omit the nut topping.<\/li>\r\n<\/ul>“}

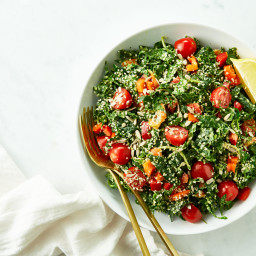
Avocado, Lemon, and Dill Kale Salad

{“head_note”:”This is a satisfying\u00a0summertime salad\u00a0that’s so good it’ll have you craving kale.\u00a0Lacinato (or dinosaur)\u00a0kale is stemmed and finely chopped before adding a rich and creamy avocado-lemon-dill dressing. The best thing about this salad (aside from the amazing flavour) is that you can customize it with whichever toppings you have on hand (cucumber and croutons are also a great addition). I love adding a generous amount of hemp hearts and\/or toasted nuts and seeds for a boost of protein and healthy fats.”,”instructions”:”

    \r\n \t

  1. Remove the stems from the kale. Compost or discard the stems. Finely chop the leaves into tiny 1-inch pieces. Wash the kale and spin it dry. Add it to a large bowl.<\/li>\r\n \t
  2. To the kale, add the sprouts, bell pepper, dill, and tomatoes (if using). Toss with your hands to combine.<\/li>\r\n \t
  3. For the dressing: In a small bowl, mash the avocado until almost smooth. Stir in the lemon juice, nutritional yeast, oil, cayenne pepper (if using), salt, and pepper, to taste.<\/li>\r\n \t
  4. Spoon all of the dressing on top of the salad.\u00a0Massage or rub the dressing into the kale with your hands until the kale is thoroughly coated in the dressing. Rinse your hands, and then taste the salad. Add more salt, pepper, and cayenne, if desired.<\/li>\r\n \t
  5. Top the salad with hemp hearts or toasted nuts and seeds of your choice. You can serve the salad with a lemon wedge if you want even more lemon drizzled on top for a zesty kick. This salad tastes\u00a0best served fresh due to the avocado, but you can store leftovers in an airtight container in the fridge for up to 12 hours.<\/li>\r\n<\/ol>“,”foot_note”:”
      \r\n \t

    • *\u00a0Lacinato kale (also known as dinosaur kale) is a flat-leaf kale which is less bitter and more tender than traditional curly kale. I always buy\u00a0Lacinato kale for salads as I prefer its softer texture. If you can’t find\u00a0Lacinato kale, feel free to use curly kale, but be sure to chop it very finely.<\/li>\r\n<\/ul>“}

Vanilla Superseed Protein Energy Scoops

{“head_note”:”These nut-free energy scoops\u00a0are the perfect snack when you’re feeling famished and can’t wait until your next meal! I love having them on hand for early mornings when I wake up hungry, but don’t have time to prepare my breakfast until my daughter is looked after. Even though these scoops are completely nut-free, their flavour is reminiscent of peanut butter thanks to the roasted sunflower seeds, and delightful, nutty combination of sesame and hemp seeds. If you are short on time, though, feel free to skip toasting the sunflower seeds. The scoops will still taste great, they just won’t be quite as nutty tasting.”,”instructions”:”

    \r\n\t

  1. Preheat the oven to 350\u00b0F. Spread the sunflower seeds onto a small baking sheet in an even layer.<\/li>\r\n\t
  2. Toast the sunflower seeds for 5 to 9 minutes, until lightly golden.<\/li>\r\n\t
  3. Add the wet\u00a0ingredients into a food processor (pitted dates, sunflower seed butter, maple syrup, and coconut oil). Process until\u00a0almost smooth, about 30 to 60 seconds.<\/li>\r\n\t
  4. Now add the dry ingredients (sunflower seeds, rolled oats, hemp hearts, sesame seeds, vanilla powder, and salt). Process until the mixture comes together. Add the water, if desired, and process again. The mixture should easily stick together when pressed between your fingers.<\/li>\r\n\t
  5. Line a large plate with parchment paper. Using a 30 mL retractable ice cream scoop, scoop the dough and gently press it into the scoop (it’s ok if some excess dough hangs over the sides of the scoop). Release\u00a0the dough onto the plate, flat side down. Dip the scoop into water, shake off the excess, and scoop the next one. Repeat this process until all the dough is used up. You should have around 14 large scoops. Place the plate with the scoops in the freezer, uncovered, while you prepare the chocolate.<\/li>\r\n\t
  6. Add the chocolate and oil into a small pot over low heat. Once two-thirds of the chocolate has melted, remove it from the heat and stir until smooth. Remove the scoops from the freezer and drizzle the chocolate onto each. You can top each scoop with some sesame seeds, if you’d like.<\/li>\r\n\t
  7. Chill the scoops in the freezer for 15 minutes, or until the chocolate hardens. Serve and enjoy!<\/li>\r\n\t
  8. Store the scoops\u00a0in an airtight container in the freezer for up to 1 month, or in the fridge for up to 4 to 5 days.<\/li>\r\n<\/ol>“,”foot_note”:”
      \r\n\t

    • * It helps to use soft, fresh dates in this recipe. If yours are a bit on the firm side, soak them in boiling water for 15 to 30 minutes, and drain well before you begin.<\/li>\r\n\t
    • ** I recommend using Sunbutter brand of sunflower seed butter. It’s super smooth and not too thick.<\/li>\r\n\t
    • If you don’t have a retractable ice cream scoop, feel free to shape the dough into balls!<\/li>\r\n<\/ul>“}

Heat Wave Superfood Lemonade

{“head_note”:”This anti-inflammatory superfood lemonade packs a powerful punch, and its golden colour is simply stunning! Fresh turmeric, ginger, lemon juice, and cayenne pepper unite to create a lemonade that’s detoxifying\u00a0and immune-boosting, yet delicious all the same. Rather than using cane sugar, this lemonade uses pure maple syrup for a natural, unrefined sweetener. The fresh ginger and cayenne pepper make this drink fairly spicy, so feel free to cut down the ginger amount (and omit the cayenne pepper) if you aren’t a big fan.”,”instructions”:”

    \r\n \t

  1. Add the water, ginger, and turmeric into a small pot. Set the heat to high and bring to a low boil. Reduce the heat to medium-low and simmer, uncovered, for 4 to 5 minutes.<\/span><\/li>\r\n \t
  2. Meanwhile, add all of the ice cubes and lemon juice into a large wide-mouth jar or glass.<\/span><\/li>\r\n \t
  3. After simmering, strain the water mixture into the jar\/glass using a fine mesh sieve. Compost or discard the solids.<\/span><\/li>\r\n \t
  4. Add maple syrup and cayenne (if using) to taste and stir.<\/span><\/li>\r\n \t
  5. Allow the ice to cool the lemonade to your liking (I let it sit for 3 minutes), stir again, and serve.<\/span><\/li>\r\n<\/ol>“,”foot_note”:”
      \r\n \t

    • * This amount of ginger results in a fairly spicy lemonade. If you prefer a less spicy drink, feel free to cut this amount down to suit your tastes.<\/li>\r\n<\/ul>“}

Jumbo Chocolate Chunk Cookies

{“head_note”:”These vegan and gluten-free chocolate chunk cookies will\u00a0blow your mind! The cookie dough is sweetened with pure maple syrup\u2014you’d never know they don’t contain any granulated cane or brown sugar (aside from the chocolate, of course). Almond butter, oats, almond flour, and a small amount of coconut oil form the hearty and nutritious base of these irresistible cookies. Prepare yourself for an addiction. We love these warm, but they’re also great straight from the freezer or fridge!”,”instructions”:”

    \r\n \t

  1. Preheat the oven to 350\u00b0F (180\u00b0C) and line a very large (approx. 21 by 15 inch) baking sheet with parchment paper.<\/li>\r\n \t
  2. In a large bowl, stir together the wet ingredients (almond butter, maple syrup, oil, and vanilla) until completely smooth.<\/li>\r\n \t
  3. Stir the dry ingredients (oats, oat flour, arrowroot, almond flour, baking soda, and salt) into the wet mixture, one by one, until thoroughly combined. The dough will be a bit\u00a0wet\/oily, but this is normal.<\/li>\r\n \t
  4. Chop the chocolate into small chunks. Set aside 3 tablespoons\u00a0(for topping the cookie dough later), and stir the rest of the chocolate into the batter until combined.<\/li>\r\n \t
  5. Using a large retractable cookie scoop (or simply a spoon and your hands), scoop mounds of dough (about 2 1\/2 tablespoons of dough per cookie). Add each onto the baking sheet, about 3 inches apart, as they’ll spread a lot while baking.<\/li>\r\n \t
  6. Press\u00a0the remaining 3 tablespoons of chocolate onto the tops of the cookie dough mounds, evenly distributed. (Reshape the cookie dough mounds if they flatten a bit.)<\/li>\r\n \t
  7. Bake for 8 to 10 minutes (I prefer 8 1\/2 to 9 minutes for gooey and soft cookies), until the cookies are spread out. If you prefer\u00a0a crispy cookie, bake for about 12 minutes.<\/li>\r\n \t
  8. Cool the cookies directly on the baking sheet for about 5 to 6 minutes. The cookies will be super\u00a0delicate until they are cooled. Using a spatula, gently transfer each cookie\u00a0directly onto a cooling rack for another 10 minutes, where they’ll firm up even more. (It’s normal to have a small amount of oil on the bottom of the cookies due to the almond butter. If this bothers you, simply place them on a couple sheets of paper towel.) Serve and enjoy! Allow the cookies to cool completely before storing.<\/li>\r\n<\/ol>“,”foot_note”:”
      \r\n \t

    • * It’s important to use natural smooth almond butter that has a fairly \”drippy\” consistency. Be sure to stir it very well before measuring and avoid using the dry\/hard nut butter at the bottom of the jar as it’s too difficult to mix with the other wet ingredients. Some readers have also said that using peanut butter resulted in cookies that didn’t spread out and didn’t hold together, so I wouldn’t recommend\u00a0subbing the almond butter.<\/li>\r\n \t
    • ** What is softened coconut oil? During the warm summer months, coconut oil is the perfect \”softened\” consistency at room temperature; it’s neither solid nor completely melted. If you do need to use melted coconut oil, just be sure that it’s not hot\/warm or it could melt the chocolate.<\/li>\r\n \t
    • *** I prefer\u00a0Camino 55% dark chocolate bars in this recipe, but feel free to use the chocolate of your choice.<\/li>\r\n \t
    • Tip: These cookies spread out a lot and are fairly thin. If you prefer a thicker cookie you can try chilling the dough before baking. (I haven’t tried this yet myself.)<\/li>\r\n<\/ul>“}

Avocado Strawberry Caprese

{“head_note”:”Meet your new favourite summer salad! This delightful combination of strawberries, avocado, basil, and tomatoes is tossed with a touch of extra-virgin olive oil, and drizzled with homemade balsamic reduction for a refreshing, lightly sweet salad that’s great on a hot day.”,”instructions”:”

    \r\n \t

  1. I<\/span>n a small saucepan, bring the vinegar to a simmer over medium heat.<\/span> Once the vinegar starts to simmer, reduce the heat to medium-low, and simmer for 6 to 10 minutes, uncovered, until the vinegar thickens, and reduces in volume by half. Set aside.<\/span><\/li>\r\n \t
  2. Meanwhile, add the strawberries, tomatoes, avocado, and basil into a large shallow bowl.<\/span><\/li>\r\n \t
  3. Drizzle on the oil and gently toss until the veggies are coated. Season generously with salt and pepper and toss again just briefly.<\/span><\/li>\r\n \t
  4. Scatter on your desired amount of toasted seeds or nuts. Drizzle on all of the balsamic reduction.<\/span><\/li>\r\n \t
  5. Serve immediately. This salad is definitely best enjoyed fresh, but leftovers can be stored in an airtight container for a few hours if necessary.<\/span><\/li>\r\n<\/ol>“,”foot_note”:””}

Soy-Free Vegan Mayonnaise

{“head_note”:”This soy-free vegan mayo is a\u00a0homemade alternative to my favourite store-bought \”Vegenaise\” mayo (the taste is very similar, too). It\u2019s thickened with the magical powers of aquafaba\u2014the liquid from a can of chickpeas. Be sure to follow this recipe exactly as written because even small changes can result in a mayo that doesn\u2019t thicken. This recipe can be made using an immersion blender or a regular high-speed upright blender; I prefer using an immersion blender since it\u2019s super quick to scoop out! If you\u2019re wondering what to do with the leftover can of chickpeas, I recommend making my favourite Chickpea Salad<\/a>. If you have leftover mayo to use up, my\u00a0Crispy Smashed Potatoes<\/a>\u00a0are also a must make!”,”instructions”:”

    \r\n \t

  1. Add the aquafaba, lemon, vinegar, syrup, salt, and dry mustard into a tall container. With an immersion blender, blend to combine. Alternatively, use an upright high-speed blender, and blend on low to medium speed.<\/li>\r\n \t
  2. While blending, slowly stream in the oil (a tablespoon or two at a time) until it thickens into a white, creamy mayo. (I usually use\u00a03\/4 cup plus 2 tablespoons of oil, but you might need anywhere from 3\/4 to 1 cup.)<\/li>\r\n \t
  3. Store leftovers in an airtight container or jar in the fridge for up to 2 weeks.<\/li>\r\n<\/ol>“,”foot_note”:”
      \r\n \t

    • * Aquafaba is the liquid leftover from cooking beans, such as chickpeas. In this recipe, I recommend using the liquid found in a\u00a0can of chickpeas for best results, as I haven’t tested it other ways yet (such as using homemade aquafaba).<\/li>\r\n \t
    • **\u00a0It\u2019s crucial to use a neutral-tasting oil in this mayo. I don\u2019t recommend using extra virgin olive oil as it will be too bitter tasting. Stick with grapeseed oil or pure\/refined olive oil for the best flavour!<\/li>\r\n<\/ul>“}

All Day Glow Green Smoothie

{“head_note”:”This refreshing and tangy smoothie happened by total accident. I created it on my birthday as I was looking to feel my absolute best, and I had resolved to eat more veggies in the year ahead. So I threw in all of the healthy ingredients I had lurking in the fridge, and I was absolutely astounded by how delicious it turned out. I’m not sure if I’ve ever created such a powerhouse smoothie before! This one is jam-packed with nutritious ingredients like fresh turmeric, cilantro, parsley, lemon, avocado, green apple, lettuce, coconut water, and more. Keep in mind this is a large batch that just fits in a 64-ounce high-speed blender, so if your blender is smaller you might want to make a half batch. I love to have a glass first thing in the morning, and another in the afternoon. Since there’s no banana in it, it also keeps well until the next day when stored in an airtight container. Be prepared to feel that \”all-day\” glow!!”,”instructions”:”

    \r\n \t

  1. Add the coconut water and mango juice into a (64-ounce) high-speed blender. (If your blender is on the small side, you may want to make a half-batch.)<\/li>\r\n \t
  2. Now add the rest of the ingredients. Blend on high until super smooth. If you have a Vitamix, use the tamper stick to get things moving. Taste and adjust sweetness if desired. If it’s too tart, feel free to add a bit of liquid sweetener.<\/li>\r\n \t
  3. Serve and enjoy! Place any leftovers into an airtight container and store in\u00a0the fridge for up to 24 hours. I love to enjoy half in the morning, and the other half in the afternoon.<\/li>\r\n<\/ol>“,”foot_note”:”
      \r\n \t

    • * The cilantro flavour in this smoothie is quite pronounced. If you aren’t a cilantro fan, feel free to swap it with more romaine or fresh mint (start with 1\/4 cup of mint).<\/li>\r\n \t
    • **\u00a0Fresh turmeric root is becoming more and more common\u00a0in grocery stores these days; keep your eyes peeled for it in the produce section. It can also be found on Amazon, and in select health food stores and Indian and Asian grocery stores. Look for firm turmeric that is unblemished.<\/li>\r\n<\/ul>“}