Category Archives: Uncategorized

Gingerbread Cut-Out Cookies

{“head_note”:”These delicious gingerbread cookies are made with whole-grain spelt flour and are spiced with a healthy dose of ginger, cinnamon, cloves, and nutmeg. I use blackstrap molasses, which is rich in iron, and pure maple syrup to naturally sweeten. They are crispy around the edges, chewy in the middle, and so much fun to decorate with my easy frosting! You won\u2019t be able to stop at just one. Not to worry if you don\u2019t have any whole-grain spelt flour\u2014I\u2019ve also provided directions for an all-purpose flour version in the recipe tips.”,”instructions”:”

    \r\n \t

  1. In a stand mixer or in a large bowl with an electric beater, beat the butter for 5 to 10 seconds, until almost smooth. Add the maple syrup, molasses, and vanilla, and beat again until combined.<\/span><\/li>\r\n \t
  2. Add the ginger, cinnamon, baking soda, salt, cloves, and nutmeg to the wet ingredients. Beat with the mixer to combine. Now, add the flour and beat again until the dough comes together and there are no flour patches left. Be careful not to overmix the dough. <\/span><\/li>\r\n \t
  3. Form the dough into two equal discs and cover each tightly with plastic wrap. Chill the dough for 3 hours so it can firm up for easier rolling. You can also chill the dough overnight.<\/span><\/li>\r\n \t
  4. Preheat the oven to 350<\/span>\u00b0<\/span>F (180<\/span>\u00b0<\/span>C) and line two large baking sheets with parchment paper.<\/span><\/li>\r\n \t
  5. Remove one disc from the fridge and unwrap. Leave the other disc in the fridge.<\/span><\/li>\r\n \t
  6. Place the disc on a large piece of parchment paper. (Alternatively, you can use a non-stick mat on the base.) Place another piece of parchment paper on top of the dough. Roll out the dough with a rolling pin until it\u2019s about \u00bc inch thick. <\/span><\/li>\r\n \t
  7. Using the cookie cutters of your choice, cut out the cookies. Peel away the excess dough and place each cookie onto the baking sheet about 1 to 2 inches apart. Repeat this entire process with the remaining dough until it\u2019s all used up.<\/span><\/li>\r\n \t
  8. Bake the cookies for 9\u201311 minutes. (Keep in mind that cookies on the thick side will bake up soft while thinner cookies will turn out crisp.) Let them cool on the pans for 5 minutes and then carefully transfer onto a cooling rack until completely cool.<\/span><\/li>\r\n \t
  9. For the frosting: In a medium bowl or stand mixer, beat together the frosting ingredients until completely smooth. Transfer the frosting into a plastic baggie and snip off a tiny triangle at the corner of the bag. (Alternatively, you can use a squeeze bottle with a piping tip.) When the cookies are completely cool, pipe the frosting as you desire. Enjoy immediately or transfer to the fridge so the frosting can firm up a bit. Once the frosting is firm, you can freeze the cookies if desired. <\/span><\/li>\r\n \t
  10. Cookies can be stored in the fridge in an airtight container for 2 days (sadly, they don\u2019t stay fresh for very long and will dry out quickly), or in the freezer for 2 to 3 weeks.<\/span><\/li>\r\n<\/ol>“,”foot_note”:”* I use Earth Balance Soy Free Buttery Spread. I use vegan butter here rather than my go-to coconut oil because I found that coconut oil resulted in a dough that, once chilled, was really hard and difficult to roll out. I don\u2019t recommend using coconut oil in this recipe.\r\n\r\n** You can swap the spelt flour for approximately 2 cups + 1\u20134 tablespoon(s) regular all-purpose flour. I only did one trial of this so you may need a bit more or less flour than I did. I recommend adding the flour a bit at a time. The dough should stick together easily, but it shouldn’t be super sticky or too dry.\r\n\r\nTip: If you are pressed for time and don\u2019t want to roll out the dough, feel free to shape the dough into 1-inch balls. Flatten the balls slightly before baking, and you\u2019ll end up with easy gingerbread cookies. I love pressing the top of the unbaked dough into crushed candy cane for a really pretty effect! <\/b>“}

Peppermint Crunch Cookies

{“head_note”:”Chocolate and peppermint all wrapped up in a nutty, gooey cookie that\u2019s topped with crushed candy cane\u2014what could be better?! If you aren’t a peppermint fan, though, I\u2019ve got you covered! Feel free to omit the peppermint extract and candy cane for a simple (but delicious) chocolate version. You could even try adding a quarter or half teaspoon of espresso powder for a richer chocolate flavour. Mmm.”,”instructions”:”

    \r\n \t

  1. Preheat the oven to 350\u00b0F (180\u00b0C) and line a very large (approximately 21- by 15-inch) baking sheet with parchment paper. You can also use two medium-size sheets.<\/span><\/li>\r\n \t
  2. In a large bowl, stir together the wet ingredients (almond butter, maple syrup, oil, and extract) vigorously until completely smooth.<\/span><\/li>\r\n \t
  3. Stir the dry ingredients (oats, arrowroot, almond flour, cocoa powder, oat flour, baking soda, salt, and chocolate chips) into the wet mixture, one by one, until thoroughly combined. The dough will be oily and dense, but this is normal.<\/span><\/li>\r\n \t
  4. Using a 2-tablespoon\/30 mL retractable cookie scoop, scoop mounds of dough. Dip each mound into the crushed candy cane until the top is fully coated (coat it really well!). Add each onto the baking sheet, spacing them about 2 inches apart.\u00a0You can gently press down on the mound just a bit (the cookies don’t spread out much on their own).<\/span><\/li>\r\n \t
  5. Bake for 7 to 9 minutes, until the cookies are spread out slightly and soft to the touch \u2014they will seem a bit underbaked, but once cool, they will firm up a bit. Be careful not to overbake as they will dry out fast once cooled.<\/span><\/li>\r\n \t
  6. Cool the cookies directly on the baking sheet for about 5 to 8 minutes. Using a spatula, gently transfer the cooki<\/span>es onto a cooling rack until completely cool<\/span>. If the bottoms are a bit oily, you can place them on a couple sheets of paper towel to absorb the oil.<\/span><\/li>\r\n \t
  7. Store the cookies in an airtight container in the fridge for up to 2 to 3 days. Or, you can freeze them for up to 2 weeks (wrap with tinfoil and then place in a freezer-safe zip bag).<\/span><\/li>\r\n<\/ol>“,”foot_note”:”* It’s important to use natural smooth almond butter in this recipe. Be sure to stir it very well before measuring, and avoid using the dry\/hard nut butter at the bottom of the jar as it will dry out the cookies.\r\n\r\n** I use Enjoy Life brand of mini chocolate chips (vegan, soy-free). Of course, regular-size chips or finely chopped chocolate should work too.\r\n\r\n*** For convenience, I buy crushed candy cane from a bulk bin. However, you can make it yourself at home, too. Simply place unwrapped candy canes in a large zip bag and roll\/beat with a rolling pin. You can also use a mini food processor, although it\u2019s very noisy!\r\n\r\n \r\n\r\nThis recipe was updated on Dec. 10, 2017.”}

One Bowl Vegan Banana Bread

{“head_note”:”This vegan banana bread is delicious, wholesome, naturally sweetened, and takes 10 minutes to throw together. What could be better when you have some overripe bananas to use up? Nothing, my friends, absolutely nothing! Whip this into the oven before guests arrive to fill the house with a delectable banana bread aroma. For a fun twist, try adding cinnamon and nutmeg into the dough before baking, or even stir in some chocolate chips or chopped dark chocolate for a more decadent loaf. I love it topped with both sliced banana (which enhances the sweetness and banana flavour) and crunchy walnuts.”,”instructions”:”

    \r\n \t

  1. Preheat the oven to 350\u00b0F (180\u00b0C). Lightly spray a 9×5-inch loaf pan with oil and set aside.<\/li>\r\n \t
  2. In a large bowl, mash the banana until almost smooth, and make sure you have 1 1\/3 cups.<\/li>\r\n \t
  3. Stir the wet ingredients (ground flax, milk, melted oil, maple syrup, and vanilla) into the banana until combined.<\/li>\r\n \t
  4. Stir the dry ingredients (sugar, oats, baking soda, baking powder, salt, and flour) into the wet mixture, one by one, in the order listed. Stop stirring when there are no flour patches at the bottom of the bowl.<\/li>\r\n \t
  5. Spoon the dough into the loaf pan and spread out evenly. Add your desired toppings and gently press them into the dough to adhere.<\/li>\r\n \t
  6. Bake the loaf, uncovered, for 45 to 55 minutes (I bake for 47 to 48 minutes, but your time may vary), until lightly golden and firm on top. The top of the loaf should slowly spring back when touched.<\/li>\r\n \t
  7. Place the loaf pan on a cooling rack for 30 minutes. Then, slide a knife around the loaf to loosen it and gently remove it from the pan, placing it directly onto the cooling rack until completely cooled (or to hasten the cooling process, transfer to the fridge for 45 minutes).<\/li>\r\n \t
  8. Slice the loaf once cooled. I love to spread it with vegan butter or coconut oil. The loaf will keep in the fridge tightly wrapped for 3 to 4 days, or it can be frozen for 4 to 6 weeks.<\/li>\r\n<\/ol>“,”foot_note”:”
      \r\n \t

    • * I have not tried it yet, but you can probably swap melted vegan butter for the coconut oil.<\/li>\r\n \t
    • ** If you don\u2019t have any maple syrup on hand, feel free to swap in another 2 tablespoons of coconut sugar. The loaf won\u2019t be quite<\/i> as moist, but it\u2019ll still work.<\/li>\r\n \t
    • *** Coconut sugar can probably be swapped for natural cane sugar.<\/li>\r\n \t
    • **** I tried this recipe with light\/white spelt flour, all-purpose white flour, and whole-grain spelt flour. My preference is light\/white spelt flour because it lends a great flavour while still feeling quite light in texture. The whole-grain spelt flour version is my second favourite; it is heartier in texture than the light\/white spelt flour version (and cracks more on the top of the loaf), with a slightly earthier flavour. It doesn\u2019t rise as much, though, and is more dense. If your whole-grain spelt flour is quite coarse, I recommend sifting it prior to use for the best results.<\/li>\r\n<\/ul>“}

Express Red Lentil Soup

{“head_note”:”Sometimes I just don\u2019t have the patience (or time) to chop a bunch of vegetables. That\u2019s why I absolutely love this light-tasting red lentil soup\u2014there\u2019s only an onion to chop, and it couldn\u2019t be faster to throw together! Red lentils break down while cooking to create the creamiest, thickest, most comforting bowl of soup, while the fresh lemon juice, dill, and garlic give it a lovely mild and\u00a0fresh flavour. (If you love bold flavours, don\u2019t be afraid to increase the garlic and lemon called for!) The flavours are even better the next day, too.”,”instructions”:”

    \r\n \t

  1. Add the oil, onion, and garlic into a large pot. Stir to combine, adding a pinch of salt to season. Increase the heat to medium. Cook for around 4 to 5 minutes until the onion softens, reducing heat if necessary to avoid burning the garlic.<\/span><\/li>\r\n \t
  2. Add the lentils, salt (you can start by adding 1 teaspoon), pepper, broth, and water. Increase heat to high and bring to a boil. Immediately reduce the heat to medium-low, cover, and simmer for 20 to 25 minutes until the soup thickens and the lentils are broken down and very soft.<\/span><\/li>\r\n \t
  3. Turn off the heat and stir in the lemon juice, adding more if desired. Season with additional salt and pepper, to taste. <\/span><\/li>\r\n \t
  4. Chop the spinach and then stir it into the soup until it wilts.\u00a0<\/span><\/li>\r\n \t
  5. Serve and enjoy with your desired toppings. Leftovers will keep in an airtight container in the fridge for up to 3 to 4 days. It freezes lovely, too. Simply add cooled leftovers into a freezer-safe container (leaving an inch at the top for expansion), secure the lid, and freeze for 1 to 2 months. (You can also add a layer of tinfoil on top of the soup as an extra layer of freezer burn prevention.)<\/li>\r\n<\/ol>“,”foot_note”:”
      \r\n \t

    • *\u00a0If you don\u2019t have a Microplane, finely mince the garlic with a knife.<\/li>\r\n<\/ul>“}

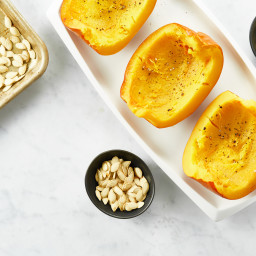
How to Roast Pumpkin and Seeds

{“head_note”:”This is my go-to method for roasting a sugar pumpkin and its seeds at the same time! Most recipes tend to provide instructions on roasting them separately, but I wanted to come up with directions on how to roast them both simultaneously. And, luckily, I’ve discovered it couldn’t be easier.”,”instructions”:”

    \r\n \t

  1. Preheat the oven to 325\u00b0F (160\u00b0C) and place two racks near the centre of the oven. Grab two rimmed medium-sized baking sheets and line one of them with parchment paper.<\/li>\r\n \t
  2. Fill a medium-sized bowl with water and set aside. Lie an absorbent towel onto the counter next to the bowl.<\/li>\r\n \t
  3. Slice off the pumpkin stem and discard.<\/li>\r\n \t
  4. Place the pumpkin, cut side down, onto a cutting board. Carefully slice the pumpkin in half.<\/li>\r\n \t
  5. Scoop out the pumpkin seeds and flesh\/strings and place it all into the bowl of water. The seeds will float to the top (like magic!). Using your hands, grab the big chunks of flesh and pick off any attached seeds. Place the seeds back into the bowl of water. Discard\/compost the chunks of flesh.<\/li>\r\n \t
  6. Use a slotted spoon to remove the seeds. Let excess water drip off and then place the seeds onto the towel. Blot dry (the seeds don\u2019t have to be bone dry and it\u2019s okay if there are some strands attached\u2014they add flavour!).<\/li>\r\n \t
  7. Spread the seeds onto the baking sheet without the parchment and toss with 1 teaspoon of oil. Spread the seeds out into a single layer and sprinkle with salt.<\/li>\r\n \t
  8. Mist or spread oil all over the inside of each pumpkin half and then sprinkle with salt and pepper. Place each half cut-side down onto the lined baking sheet.<\/li>\r\n \t
  9. Place both sheets into the oven with the seeds on the lower rack. Roast at 325\u00b0F (160\u00b0C) for 20 minutes then remove the seeds and taste test a couple. As long as the inner seeds aren’t tasting burned, you can keep roasting them. I usually return the seeds to the oven for another 3 to 4 minutes. Remove the seeds and cool.<\/li>\r\n \t
  10. Leave the pumpkin in the oven and increase the oven temp to 350\u00b0F (180\u00b0C). Continue roasting the pumpkin for another 12 minutes or so, until fork-tender. (The timing may vary based on how large and fresh your pumpkin is.) At this point you can slice it up and serve it as a side vegetable with your meal, or process\/blend the flesh to make homemade pumpkin pur\u00e9e.<\/li>\r\n<\/ol>“,”foot_note”:”
      \r\n \t

    • * One sugar pumpkin (roughly 2 3\/4 pounds) yields\u00a0about 4 cups (720 g) of roasted pumpkin flesh and 3\/4 cup (75 g) seeds.<\/li>\r\n<\/ul>“}

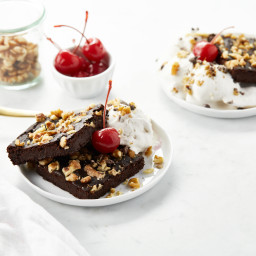
Fudgy Black Bean Brownies

{“head_note”:”Meet my all-time favourite black bean brownies! When you have an intense chocolate craving, there’s nothing better than these dense, rich, and fudgy\u00a0brownies. We\u2019ve made them countless times and they’re always a hit with everyone. Enjoy them on their own, or serve with vanilla ice cream and cherries for a sundae-like twist. Or, if you’d like to spread the brownies with a chocolate buttercream frosting, be sure to see my frosting recipe in the Tips section!”,”instructions”:”

    \r\n \t

  1. Preheat the oven to 350\u00b0F (180\u00b0C) and line an 8-inch square pan with two pieces of parchment paper, one going each way.<\/li>\r\n \t
  2. In a small bowl, whisk together the water, ground flax, and arrowroot powder until no clumps remain. Set aside for a few minutes to thicken.<\/li>\r\n \t
  3. Drain and rinse the black beans very well. Into a food processor, add all of the ingredients except the walnuts (drained beans, sugar, cocoa powder, melted oil\/butter, baking powder, vanilla, sea salt, and flax mixture). Process until smooth, scraping down the side of the bowl as needed. I like to let the processor run for a couple minutes to make sure it blends all the beans smooth. No one wants a bean chunk in a brownie, trust me!<\/li>\r\n \t
  4. Spoon the batter into the prepared pan. Spread out until smooth. Evenly scatter the walnuts on top, and gently press down.<\/li>\r\n \t
  5. Bake for 26\u00a0to 30\u00a0minutes, until firm to the touch.<\/li>\r\n \t
  6. Place the\u00a0pan on a cooling rack for 30 minutes.\u00a0Then place the pan in the freezer for around 20 minutes to expedite the cooling process (yes, I’m impatient!).<\/li>\r\n \t
  7. Remove the brownie slab from the pan and place it on a cutting board. Slice into 9 to 12 squares. The brownies can be wrapped and stored in the fridge for a few days, or in the freezer for 2 to 4 weeks.<\/li>\r\n<\/ol>“,”foot_note”:”
      \r\n \t

    • * To toast the walnuts, preheat the oven to 300\u00b0F (150\u00b0C) and spread the chopped walnuts onto a baking sheet. Toast for 9\u201312 minutes, until golden and fragrant.<\/li>\r\n \t
    • For the chocolate \u201cbuttercream\u201d recipe: In a medium bowl, add 2 tablespoons (30 g) vegan butter or coconut oil, 1\/2 cup + 2 tablespoons (80 g)\u00a0confectioner’s\u00a0sugar, 1\/4 cup (20 g) unsweetened cocoa powder, 3 to 5 teaspoons (15 to 25 mL) non-dairy milk, 1\/2 teaspoon pure vanilla extract, and a pinch of fine sea salt. Beat with an electric mixer until smooth. This recipe makes enough to thinly cover one batch of brownies.<\/li>\r\n \t
    • Make it nut-free: Omit the walnut topping.<\/li>\r\n<\/ul>“}

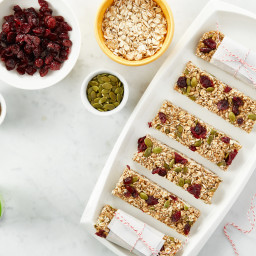
New Mama Glo Bars

{“head_note”:”I created these Glo Bars with new mamas in mind, but rest assured that they can be enjoyed by all! These nut-free Glo Bars contain oats, ground flax, sesame seeds, and coconut oil, all of which are thought to help boost milk supply in breastfeeding women. They are a great no-bake bar to store in the freezer before baby arrives, too; I love to keep a stash in my freezer so I always have some on hand. I purposely made these bars nut- and chocolate-free because, in some cases, these foods can contribute to fussy breastfed babies (of course, every baby is different\u2014tweak as you see fit!). But it also makes them a great nut-free option for after-school snacks, too!”,”instructions”:”

    \r\n \t

  1. Line a 9-inch square pan with a piece of parchment paper. I like to leave some overhang so the bars are easy to lift out after freezing.<\/span><\/li>\r\n \t
  2. In a large bowl, stir together the dry ingredients (oats, cereal, sesame seeds, pepita seeds, ground flaxseed, dried fruit, coconut, cinnamon, and salt).<\/span><\/li>\r\n \t
  3. Add the brown rice syrup into a small pot over low heat. Stir in the maple syrup, sunflower seed butter, and coconut oil until combined. When the mixture is warm and runny\u00a0remove from heat. Stir in the vanilla.<\/span><\/li>\r\n \t
  4. Immediately pour the brown rice syrup mixture over the dry ingredients (I use a spatula to scoop every last drop!) and with a large metal spoon, stir until the oats are fully coated in the syrup mixture. This can take some elbow grease, but we don\u2019t want any dry patches, so mix well. <\/span><\/li>\r\n \t
  5. Scoop the mixture into the prepared pan and spread out evenly. I like to lightly wet my hands and use them to spread the mixture out. Grab a small pastry roller if you have one, and roll the mixture until even and smooth. Or, simply press down firmly with your hands\u2014the more you pack down the mixture the better the bars hold together. Using your fingertips, press the mixture downward along the edges to create straight edges.<\/span><\/li>\r\n \t
  6. Place the pan in the freezer, uncovered, for about 10 to 15 minutes until the bars firm up enough to slice. Remove the slab and place on a cutting board. With a pizza slicer, slice the bars into 12 equal bars. <\/span><\/li>\r\n \t
  7. Wrap each bar separately in plastic wrap. Store in the fridge for up to 1 week, or freeze\u00a0the wrapped bars in a freezer-safe zip bag for 4 to 6 weeks.\u00a0The bars will firm up when chilled. You can let them sit at room temperature for 5\u201310 minutes before enjoying, if desired.<\/span><\/li>\r\n<\/ol>“,”foot_note”:”
      \r\n \t

    • * These bars are great with toasted sesame and pepita seeds, as well as raw.<\/li>\r\n \t
    • ** To make the bars look extra colourful, like in the photo, I like to scatter the dried cranberries on top (along with a handful of pepitas) before pressing the mixture into the pan.<\/li>\r\n \t
    • *** There are no substitutes for brown rice syrup unfortunately. I’ve tested all different liquid sweeteners and nothing else binds the bars enough.<\/li>\r\n \t
    • **** Organic Sunbutter (smooth) is my go-to store-bought brand. Make sure it’s silky smooth and not dry and hard.<\/li>\r\n<\/ul>“}

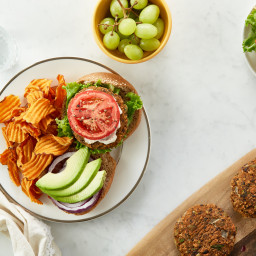
Oh Em Gee Veggie Burgers

{“head_note”:”Packed with sweet potato (or butternut squash\u2014your choice!), black beans, barbecue sauce, garlic, and an array of flavorful spices, this veggie burger bakes up perfectly and holds together well. I\u2019ll admit these burgers are a bit involved to prepare, but I think the work\u00a0is worth it, because this recipe makes a big batch, enough for 12 patties, which you can freeze for later. To save time, I recommend roasting the sweet potato, toasting the walnuts, and making the 9-Spice Mix in advance. Also, be sure to chop all the ingredients very finely and evenly, as this will help the patties hold together. I always recommend that you read the entire recipe before you begin, but this is especially true here since there are quite a few\u00a0steps.”,”instructions”:”

    \r\n \t

  1. Preheat the oven to 375\u00b0F (190\u00b0C). Line an extra-large baking sheet with parchment paper.<\/li>\r\n \t
  2. Peel the sweet potato and cut it into 1\/2-inch cubes. You should have about 4 cups. Spread the cubes over the baking sheet and toss with 1 tablespoon of oil. Season with salt. Roast for 15 minutes, then flip and roast for 15 to 20 minutes more, until fork-tender. <\/li>\r\n \t
  3. In a large skillet, toast the chopped walnuts over medium heat for 5 to 6 minutes, until fragrant and lightly golden. Transfer the walnuts to an extra-large bowl (trust me when I say extra-large<\/em> as there is a lot of dough to mix).<\/li>\r\n \t
  4. In the skillet, heat the remaining 2 teaspoons oil over medium heat. Add the onion and garlic, stir to combine, and saut\u00e9 for 3 to 5 minutes, until softened. Transfer to the bowl with the walnuts.<\/li>\r\n \t
  5. In a food processor, pulse the beans until you have a mixture of bean paste, chopped beans, and fully intact beans. Be careful not to overprocess them, as you still want a bit of texture. Transfer the beans to the bowl. (You can also mash by hand if necessary.)<\/li>\r\n \t
  6. Measure out 2 lightly packed cups of the roasted sweet potato and transfer to the large bowl. With a fork, mash the potato into the other ingredients in the bowl until the potato is almost smooth.<\/li>\r\n \t
  7. Add the 9-Spice Mix, salt, parsley, barbecue sauce, bread crumbs, and oat flour to the bowl. Stir until thoroughly combined. You can knead the dough together with your hands if that\u2019s easier, or just keep stirring (it\u2019s a great arm workout!). Taste and adjust the seasonings, if desired.<\/li>\r\n \t
  8. Scoop a heaping 1\/3 cup of the dough and shape it into a round, uniform patty, packing it tightly as you rotate the patty in your hands. Place the patty on the lined baking sheet. Repeat to make 11 or 12 patties total, setting them at least an inch apart.<\/li>\r\n \t
  9. Bake for 15 minutes at 375\u00b0F (190\u00b0C), gently flip with a spatula, and bake for 10 to 20 minutes more, until firm and lightly golden. Cool on a cooling rack for about 10 minutes before serving (this helps them firm up). Serve the patty in a bun along with your desired toppings. We love the combo of vegan mayo<\/a>, BBQ sauce, avocado, lettuce, and tomato!\u00a0<\/li>\r\n \t
  10. Let any leftover patties cool completely before storing in an airtight container in the fridge for up to 3 days. You can also wrap the patties individually in aluminum foil, place in a freezer bag with the air sucked out, and freeze for 3 to 4 weeks. Thaw completely on the counter or in\u00a0the fridge before reheating in a greased skillet over medium-high heat for a few minutes on each side.<\/li>\r\n<\/ol>“,”foot_note”:”
      \r\n \t

    • Tip<\/b> You will need 2 cups of roasted sweet potato (or butternut squash) for this burger recipe. Any leftover roasted potato or squash can be served alongside the burgers, so feel free to make extra.<\/li>\r\n \t
    • Make it gluten-free <\/b>Use gluten-free bread crumbs instead of spelt bread crumbs.<\/li>\r\n \t
    • Make it nut-free<\/b> Use hulled sunflower seeds or pepita seeds instead of walnuts.<\/li>\r\n \t
    • Make it kid-friendly<\/b> Shape small patties and serve them on slider buns. They are the perfect size for precious hands! You may also consider reducing the spice mix slightly depending on how much your kids enjoy spice.<\/li>\r\n<\/ul>“}

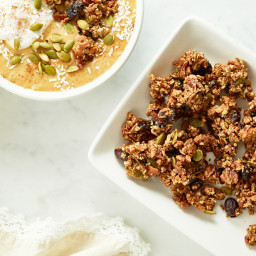
Grain-Free Pumpkin Spice Granola Clusters

{“head_note”:”Get ready for a fall-inspired granola that is going to rock your world! Pecans, almonds, dried cranberries, coconut, and pepita and sunflower seeds are combined with a delicious pumpkin pie spice mix, pure maple syrup, coconut oil, and vanilla for a granola that\u2019s naturally grain-free and incredibly tasty. Your fall and winter breakfasts will never be the same again! Since nuts can burn so easily, I love to slow bake this granola at a low temperature (275\u00b0F\/135\u00b0C) to ensure that it doesn\u2019t brown too quickly.”,”instructions”:”

    \r\n \t

  1. Preheat the oven to 275\u00b0F (135\u00b0C) and line an extra-large (or two standard-sized) baking sheet(s) with parchment paper.<\/span><\/li>\r\n \t
  2. Add the almonds into a food processor. Process for about 5 seconds, until the almonds are chopped. There will be quite a bit of \u201calmond powder\u201d but this is normal.<\/li>\r\n \t
  3. Add the pecans into the food processor along with the almonds. Process for just a few seconds more, until the pecans are chopped. Spoon the almond-pecan mixture into a large mixing bowl. You\u2019ll have a mix of chopped nuts and powder; add it all into the bowl.<\/li>\r\n \t
  4. To the bowl with the almonds and pecans, add the rest of the dry ingredients (cranberries, coconut, pepitas, sunflower seeds, cinnamon, ginger, nutmeg, allspice, and salt). Stir well to combine.<\/li>\r\n \t
  5. To the dry ingredients, add the maple syrup, melted oil, and vanilla. Stir very well, until the nut mixture is thoroughly coated and \u201cwet looking\u201d. Keep stirring until there are no dry patches at the bottom of the bowl.<\/li>\r\n \t
  6. Spoon the granola onto the prepared baking sheet(s) and spread it out into a thin layer (no more than 1\/4-inch width).<\/li>\r\n \t
  7. Bake the granola for 20 minutes. Remove from the oven and rotate the baking sheet. Return the granola to the oven to bake for another 14 to 18 minutes, until it\u2019s lightly firm and golden (be careful not to brown it).<\/li>\r\n \t
  8. Place the baking sheet on a cooling rack for 20 minutes then break it apart into clusters. Allow it to cool completely on the baking sheet before storing it. Store the granola in a glass jar in the fridge for 2 to 3 weeks, or freeze it in an airtight freezer bag for 4 to 5 weeks.<\/li>\r\n<\/ol>“,”foot_note”:”
      \r\n \t

    • *\u00a0I like Patience Fruit & Co brand of organic, naturally sweetened (with apple juice) dried cranberries. Feel free to use any kind you enjoy! For a fun twist, try swapping the dried cranberries for chopped pitted dates. (To make dates easier to chop, chill them in the fridge until firm.)<\/li>\r\n<\/ul>“}

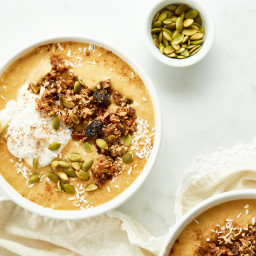
Pumpkin Pie Smoothie Bowl

{“head_note”:”This is my favourite fall-inspired smoothie bowl! Packed with pumpkin, cinnamon, ginger, coconut milk, and more, it\u2019ll have you in festive fall spirits in no time. Be sure to chill a can of light coconut milk before making this to ensure that your smoothie ends up nice and cold. I love topping this with Coconut Whipped Cream<\/a> and Grain-Free Pumpkin Spice Granola Clusters<\/a> for a smoothie bowl that feels decadent and healthy all at once.”,”instructions”:”

    \r\n \t

  1. Soak the pitted dates for 30 minutes in boiled water. This step simply softens the dates and helps the blender blend them smooth. (If you have a Vitamix, you can skip this soaking step as the machine is powerful enough on its own to blend the dates smooth.)<\/li>\r\n \t
  2. Place all ingredients into blender and blend until smooth. Feel free to adjust the sweetness and spices to taste and blend again.<\/li>\r\n \t
  3. Pour the smoothie into 2 shallow bowls. Add your desired toppings and serve immediately.<\/li>\r\n<\/ol>“,”foot_note”:”
      \r\n \t

    • To keep this smoothie bowl nut-free, simply omit the\u00a0Grain-Free Pumpkin Spice Granola Clusters, or use a nut-free granola.<\/li>\r\n<\/ul>“}