Category Archives: Uncategorized

Adriana’s Fave 10-Minute Pasta

{“head_note”:”I\u2019ve made this pasta countless times for our family; it\u2019s hard to beat how fast and nutritious it is, and it can be changed up so many ways. It packs in around 20 grams of protein and 11 grams of fibre per (adult-size) serving (depending on which kind of pasta you use, of course\u2014see my notes), not to mention healthy fats from the hemp hearts. My advice if you\u2019re in a rush is to start heating up the water first, before you gather any other ingredients, as it can take some time for the water to come to a boil. If you happen to have a batch of my Fail-Proof Marinara Sauce from Oh She Glows Every Day <\/i>(p. 175) on hand, it works wonderfully in this dish. Of course, store-bought marinara works just as well, too.”,”instructions”:”

    \r\n \t

  1. Add water into a large pot and bring to a boil over high heat. While you are waiting for it to boil, gather the rest of the ingredients. Once boiling, reduce the heat to medium, add the pasta, and stir with a wooden spoon. Cook the pasta according to the package directions, stirring every now and then to prevent the pasta sticking.<\/span><\/li>\r\n \t
  2. Drain the cooked pasta well and place it back into the pot. Stir in the marinara, hummus, and hemp hearts until combined. Taste and add a bit of salt or other mix-ins if desired.<\/span><\/li>\r\n \t
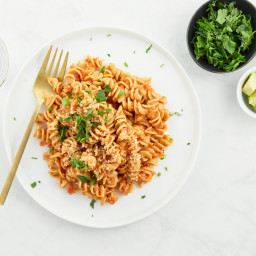
  3. Heat over low until warmed throughout. If serving this pasta to a little one, spread a scoop of pasta out on a plate to gently cool it before serving.<\/span><\/li>\r\n \t
  4. Leftovers can be stored in an airtight container in the fridge for a couple days. To reheat, add the pasta into a pot along with a bit of extra marinara sauce (this adds moisture back) and stir to combine. Heat over medium-low heat until warmed throughout.<\/li>\r\n<\/ol>“,”foot_note”:”* I typically use whole-grain kamut pasta. And sometimes, I mix in a bit of red lentil pasta for a protein boost. Feel free to use any kind of pasta you and your family enjoy!\r\n\r\n** To quickly thaw frozen peas, add them to the pot during the last minute or two of cooking the pasta.\r\n\r\n*** When I have time, I love to steam or boil carrots (or cauliflower) and then pur\u00e9e them until smooth. Then I stir the pur\u00e9ed veggies directly into the pasta. It\u2019s an easy way to add even more nutrition without impacting the flavour too much.\r\n\r\nThis pasta goes lovely with a simple side salad and garlic bread. If your little one isn’t a salad fan, try giving them small lettuce leaves for dipping into the dressing.”}

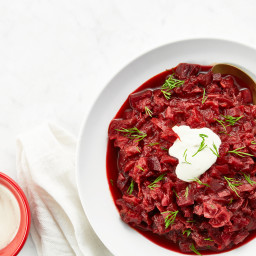
Hunky Heartbeet Cabbage Soup

{“head_note”:”You won\u2019t believe the gorgeous colours in this incredibly healthy, borscht-inspired soup, from the prep stage (gorgeous shades of plum and violet) to the final end result (a bold crimson red). It’s the perfect soup to celebrate Valentine’s Day (or really, to brighten up any chilly winter day). This soup takes an hour and a half to cook thanks to the raw beets, so be sure to give yourself enough time; the bonus is that you can cover it and walk away as it simmers. To avoid a longer cook time, chopping the beets very small (think pea- or almond-size) is key. A big thank-you to my Aunt Elizabeth for inspiring this soup.”,”instructions”:”

    \r\n \t

  1. Add the coconut oil into a large pot. Over medium heat, saut\u00e9 the onion for about 3 to 5 minutes, stirring once or twice.<\/span><\/li>\r\n \t
  2. Add the diced cabbage and beets. Stir again. Continue saut\u00e9eing for another few minutes.<\/span><\/li>\r\n \t
  3. Add all of the marinara sauce and the water. Stir to combine. Simmer the soup, covered, over low to medium heat for 1 hour and 30 minutes to 1 hour and 45 minutes, or until the beets are fork-tender. Your cook time may vary depending on how fresh your beets are and how small you chopped them. (If it\u2019s your first time cooking the soup, you may want to check on it a few times and stir to to make sure it\u2019s not sticking to the bottom of the pot.)<\/span><\/li>\r\n \t
  4. Taste and season with salt to taste. Ladle<\/span>\u00a0into a bowl and serve with a spoonful or swirl of Cashew Sour Cream and chopped dill if desired, but it’s great all on its own, too.<\/span><\/li>\r\n \t
  5. This soup will keep in the fridge in an airtight container for up to 1 week. It freezes beautifully, too: Simply cool the soup and place it into a freezer-safe container, leaving an inch of space at the top for expansion. Freeze for up to 2 months.<\/li>\r\n<\/ol>“,”foot_note”:”* To prevent staining your hands, wear disposable gloves while peeling and dicing the beets.\r\n\r\n** If you can find it, I highly recommend using White Linen Collection Marinara Sauce from Costco in this recipe. I use 1 full bottle, which works out perfectly to about 5 cups. It\u2019s my favourite store-bought marinara sauce (I have no affiliation with them, by the way, just passing along my personal recommendation!). My Fail-Proof Marinara Sauce from Oh She Glows Every Day <\/i>is also lovely in this soup!”}

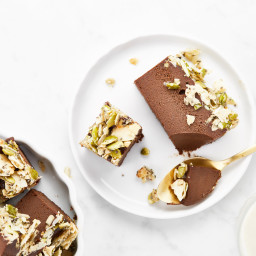
True Love Freezer Fudge

{“head_note”:”You won\u2019t believe this decadent chocolate freezer fudge and crunchy granola topping are nut-free, vegan, and grain-free! This dessert is the perfect way to celebrate your loved ones, and leftovers store well in the freezer for weeks to come.”,”instructions”:”

    \r\n \t

  1. Add the sunflower seeds into a medium bowl and cover with boiling water. Soak the seeds for about 90 minutes. Alternatively, you can soak the seeds in room-temperature water for about 8 hours. Rinse and drain well.<\/span><\/li>\r\n \t
  2. Meanwhile, prepare the Crunchy Coconut Granola Clusters<\/a>. <\/span><\/li>\r\n \t
  3. Grease a 9×5-inch loaf pan with oil, and then line it with parchment paper for easy removal.<\/span><\/li>\r\n \t
  4. Add the drained sunflower seeds, maple syrup, melted coconut oil, melted chocolate chips, cocoa powder, vanilla, and salt into a high-speed blender. <\/span><\/li>\r\n \t
  5. Blend the mixture until super smooth, stopping to scrape down the blender as needed. If you have a Vitamix, you can use the tamper stick to get the mixture moving.<\/span><\/li>\r\n \t
  6. Spoon the mixture into the prepared loaf pan.<\/span><\/li>\r\n \t
  7. Top with the granola clusters so they cover the entire top. Don\u2019t be shy; really pack them in (I like to press the granola pieces into the filling sticking up, for extra height). Press down gently to adhere.<\/span><\/li>\r\n \t
  8. Cover with wrap and place the pan into the freezer for around 5 hours, or overnight, until the chocolate fudge is firm throughout. <\/span><\/li>\r\n \t
  9. Run a knife around the edges to loosen the fudge from the pan<\/span> and then invert onto a cutting board, granola-side down. Peel away the parchment paper (it might be a bit tricky to remove, but this is normal). Flip the fudge granola-side up. Slice into squares and serve immediately.<\/span><\/li>\r\n \t
  10. Leftovers can be wrapped up and stored in an airtight container in the freezer for 3 to 6 weeks.<\/span><\/li>\r\n<\/ol>“,”foot_note”:”* Instead of using the Crunchy Coconut Granola Clusters, you can try store-bought granola or toasted nuts or seeds.\r\nA high-speed blender, such as a Vitamix, will yield the smoothest results. Some blenders might not be able to get the sunflower seeds smooth enough. I tried processing the filling in a food processor and it will work okay in a pinch, but the mixture didn\u2019t get as smooth as in the Vitamix.”}

Crunchy Coconut Granola Clusters

{“head_note”:”This easy granola is inspired by a grain-free granola from Costco that I love. The ingredient list is short so I figured that I could make it at home quite easily. My version swaps cane sugar out for pure maple syrup and brown rice syrup, and the end result is very similar to my favourite store-bought brand, but I think even tastier! Be sure to use large-flake dried coconut and not shredded coconut in this recipe, as the large-flake coconut is, in part, what makes it cluster-like.”,”instructions”:”

    \r\n \t

  1. Preheat the oven to 300\u00b0F (150\u00b0C) and line a large baking sheet with parchment paper.<\/li>\r\n \t
  2. In a medium pot, stir together the maple and brown rice syrup over medium heat. Just before the mixture begins to simmer, remove it from the heat. Stir in the vanilla.<\/li>\r\n \t
  3. To the pot, add the coconut, pepita, sunflower, and chia seeds, and salt. Stir well to combine. Keep stirring until the coconut is thoroughly coated in the syrup mixture.<\/li>\r\n \t
  4. Spoon the granola mixture onto the baking sheet and spread it out into a thin layer.<\/li>\r\n \t
  5. Bake the granola for 15 to 20 minutes, until lightly golden. Watch closely during the last 10 minutes of baking to avoid burning it.<\/li>\r\n \t
  6. Place the baking sheet onto a cooling rack and cool for 30 to 60 minutes before breaking the granola apart into clusters. <\/li>\r\n \t
  7. Once completely cool, store in an airtight container in the fridge for 1 to 2 weeks, or in the freezer for up to 1 month. <\/li>\r\n<\/ol>“,”foot_note”:””}

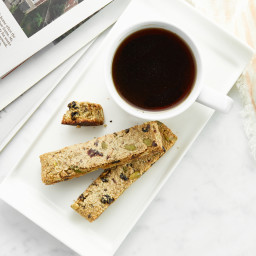
Power Biscotti

{“head_note”:”These crunchy snacks were specially designed to be nutrient-rich down to their last grain-free bite. Rather than grain-based flour, these biscotti are made with homemade sunflower seed flour. Dried fruit, pepitas, and cacao nibs are folded in to offer pops of texture, while pure maple syrup provides subtle sweetness. These biscotti make a fantastic energizing snack or breakfast that you can grab on your way out the door. Don’t forget to decrease the oven temperature to 275\u00b0F (135\u00b0C) after the first bake time or you’ll risk burning the biscotti during the second and third baking rounds. Shared<\/em>\u00a0from\u00a0Blissful Basil by arrangement with BenBella Books. Copyright\u00a0\u00a9 2016, Ashley Melillo. <\/i>The recipe below is lightly edited\u00a0to reflect my own testing process.”,”instructions”:”

    \r\n \t

  1. Preheat the oven to 350\u00b0F (180\u00b0C). Line a large baking sheet with parchment paper.<\/span><\/li>\r\n \t
  2. In a small mixing bowl, whisk together the ground flaxseed and water. Set\u00a0<\/span>aside for 5 minutes to thicken.<\/li>\r\n \t
  3. Meanwhile, add the sunflower seeds to a food processor and process for 45\u201360 seconds, or until you have a coarse flour or fine meal, stopping to pulse several times to ensure even processing. The texture should be flour-like; be careful not to overprocess or you\u2019ll end up with sunflower butter.<\/li>\r\n \t
  4. Transfer the sunflower flour to a large mixing bowl and whisk in the arrowroot and sea salt. Stir in the dried fruit, pepitas, and cacao nibs (if using).<\/li>\r\n \t
  5. Add the maple syrup and vanilla extract to the small mixing bowl with the flaxseed mixture and vigorously whisk to combine. Pour over the dry sunflower mixture, and use a large wooden spoon to mix well for about 30 seconds. At first it will seem like there isn\u2019t enough liquid, but keep stirring until the liquid is evenly dispersed and you have a damp dough.<\/li>\r\n \t
  6. Turn the dough out onto the lined baking sheet, and divide it into 2 equal pieces. Use lightly wet hands to shape and compact the dough into 2 tightly packed rectangles. Each rectangle should be approximately 4 \u00d7 6 inches, and just shy of 1 inch thick.<\/li>\r\n \t
  7. Bake for 18\u201322 minutes, or until the edges are light golden brown and each rectangle feels well set, yet retains a soft indentation when gently pressed. Remove from the oven and cool for about 20 minutes.<\/li>\r\n \t
  8. Meanwhile, decrease the oven temperature to 275\u00b0F (135\u00b0C).<\/li>\r\n \t
  9. Once the biscotti rectangles are mostly cool, use a sharp knife to cut them widthwise into 1-inch-thick slices, pressing straight down and rocking the knife back and forth to slice rather than using a sawing motion. You should have a total of 12\u201314 biscotti, 6\u20137 from each rectangle.<\/li>\r\n \t
  10. Carefully return the biscotti to the lined baking sheet, sliced-side down. Bake for 16\u201318 minutes. Then, carefully flip each biscotti, and bake for another 16\u201318 minutes, or until a light golden brown and crisp to the touch. They\u2019ll continue to crisp as they cool, so keep that in mind when testing for doneness.<\/li>\r\n \t
  11. Carefully transfer the biscotti to a wire cooling rack. Cool completely. Store in an airtight glass container to maintain crispness. They\u2019ll keep for up to 1 week at room temperature, or you can store them in the freezer for a bit longer.<\/li>\r\n<\/ol>“,”foot_note”:”Oven temperatures may vary greatly, so be sure to keep an eye on the biscotti during all three stages of baking to avoid burning it.”}

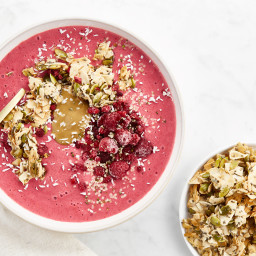
In the Buff Smoothie Bowl

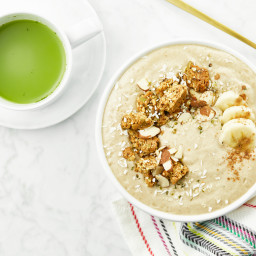
{“head_note”:”I just can’t get enough of this creamy, monochrome smoothie bowl! Packed with protein and healthy fats, it keeps me going all morning long, and its subtle, earthy flavours and thick texture are the perfect base for loading on all kinds of toppings.”,”instructions”:”

    \r\n \t

  1. Add 1 cup (250 mL) of\u00a0almond milk into a high-speed blender, followed by the rest of the ingredients. Blend until smooth. If necessary, add more milk to get the blender going.<\/li>\r\n \t
  2. Pour into a bowl, and add your desired toppings. Serve immediately and enjoy with a spoon!<\/li>\r\n<\/ol>“,”foot_note”:”* Be sure to use a large frozen banana or the texture of the smoothie bowl won’t be thick enough.\r\n\r\n** If you are omitting the protein powder, you can reduce the almond milk to 1 cup (250 mL), and add more from there if needed. I use Sunwarrior Warrior Blend protein powder in \”Natural\”. It’s important to use a neutral-flavoured protein powder so it doesn’t overwhelm the delicate flavours of the smoothie bowl.\r\n\r\n \r\n\r\nIf you want a bit of a kick flavour-wise, try adding some fresh ginger (to taste) to heighten the flavours.”}

Vegan Broccoli and Cheese Soup

{“head_note”:”Like a big, cozy sweater, this soothing soup will help you get through the long winter. It combines my love for broccoli and cheese sauce, while doing without the dairy-based cream or cheese. This is a bit of a fussy soup (think weekend<\/i>, not weeknight) as it involves a few homemade components (cheese sauce, soup, and homemade croutons), so you\u2019ll need an hour start to finish. If you can make the cheese sauce the day before, that\u2019ll help streamline things!\r\n\r\nThis soup is adapted from my 2011 version<\/a>. The cheese sauce is lightly adapted from my cheese sauce in Oh She Glows Every Day.”,”instructions”:”

    \r\n \t

  1. For the cheese sauce: Place the potatoes and carrots in a medium pot and add water to cover. Bring to a boil over high heat, reduce the heat to medium, and simmer uncovered for 10 to 15 minutes, until fork-tender. Drain. <\/li>\r\n \t
  2. While the potatoes and carrots are simmering, add the nutritional yeast, oil, water, lemon juice, salt, garlic, and vinegar into a high-speed blender and set aside.<\/li>\r\n \t
  3. Chop the onions, garlic, celery, broccoli, and potatoes for the soup and set aside. <\/li>\r\n \t
  4. When the simmering potatoes and carrots are fork-tender, drain them and add to the blender. Blend the cheese sauce until smooth, then transfer to a bowl.<\/li>\r\n \t
  5. For the soup: In a large pot, saut\u00e9 the oil, onion, and garlic over medium heat, stirring frequently. Cook for about 3 to 5 minutes.<\/li>\r\n \t
  6. To the pot, add the celery, broccoli, and potatoes and saut\u00e9 for a few minutes more. Now, add the broth, nutritional yeast, cayenne pepper, lemon juice, salt, and pepper. Cover and simmer over medium heat for about 13 to 15 minutes, until the potatoes are fork-tender. Turn off the heat and let the soup sit for a few minutes. Add the chickpea miso.<\/li>\r\n \t
  7. Carefully transfer the soup into a blender (you might have to do this in two batches). Blend until smooth and place back into the pot. <\/li>\r\n \t
  8. Set aside 1\/4 cup (60 mL) of cheese sauce for garnish. Add the rest of the cheese sauce into the soup and stir to combine. Adjust seasonings to taste if desired.<\/li>\r\n \t
  9. Ladle the soup into bowls and swirl in a tablespoon of the reserved cheese sauce into each bowl. Top with Pan-Fried Garlic Croutons, paprika, and parsley, if desired.<\/li>\r\n<\/ol>“,”foot_note”:”* To cut down on cooking time, be sure to dice the potatoes and carrots very small.\r\n\r\n** Refined coconut oil doesn\u2019t have a coconut flavour, which is why I love it in the cheese sauce. Grapeseed oil also has a neutral flavour, but if you don\u2019t have either you can probably get away with a light-tasting olive oil.\r\n\r\n*** I love chickpea miso, it\u2019s light in flavour and often soy-free (be sure to check the label, though). If you can\u2019t find chickpea miso, any light or white miso should do the trick! I like a full 3 teaspoons of chickpea miso in this soup, but depending on the flavour of your miso you might prefer a bit less.\r\n\r\n**** Instead of bread-based croutons, you can top this soup with my Roasted Chickpea Croutons<\/a>.”}

Easy Nut-Free Taco Salad

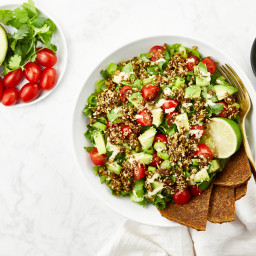
{“head_note”:”This is my quick and easy taco salad; it\u2019ll only set you back about 15 minutes of prep work, and it\u2019s super satisfying and delicious! The sun-dried tomato\u2013pepita taco crumble adds a lovely taco flavour, as well as satiating protein, fibre, and healthy fats. If you have some on hand, this salad is also great topped with Cashew Sour Cream<\/a> (of course, this would mean adding nuts to the recipe).”,”instructions”:”

    \r\n \t

  1. For the hummus dressing: In a small bowl, stir together the hummus, lemon juice (or vinegar), and salt until smooth. If it\u2019s too thick, add a bit of olive oil to thin it; if it\u2019s too thin, add a bit more hummus and stir again.<\/li>\r\n \t
  2. Prepare the taco crumble: Add the sun-dried tomatoes into a food processor. Process until finely chopped. Now add the pepitas, oil, chili powder, cumin, garlic powder, optional cayenne, and salt, and process for a few seconds until roughly chopped. Adjust seasonings to taste, if desired.<\/li>\r\n \t
  3. Assemble the salad bowls: Grab two large, shallow bowls. Divide the salad ingredients among the two bowls equally, layering each ingredient on top of the romaine (in any order you like), as well as the taco crumble and the hummus dressing. Serve with corn chips or tortilla wedges and sliced lime to drizzle over top.<\/li>\r\n<\/ol>“,”foot_note”:”* To save time, I love buying pre-roasted and salted pepitas to use in this taco crumble.”}

Dill Pickle Smoothie

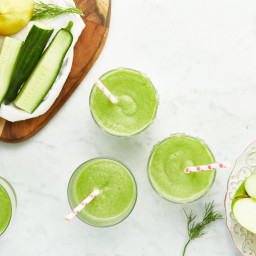
{“head_note”:”If you are anything like me, you are both intrigued and horrified by this smoothie name. But trust me when I say that this combo of ingredients is surprisingly delightful!\u00a0This savoury and tangy, yet lightly sweet smoothie packs an unexpected flavour punch. It\u2019s so refreshing and oddly addictive, and it\u2019ll make you feel cleansed, light, and energized. This recipe is adapted with permission from The Perfect Blend Cookbook by Tess Masters (Ten Speed Press, 2016).”,”instructions”:”

    \r\n \t

  1. Add all of the ingredients except the ice into a high-speed blender. Blend on high until smooth. (You can add a bit more water, if needed, to get the machine blending.)<\/span><\/li>\r\n \t
  2. Add the ice and blend again until smooth. Taste and adjust the ingredients if desired. Serve cold.<\/li>\r\n<\/ol>“,”foot_note”:””}

Brownie Breakfast Bake

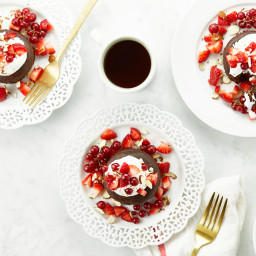
{“head_note”:”This ultra dense brownie bake is about as healthy as it gets! Sweetened with overripe bananas and a small amount\u00a0of pure maple syrup, we think it\u2019s passable for breakfast. Be sure to use very ripe, spotty, almost black bananas for the sweetest flavour. It’s\u00a0great for a healthy snack or breakfast when you want something that feels indulgent without sabotaging your healthy eating plans, and its dense texture makes it quite filling too. I love it topped with Coconut Whipped Cream<\/a>\u00a0(homemade or store-bought) and fresh berries.”,”instructions”:”

    \r\n \t

  1. Preheat the oven to 350\u00b0F (180\u00b0C). Lightly grease 4 small ramekins with oil and place them onto a baking sheet.<\/li>\r\n \t
  2. Add all of the bake ingredients into a food processor and process until smooth, stopping to scrape down the bowl as needed.<\/li>\r\n \t
  3. Divide the batter among the ramekins, adding about 1\/2 cup (125 mL) batter per ramekin.<\/li>\r\n \t
  4. Bake for around 30 to 35 minutes, until the tops slowly spring back when pressed lightly with a finger. The tops will also be lightly cracked.<\/li>\r\n \t
  5. Place the ramekins onto a cooling rack for 30 minutes or so. <\/li>\r\n \t
  6. Using a butter knife, loosen the cake from the edges of the ramekin and pop out onto a plate. Top with coconut whipped cream, nuts, and berries. It’s also lovely spread with nut or seed butter and jam. Leftovers can be wrapped up and stored in the fridge for a few days or in the freezer for a couple weeks or longer.<\/li>\r\n<\/ol>“,”foot_note”:”* Be sure to use overripe, black and spotty bananas for the sweetest flavour.”}