Category Archives: Uncategorized

Zucchini Bread Muffin Tops

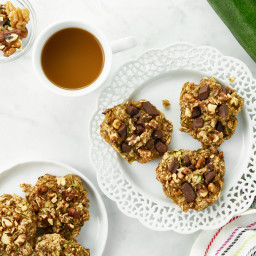
{“head_note”:”These chewy zucchini bread muffin tops make a great running-out-the-door breakfast or snack, and kids adore them, too! Naturally-sweetened with applesauce and dates, they have no added sugars (the optional chocolate chunks can easily be swapped for walnuts), and they pack in 1 1\/2 cups of grated zucchini. One of my favourite things about these muffin tops\u2014aside from the great taste, of course\u2014is that they aren\u2019t crumbly once cooled, so they\u2019re virtually mess-free (a huge bonus if feeding young kids) and pack well for outings, picnics, and road trips. #winning”,”instructions”:”

    \r\n \t

  1. Preheat oven to 350\u00b0F (180\u00b0C) and line a large baking sheet with parchment paper.<\/span><\/li>\r\n \t
  2. Grate the zucchini. With paper towel or an absorbent tea towel, gently press out some of the water in the zucchini (just a bit…it doesn\u2019t have to be bone dry). Set aside.<\/span><\/li>\r\n \t
  3. Add the pitted dates, applesauce, melted oil, cinnamon, baking powder, vanilla, and salt into a heavy-duty food processor. Process until smooth, stopping to scrape down the bowl as needed. Let the processor run for at least a minute to ensure the mixture gets as smooth as possible.<\/span><\/li>\r\n \t
  4. Add in 1 1\/2 cups of rolled oats and process for only 4 to 5 seconds, just long enough to roughly chop the oats.<\/span><\/li>\r\n \t
  5. Remove the processor bowl from the base, remove the blade, and spoon the dough into a large bowl. Stir in the remaining 1\/2 cup rolled oats, all the zucchini, and the chocolate or walnuts (if using) until thoroughly combined.<\/span><\/li>\r\n \t
  6. Spoon a mound of dough, about 2 to 3 tablespoons worth, onto the baking sheet.<\/span> Do not press down on the dough to flatten\u2014simply leave it in a small mound. <\/span>Repeat until all the dough is used up.<\/span><\/li>\r\n \t
  7. Bake the muffin tops for around 18 to 22 minutes, until semi-firm to the touch and golden brown on the bottom.<\/span><\/li>\r\n \t
  8. Transfer the baking sheet onto a cooling rack for 10 minutes. <\/span><\/li>\r\n \t
  9. Using a spatula, carefully slide each muffin top directly onto a plate and chill in the fridge until completely cool. (The muffin tops will be delicate and doughy in the middle until they are cooled and chilled in the fridge. I find they taste best chilled, too!) Leftovers will keep in an airtight container in the fridge for 4 to 5 days, or you can freeze them (tightly wrapped and sealed in an airtight container) for 2 to 4 weeks.<\/span><\/li>\r\n<\/ol>“,”foot_note”:”* I use the regular-size grate hole on the grater box. This produces muffins with visible strands of zucchini. If you\u2019d like the zucchini completely undetectable, you can try using the finest grate hole. Just keep in mind that zucchini that’s grated more finely will pack more densely when measuring, so you may want to use only 1 cup as opposed to 1 1\/2 cups.\r\n\r\n** Make sure you use very soft Medjool dates. If your dates are firm, soak them in hot water until softened (and then drain) before proceeding with recipe.\r\n\r\n \r\n\r\nWant in on a little secret? I save dirtying a mixing bowl and carefully stir the 1\/2 cup of oats, zucchini, and mix-ins directly into the processor bowl. It\u2019s not an easy feat (which is why I provided the mixing bowl option), but because my processor is fairly large, with some finesse I can make it work. Feel free to use whichever method you prefer!”}

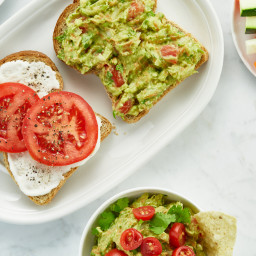
Nutrient-packed Guacamole

{“head_note”:”This guacamole is hiding a nutritious secret\u2014finely grated zucchini and carrots that take this already-healthy dip to the next level! It\u2019s a great way to sneak in more veggies, especially for kids. (Of course, the recipe works without the carrots and zucchini, too.) Serve this hearty guacamole with corn chips or sliced veggies, on top of a big salad, or spread on toast (guacamole toast, anyone?!).”,”instructions”:”

    \r\n \t

  1. Place the avocado flesh into a medium bowl and mash it with a fork until your desired texture is achieved. <\/span><\/li>\r\n \t
  2. Stir in the rest of the ingredients until combined. Taste, and adjust lime juice and salt, if desired. Serve immediately. Guacamole is best served fresh, but leftovers can be stored in an airtight container in the fridge for up to 24 hours. To help keep it fresh, I like to press plastic wrap directly onto the guacamole before sealing the container with a lid. Stir the leftover dip before serving.<\/span><\/li>\r\n<\/ol>“,”foot_note”:”* Use the finest grate hole on the grater box so the zucchini and carrots are less noticeable.\r\n\r\n \r\n\r\n** If you aren\u2019t a big fan of raw onions, you can rinse the onion in a colander and drain it well before stirring it into the guacamole. This helps cut the sharpness a bit. Or, you can simply reduce the amount of onion called for, adding it to taste.”}

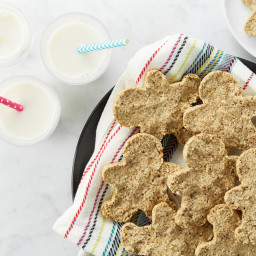
Healthy Kiddo Cookies

{“head_note”:”These crispy, chewy cookies are reminiscent of Scottish oatcakes, with an almond flare and a hint of maple. I made them so I\u2019d have a healthy go-to treat for my toddler and baby. Despite being incredibly wholesome and low in sugar, kids adore these cookies (and adults do, too!). They\u2019re really easy to make, and fun to shape with different cookie cutters. Smaller cookies will cook faster, so keep an eye on them and start at the low end of the bake-time range. If feeding a baby, be sure to consult with your pediatrician before introducing solids, including the (potentially allergenic) ingredients listed below, and always supervise little ones during feeding.”,”instructions”:”

    \r\n \t

  1. Preheat the oven to 350\u00b0F (180\u00b0C) and line a large baking sheet with parchment paper. <\/span><\/li>\r\n \t
  2. Add the almonds to a food processor and process until they\u2019re the texture of sand. Be careful not to overprocess them, or the almonds will break down into butter.<\/span><\/li>\r\n \t
  3. To the almonds in the food processor, add the melted oil, rolled oats, oat flour, salt, cinnamon, and maple syrup. Process until the mixture comes together into a uniform dough.<\/span><\/li>\r\n \t
  4. Add the water to help the dough get a tiny bit stickier, and process again. The dough should easily stick together when pressed between your fingers. <\/span><\/li>\r\n \t
  5. Place a cookie cutter onto the baking sheet. Press a spoonful or two of dough into the cookie cutter until it\u2019s flat and even (aim for 1\/4 to \u00bd inch thickness). Gently pop out the shaped cookie onto the parchment paper. Repeat this process until you have used up all of the dough.<\/span><\/li>\r\n \t
  6. Bake the cookies for 12 to 15 minutes, until the cookies are semi-firm to the touch. (They <\/span>won\u2019t<\/span><\/i> be golden around the edges when you take them out, but they\u2019ll be golden on the bottoms.) <\/span><\/li>\r\n \t
  7. Place the baking sheet on a cooling rack for 5 minutes, and then with a spatula, carefully transfer each cookie to the cooling rack until completely cool. Leftovers can be stored in an airtight container in the fridge for 5 to 7 days. You can\u00a0also freeze them for 2 to 4 weeks, wrapped up tightly, and placed\u00a0in an airtight container.\u00a0<\/span><\/li>\r\n<\/ol>“,”foot_note”:”* I have yet to land on a nut-free version worth sharing, but when I do I will share it in this tip section!\r\n\r\n \r\n\r\n**Store-bought oat flour can taste bitter depending on the brand, so I recommend making your own oat flour at home if you can (it\u2019s so fast and fresh!). To make your own oat flour, add a slightly heaping 1\/2 cup of rolled oats into a high-speed blender. Blend on high until a fine flour forms.\r\n\r\n \r\n\r\nFor a decadent version of these cookies, try dipping half of each cookie into melted dark chocolate. Chill the cookies until the chocolate hardens.”}

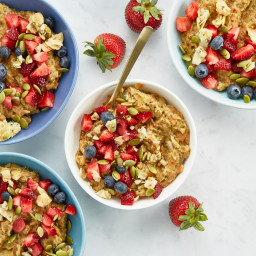
Superfood Porridge

{“head_note”:”I developed this recipe so I\u2019d have a super-nutritious, go-to porridge for my baby and toddler (and the adults too!). This thick and hearty porridge is naturally sweetened with mashed banana and finely shredded carrot, and it\u2019s packed with superfoods like chia seeds and hemp hearts. I love to stir in some finely grated zucchini, as well, upping the veggie goodness even more. If I\u2019m thinking ahead, I\u2019ll mix the oatmeal together before bed so it can soften and thicken in the fridge overnight. Soaking cuts down the cook time drastically\u2014all you have to do in the morning is throw it into a pot and heat it until creamy. Of course, you can prepare it from scratch in the morning, too. And my kids also enjoy this porridge chilled, so that\u2019s a good option if it\u2019s summer or if you just don\u2019t have time to heat it up. If serving this to a baby who\u2019s still on pur\u00e9es, you can throw this oatmeal into a blender or food processor (adding a splash of water or milk, if necessary) and process it for a smoother texture.”,”instructions”:”

    \r\n \t

  1. In a medium bowl, mash the banana until almost smooth. Place it into a medium pot.<\/span><\/li>\r\n \t
  2. Peel the carrots. Using the fine grate hole on a box grater, grate the carrots and measure \u00be to 1 lightly packed cup. Place the carrot into the pot with the banana. If using, grate the zucchini (again using the smallest grate hole) and place it into the pot, too.<\/span><\/li>\r\n \t
  3. Add the rolled oats, milk or water, chia seeds, and optional dash of salt into the pot. Stir well until combined.<\/span><\/li>\r\n \t
  4. Set over medium heat and cook the oats uncovered, stirring frequently and reducing heat if the oats stick to the bottom, for about 10 to 15 minutes, until the oats are softened and the mixture thickens. (If you soaked the oatmeal overnight, simply heat it and serve.)<\/span><\/li>\r\n \t
  5. At the end of cooking, stir in the cinnamon to taste and all the hemp hearts.\u00a0<\/span><\/li>\r\n \t
  6. Serve and enjoy with your desired toppings. Leftovers will keep in the fridge in an airtight container for a couple days. To reheat, transfer oatmeal into a pot on the stovetop and heat over medium heat, stirring in a splash of water or milk to thin if necessary.<\/span><\/li>\r\n<\/ol>“,”foot_note”:”To save on cooking time, combine the ingredients in a bowl and let the porridge soak in the fridge (covered) overnight. In the morning, simply stir and heat on the stovetop, adding more water or milk if desired.\r\n\r\nThis recipe yields a very thick oatmeal (and it thickens even more when chilled). Feel free to use more liquid if you prefer a thinner consistency.”}

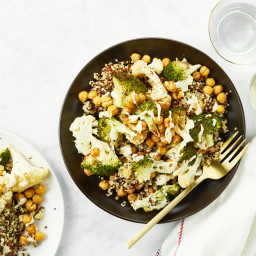
Roasted Buddha Bowl

{“head_note”:”If you think you\u2019re not a fan of cauliflower or broccoli, this might just be the recipe that changes your mind. Roasted to perfection and served with an addictive (seriously, addictive<\/i>) cashew-based garlic lemon tahini sauce, these veggies get downright dreamy. The addition of roasted chickpeas boosts the dish to a full-blown meal, and lends it a delightful crunch, too. I love serving it on a bed of warm quinoa. Pro tip: The dressing recipe makes only half a cup (125 mL), so if you\u2019re someone who likes a lot of dressing with your bowls (or even a versatile dressing for workweek lunches!), I recommend doubling it.”,”instructions”:”

    \r\n \t

  1. Soak cashews in a bowl of water overnight or for at least 8 hours. For a quick-soak method, pour boiling water over the cashews and let sit in the bowl for at least 45 minutes. Drain.<\/li>\r\n \t
  2. Preheat the oven to 400\u00b0F (200\u00b0C) and line two large baking sheets with parchment paper.<\/li>\r\n \t
  3. Place the chopped broccoli and cauliflower onto one baking sheet. (If it doesn\u2019t all fit on one, you can add some onto the second sheet.) Drizzle with 1 tablespoon oil and toss until coated. Sprinkle with a generous amount of salt and pepper. Place into the oven.<\/li>\r\n \t
  4. Place a tea towel on the counter and spread out the drained chickpeas. Fold the sides of the towel over the chickpeas to cover, and roll the chickpeas around until dry. Transfer chickpeas onto the parchment-lined baking sheet. Drizzle with 1 teaspoon oil and roll around the chickpeas with your hands until they are fully coated. Sprinkle with salt and place into the oven.<\/li>\r\n \t
  5. Roast the broccoli, cauliflower, and chickpeas for 25 to 30 minutes, until the broccoli and cauliflower are lightly browned and the chickpeas are golden. (At the halfway mark you can give the chickpea pan a gentle shake to roll them around in the pan.)<\/li>\r\n \t
  6. Meanwhile, add all of the dressing ingredients into a blender and blend on high speed until smooth. If you are cooking grains, such as quinoa, cook them now, too.<\/li>\r\n \t
  7. Plate the cooked grains (if using), and top with the roasted broccoli, cauliflower, and chickpeas. Drizzle on a generous amount of dressing. Season with salt and pepper, and any desired spices (I like to add smoked paprika and\/or cayenne pepper, too).<\/li>\r\n \t
  8. If you have leftover dressing, it will keep for up to 5 days in the fridge in a sealed container. The dressing will thicken as it sits (especially when chilled), so you can add more water to thin out as necessary, or simply allow it to come to room temperature before serving. Any leftover grains, chickpeas, and veggies will keep in a sealed container in the fridge for up to a few days. I tend to reheat them in a skillet with some oil over medium heat.<\/li>\r\n<\/ol>“,”foot_note”:”Need a nut-free dressing? Try this Lemon Tahini dressing<\/a> on for size.”}

Feel Good Hearty Granola Bars

{“head_note”:”Hearty, soft-baked, and chewy, these no-sugar-added granola bars will fill up the tank and keep your energy stable. Feel free to play around with the mix-ins, as the recipe is quite adaptable. Also, if you\u2019re feeding a nut-free crowd, you can easily swap out the walnuts and almonds for more seeds (or chocolate chips, if you\u2019re feeling wild!).”,”instructions”:”

    \r\n \t

  1. Preheat the oven to 350\u00b0F. Lightly grease a large rectangular baking dish (approximately 9\” x 13\”) and line with a piece of parchment paper (with overhang) so the bars are easier to remove.<\/span><\/li>\r\n \t
  2. In a large bowl, mash the banana until smooth. Make sure you have 1 1\/2 cups (if you have extra\u00a0mashed banana, you can freeze it for a smoothie). <\/span><\/li>\r\n \t
  3. Stir in the vanilla.<\/span><\/li>\r\n \t
  4. Place the oats into a food processor (or blender set on the lowest speed) and pulse until the oats are coarsely chopped (but still have lots of texture). Stir the chopped oats into the banana mixture until fully incorporated.<\/span><\/li>\r\n \t
  5. Stir the dried fruit, walnuts, sunflower and pepita seeds, almonds, hemp hearts, cinnamon, and salt into the banana-oat mixture until thoroughly combined. The dough will be very heavy and a bit wet.<\/span><\/li>\r\n \t
  6. Spoon the mixture into the prepared dish. With lightly wet hands, smooth out until even and uniform. Press down on the dough until compacted. <\/span><\/li>\r\n \t
  7. Bake for 22 to 26 minutes, until firm and lightly golden along the edges. <\/span><\/li>\r\n \t
  8. Place the dish on a cooling rack for 10 minutes, then carefully slide a knife to loosen the ends and gently lift out. Place the slab on a cooling rack until completely cool.<\/span><\/li>\r\n \t
  9. Once cool, slice into bars. I like to use a pizza slicer as it easily cuts through the dried fruit and nuts. Leftovers can be wrapped up and stored in the fridge for a week, or stored in the freezer for 4 to 6 weeks.<\/span><\/li>\r\n<\/ol>“,”foot_note”:”* You can omit the dried fruit and sub in chocolate chips (or add a mix of both).\r\n\r\nThese bars aren’t super sweet, so if you prefer something sweeter you may want to add a touch of sweetener.\r\n\r\nTo store these in the freezer, wrap the bars individually in parchment paper using 6-inch by 12-inch pieces of parchment, then tie with string or tape to secure. Finally, place all of the bars into a freezer-safe zip bag, press out all the air, and seal it shut. Or, you can simply wrap each bar with plastic wrap or tinfoil.\r\n\r\n \r\n\r\nApproximate nutritional info: (per bar, based on 14 large bars using 1\/2 cup dried sweetened cherries): 186 calories, 8.7 grams fat, 22 grams carbs, 4.7 grams fibre, 6 grams sugar, 6.6 grams protein. Without dried cherries, bars have approx. 3.6 grams of sugar and 166 calories.”}

Vegan Cream Cheese Frosting

{“head_note”:”This sweet and tangy vegan cream cheese frosting is so easy to make, and it\u2019s the perfect topping for my Vegan Cinnamon Rolls<\/a>. It keeps well in the fridge, so you can make it in advance and store it in an airtight container in the fridge until you need it.”,”instructions”:”

    \r\n \t

  1. In a large bowl, beat the butter, cream cheese, and vanilla together with an electric mixer until smooth. <\/li>\r\n \t
  2. Slowly add in the powdered icing sugar, a bit at a time, and beat until smooth. Add almond milk, a teaspoon at a time, to thin as desired; beat after each addition. Leftovers can be stored in the fridge in an airtight container for 3 to 5 days.<\/li>\r\n<\/ol>“,”foot_note”:”* If your vegan butter is very firm, you can leave it at room temperature to soften a bit before starting this recipe.\r\n\r\nIf the frosting becomes too thin, add a bit more icing sugar and beat again.”}

Classic Cinnamon Rolls

{“head_note”:”Fluffy cinnamon rolls topped with a sweet and tangy cream cheese frosting; these are great to whip up for special occasions or laid-back weekend mornings. There are quite a few steps, but don\u2019t panic! I promise, as long as you read everything over before you begin, you’ll be fine\u2014they’re actually quite easy to make. Even though this recipe technically requires about 2 hours and 45 minutes total time, only 30 to 40 minutes of that are active. The remainder is rest and bake time, during which I encourage you to kick up your feet and relax! See my tips below for how to make these the night before, too. I adapted this recipe from my Pumpkin Pie Cinnamon Rolls<\/a> (2010).”,”instructions”:”

    \r\n \t

  1. Set aside a 9- by 13-inch casserole dish.<\/li>\r\n \t
  2. For the yeast: In a small bowl, add the warm water. Make sure it\u2019s not too hot; it should feel like warm bath water (approximately 110\u00b0F\/45\u00b0C). Stir in the sugar until mostly dissolved. Now, stir in the yeast until dissolved. Set aside for about 6 to 7 minutes so the yeast can activate (it\u2019ll look foamy when ready).<\/li>\r\n \t
  3. For the dough: Flour a working surface for later. Add 2 cups of flour into a large mixing bowl.<\/li>\r\n \t
  4. Melt 1\/3 cup butter in a small saucepan over low heat. Remove the pot from the burner and stir in the almond milk, 1\/3 cup sugar, and salt. The mixture should be lukewarm\u2014if it\u2019s any hotter let it cool off for a minute. Stir in all of the yeast mixture until just combined.<\/li>\r\n \t
  5. Pour the wet yeast mixture over the flour and stir with a large wooden spoon. Stop mixing once all of the flour is incorporated and it looks a bit like muffin batter, about 15 seconds.<\/li>\r\n \t
  6. Add in the remaining 1\/2 cup and 3 tablespoons flour. Mix with a spoon for several seconds. Lightly oil your hands and roughly knead the mixture until it comes together into a shaggy, sticky dough. It\u2019ll probably stick to your fingers (even with the oil), but that\u2019s normal. Turn the dough out onto the floured surface.<\/li>\r\n \t
  7. Knead the dough for about 3 to 4 minutes until it\u2019s no longer sticky to the touch; it should be smooth and elastic. While kneading, sprinkle on a small handful of flour whenever the dough becomes sticky to the touch. Don\u2019t be afraid to add some flour; I probably use between 1\/2 and 3\/4 cup while kneading. Shape the dough into a ball.<\/li>\r\n \t
  8. Wash out the mixing bowl and dry it. Oil the bowl (I love to use a spray oil for ease) and place the ball of dough inside. Flip the dough around so it gets lightly coated in the oil. Tightly cover the bowl with plastic wrap and place it in the oven with the light on (or simply in a warm, draft-free area). Let the dough rise for 60 minutes.<\/li>\r\n \t
  9. Meanwhile, make the cinnamon sugar filling. In a small bowl, mix 1\/2 cup sugar and the cinnamon and set aside.<\/li>\r\n \t
  10. Make the pan sauce: In a small pot, melt 1\/2 cup butter (you can use the unwashed pot from before). Remove half of the melted butter (eyeballing it is fine) and put it in another small bowl (this will be spread onto the rolled-out dough before adding the cinnamon sugar). With the scant 1\/4 cup melted butter remaining in the pot, stir in the 2 1\/2 tablespoons of brown sugar until combined (this is the pan sauce). Pour the pan sauce into a 9- by 13-inch casserole dish and spread it out.<\/li>\r\n \t
  11. After the first dough rise, re-flour your working surface and grab a rolling pin. Roll the dough into a large rectangle, approximately 20 by 14 inches.<\/li>\r\n \t
  12. With a pastry brush, spread the remaining melted butter onto the dough, covering the entire surface. Sprinkle on all of the cinnamon sugar filling, leaving a 1\/2 inch around the edges without any sugar.<\/li>\r\n \t
  13. Grab the end of the dough (short side of rectangle) and roll it up, rolling as tightly as possible. Place it seam-side down once it\u2019s rolled up. Use a serrated knife to slice 1 1\/2 inch\u2013thick rolls. You should have 10 to 12.<\/li>\r\n \t
  14. Grab your cut rolls and place into the prepared pan, cut-side down, a few inches apart from one another. Cover the pan with plastic wrap, place into the oven with the light on, and allow them to rise for 45 minutes.<\/li>\r\n \t
  15. Meanwhile, prepare the Vegan Cream Cheese Frosting<\/a>.<\/li>\r\n \t
  16. After the second rise, remove the rolls from the oven and preheat the oven to 350\u00b0F (180\u00b0C).<\/li>\r\n \t
  17. Remove the plastic wrap. Bake the rolls for 23 to 26 minutes at 350\u00b0F (180\u00b0C), until lightly golden in a few spots. Remove from oven and allow the rolls to cool for about 10 minutes.<\/li>\r\n \t
  18. Frost the rolls with the cream cheese frosting. Slide a butter knife around each cinnamon roll and lift it out. (Alternatively, you can pop them out first and frost each roll individually.) Serve immediately and enjoy!<\/li>\r\n \t
  19. If you have leftovers, you can wrap them up and chill them in the fridge for up to 48 hours. I like to reheat unfrosted rolls in the oven on a baking sheet for 5 minutes at 350\u00b0F (180\u00b0C). The oven returns them to their amazing gooey-soft state! Alternatively, you can freeze the cooled unfrosted rolls (wrap them in a layer of plastic wrap, followed by tinfoil) for a week or two. To reheat, simply unwrap and pop them frozen onto a baking sheet and into the oven for 10 to 12 minutes at 350\u00b0F (180\u00b0C)\u00a0until warmed throughout. The edges get a bit crispy, and it\u2019s oh so good!<\/li>\r\n<\/ol>“,”foot_note”:”Want cinnamon rolls prepped for breakfast the next day? Simply follow the recipe until you complete the second rise. Place the wrapped dish in the fridge overnight. In the morning, remove the dish from the fridge and let the rolls sit in the oven with the light on for about 20 minutes. After that, remove the dish from the oven and preheat the oven to 350\u00b0F (180\u00b0C). Remove the plastic wrap, and bake as directed. They can be prepped up to 18 hours in advance. Just be sure to cover the dish tightly with plastic wrap while in the fridge.”}

Peanut Butter Eggs

{“head_note”:”These peanut butter eggs are a cinch to throw together, and they\u2019re healthier than store-bought versions, using just a fraction of the sweetener and doing without any butter. My peanut butter eggs are naturally sweetened with pure maple syrup, which pairs delightfully with the salted peanut butter flavour. They\u2019re chewy inside with a \”crack\” of chocolate that quickly melts in your mouth!”,”instructions”:”

    \r\n \t

  1. Line a large plate with parchment paper and set aside. <\/span><\/li>\r\n \t
  2. Stir your peanut butter well before measuring to make sure there isn\u2019t a lot of oil sitting on top. <\/span><\/li>\r\n \t
  3. In a medium bowl, stir the peanut butter, salt, and maple syrup vigorously for 30\u201360 seconds, until the mixture thickens up. <\/span><\/li>\r\n \t
  4. Stir in the coconut flour until combined, starting with a teaspoon. We’re looking for a texture that isn’t too sticky, but isn\u2019t too dry either. Let it sit for a couple minutes to thicken slightly, as the coconut flour will continue to absorb moisture over time. If your peanut butter mixture is still very sticky, you can add a touch more coconut flour and stir again. <\/span><\/li>\r\n \t
  5. Spoon about 1 1\/2 tablespoons of dough into your hand and form it into an egg shape (or you can use an egg mold if you have one), then place it on the lined plate; repeat until no more dough remains. Chill in the freezer for about 20 to 30 minutes until firm. <\/span><\/li>\r\n \t
  6. A few minutes before the eggs are finished chilling, add the chocolate chips and coconut oil into a small pot and heat over the lowest heat setting, stirring frequently (alternatively, you can use a double boiler). Stir until the chocolate is completely smooth, and then turn off the heat.<\/span><\/li>\r\n \t
  7. Rest an egg on a fork and dip it into the melted chocolate until it\u2019s completely coated. Tap off excess chocolate on the side of the pot and place the egg back on the lined plate. <\/span>Immediately add on some sprinkles<\/span> before the chocolate sets. Repeat for the rest. (If at any point the melted chocolate starts to thicken [this could happen due to the coldness of the eggs], simply add a tiny bit of coconut oil and gently warm the chocolate over low heat, stirring until combined.)<\/span><\/li>\r\n \t
  8. Place the plate in the freezer for around 10 to 15 minutes until the chocolate is firm. Leftover eggs can be stored in the fridge in an airtight container for 2 to 3 days. They are best enjoyed fresh though as the peanut butter has a tendency to dry out with time.<\/span><\/li>\r\n<\/ol>“,”foot_note”:”* I recommend only using 100% natural peanut butter for this recipe. You only want to see roasted peanuts on the label. The no-stir<\/i> kinds made with oil and sugar might not work the same way. The PB I use is quite runny. If your PB seems dry, you probably won’t need to use all of the coconut flour.\r\n\r\n \r\n\r\nIf you have any leftover melted chocolate and you don\u2019t want it to go to waste, simply spoon it onto a parchment lined plate (or into a silicone mold) and freeze it until firm.”}

Butternut Squash Mac ‘n Cheese

{“head_note”:”Creamy, cheesy, comforting\u2014and healthy, too\u2014what more could you want from a pasta dish? The original recipe was posted on my blog way back in 2011, and it quickly became one of my most popular recipes. I’ve now tweaked it slightly (mainly, streamlined the directions and added more flavour to the sauce), and I think it’s better than ever. We just can’t get enough! If you want a super-fast weeknight option, feel free to use canned butternut squash pur\u00e9e in lieu of the roasted squash.”,”instructions”:”

    \r\n \t

  1. Preheat the oven to 425\u00b0F (220\u00b0C). Line a large baking sheet with parchment paper. Lightly spray or brush the oil onto the orange flesh of each squash half. Garnish with salt and pepper. Place the halves cut-side down on the baking sheet. Roast for about 35 to 50 minutes, uncovered, until a fork or knife easily slides through the squash. The skin will be lightly browned and the squash may be brown in some spots (which only adds to the flavour). <\/span><\/li>\r\n \t
  2. When there are about 20 minutes left of the squash\u2019s roasting time, cook the pasta according to the package directions. Drain. <\/span><\/li>\r\n \t
  3. After the squash is finished cooking, flip it flesh-side up and let it cool for 10 minutes or so before handling.<\/span><\/li>\r\n \t
  4. Into a blender, add the cheese sauce ingredients (butter, milk, starch, nutritional yeast, Dijon, garlic and onion powder, lemon juice, salt, pepper, and miso) along with 1 lightly packed cup of the roasted squash (simply spoon it out of the skin and measure). Blend on high until smooth. <\/span><\/li>\r\n \t
  5. Add the cooked and drained pasta back into the pot and stir in all of the cheese sauce. Chop the leftover squash into small cubes, scoop the cubes out of the skin, and add them into the pot (along with any other mix-ins you like). Heat over medium and stir until thickened. Add more salt and pepper to taste (and more lemon juice if you want a bit more brightness). Serve immediately.<\/span><\/li>\r\n<\/ol>“,”foot_note”:”* For a quick and easy option, swap the roasted butternut squash for 1 cup of canned butternut squash or pumpkin pur\u00e9e. It works well and is great for time-crunched weeknight meals. Instead of roasting squash halves, you can save a bit of time by purchasing pre-chopped fresh squash, too.\r\n** You can probably substitute the vegan butter for a light-tasting oil, such as grapeseed oil or refined coconut oil.\r\n\r\nMake it nut-free: Use a nut-free plant-based milk. Just be sure it’s unsweetened and unflavoured.”}