Category Archives: Uncategorized

Triple Almond Energy Balls

{“head_note”:”I love energy balls because they\u2019re infinitely customizable and so easy to take on the go. I like to grab a couple straight from the freezer and pop them into a small glass jar to throw in my purse on busy days. They\u2019re perfect for for tiding you over until mealtime, and this Triple Almond Energy Ball recipe is toddler-approved, too\u2014just be sure to cut them up into small pieces as ball shapes are a choking hazard. Their rich, nutty \u00a0flavour comes from using whole almonds, roasted almond butter, and almond extract. A true triple threat!! You may recognize the flavour from my Triple Almond Thumbprint Cookies in Oh She Glows Every Day<\/i>. I just can\u2019t get enough of almond extract\u2014I find it really heightens the flavour in almond-based recipes!”,”instructions”:”

    \r\n \t

  1. Add the almonds and cashews to a food processor and process into a coarse crumb. Be sure not to overprocess the nuts into butter.<\/span><\/li>\r\n \t
  2. To the nut mixture, add the pitted dates. Process again until the dates are finely chopped. <\/span><\/li>\r\n \t
  3. Next, add the roasted almond butter (or raw cashew butter, if using), cinnamon, salt, almond extract, and water (starting with a couple teaspoons) to the processor bowl and process again until the mixture comes together into a dough. You should be able to easily roll the dough into balls without them feeling dry or crumbly. If the dough is too dry, add more water one teaspoon at a time and continue processing until the mixture moistens to desired consistency.<\/span><\/li>\r\n \t
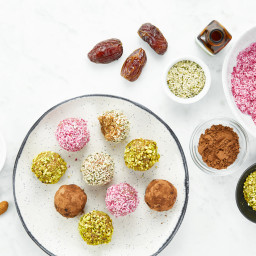
  4. Roll the dough into\u00a011 to 12 golf ball-sized balls. If using, roll each ball in your garnish of choice: shredded coconut, hemp hearts, ground shelled pistachios (or other nuts), or cocoa powder. (If the garnishes aren’t sticking, you can lightly wet the balls with water before rolling.)<\/span><\/li>\r\n \t
  5. Chill the balls in the freezer for about an hour to firm up, or feel free to eat them at room temperature if you can\u2019t wait that long! Leftover balls will keep in an airtight container in the freezer for a few weeks. You can also store them in the fridge in an airtight container for several days if you prefer. <\/span><\/li>\r\n<\/ol>“,”foot_note”:”* You\u2019ll want to make sure the dates are very well packed into the measuring cup. If your dates are very firm and dry, I also recommend soaking them in hot water for about half an hour, and then draining well before using as directed.\r\n\r\n** The amount of water you will need will depend on how fresh and sticky your Medjool dates are.\r\n\r\n \r\n\r\nThese energy balls have a soft texture. If you prefer a crunchier consistency, you can roll the balls in ground nuts or stir some chopped nuts or chocolate into the dough itself.\r\n\r\n \r\n\r\nTo make the pink shredded coconut, I mixed unsweetened shredded coconut with a bit of beet juice.”}

Easy Vegan Sugar Cookies

{“head_note”:”These wholesome vegan sugar cookies come together in a snap\u2014there\u2019s no waiting for the dough to chill before you roll it out, so you can have a batch of tender cookies out of the oven in less than 30 minutes! With lightly golden bottoms, crisp outer edges, and soft, delicate centres, these cookies are a perfect light-tasting base for my festive,\u00a0naturally coloured pink frosting. If you aren\u2019t planning to frost your cookies, you may want to add a touch more cane sugar to sweeten the dough. The cookies aren\u2019t overly sweet as-is, but the frosting really makes them pop!”,”instructions”:”

    \r\n \t

  1. Preheat the oven to 350\u00b0F (180\u00b0C) and line one very large baking sheet (or two medium-sized sheets) with parchment paper. <\/span><\/li>\r\n \t
  2. To a small bowl, add the wet ingredients: grapeseed oil, maple syrup, almond milk, brown rice syrup, ground flaxseed, and vanilla. Whisk until combined.<\/span><\/li>\r\n \t
  3. To a large bowl, add the dry ingredients: almond flour, spelt flour, arrowroot starch, cane sugar, salt, and baking soda. Whisk until combined. <\/span><\/li>\r\n \t
  4. Pour the wet mixture over the dry mixture and stir until it comes together as a heavy dough. Knead the dough a few times with your hands until no patches of flour remain on the bottom of the bowl. Be careful not to overwork the dough. If the dough is too dry, add almond milk one teaspoon at a time and knead until the desired consistency is reached. If the dough is too wet, add more spelt flour and knead again. Shape the dough into a large ball, then break it so you are left with two even halves. <\/span><\/li>\r\n \t
  5. Place a nonstick mat or large piece of parchment paper on the counter. Place one ball of dough in the middle and cover the ball with a second piece of parchment paper. Using a rolling pin, roll out the dough until it is 1\/8- to 1\/4-inch thick. Be careful not to roll the dough too thinly or the cut-out shapes will break as you transfer them to the baking sheet. Cut the rolled-out dough into shapes using your desired cookie cutters. Carefully transfer each cookie onto the prepared baking sheet(s), placing each an inch apart. Repeat this process until you\u2019ve used up all of the remaining dough.<\/span><\/li>\r\n \t
  6. Bake the cookies for 7 to 9 minutes until their bottoms are very lightly goldened (the cookies should not bake to golden brown or they\u2019ll become too crisp after cooling). Cool the cookies completely on the baking sheet.<\/span><\/li>\r\n \t
  7. Meanwhile, prepare the Pink Frosting: In a small bowl or mug, combine the beet powder along with 1 teaspoon of very hot water. Whisk until the beet powder is dissolved. Set aside.<\/span><\/li>\r\n \t
  8. Add the vegan butter to a large bowl. With electric beaters, beat the butter until smooth, then add the powdered sugar, milk, and salt as well as 1\/2 teaspoon of the prepared beet juice. Starting on low speed, beat until smooth, <\/span>gradually increasing the speed as the ingredients combine<\/span>. If the frosting is too thick, you can thin it with a bit more almond milk and continue beating until smooth. If it\u2019s too thin, you can add a little more powdered sugar and beat again until smooth.<\/span><\/li>\r\n \t
  9. Spread or pipe the frosting onto the cooled cookies and top with sprinkles (if using). Serve and enjoy! Leftover cookies can be stored in an airtight container in the fridge for 1 to 2 days, or tightly wrapped and frozen for up to 4 weeks.<\/span><\/li>\r\n<\/ol>“,”foot_note”:”* Instead of light spelt flour, you can use 3\/4 cup plus 2 tablespoons (150 g) white all-purpose flour. The flavour won\u2019t be as complex or nutty as the spelt version, but it\u2019ll work in a pinch. Alternatively, you can use 1 1\/4 cups (200 g) whole-grain spelt flour. If using whole-grain spelt flour, I suggest shaving a minute off the bake time. This version produces the most wholesome and earthy flavour of the bunch, and yields a denser cookie, too. Another option is to sift the whole-grain spelt flour before using to refine its texture. In order, my preferred flour variations would be: light all-purpose spelt flour, regular all-purpose flour, and whole-grain spelt flour last.\r\n\r\n \r\n\r\n** You can probably sub the arrowroot starch with cornstarch, but I haven\u2019t tested it.\r\n\r\n \r\n\r\n*** If you don’t have beet powder on hand feel free to use your desired red food colouring. Beet juice may work, too!\r\n\r\n \r\n\r\nTo keep this recipe soy-free, be sure to use a soy-free vegan butter in the frosting.”}

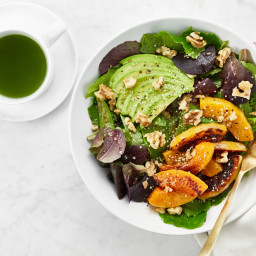
Vitamin Glow Warm Squash Salad

{“head_note”:”This is a simple, warming salad that\u2019s been on my regular lunch rotation all winter long! It\u2019s so comforting and the vitamin A in the squash gives my skin a\u00a0revitalizing pick-me-up. I\u2019ve used butternut squash in this recipe, but feel free to use any variety of winter squash you have on hand. And if you\u2019d like to throw some other veggies onto the pan while you roast the squash, be my guest\u2014this hearty salad can be easily customized to suit your preferences and pantry! The directions are written so the recipe serves 4 people, but if you\u2019d like to make a single serving at a time, you can find my method in the tips section below.”,”instructions”:”

    \r\n \t

  1. For the butternut squash: Preheat the oven to 400\u00b0F (200\u00b0C), and line a large baking sheet with parchment paper. Peel, halve, and seed the squash. Slice the squash into 1\/2-inch wedges. Transfer to the baking sheet and toss with the tablespoon of oil. Spread the squash into an even layer and season generously with salt. Roast for 30 to 40 minutes, flipping once halfway through until the squash is fork tender and lightly browned. <\/span><\/li>\r\n \t
  2. Meanwhile, prepare the Garlic-Dijon Vinaigrette: Finely grate or mince the garlic and place it into a small glass jar. Add the vinegar, oil, lemon juice, Dijon, salt, pepper, and maple syrup. Secure the lid and shake vigorously until combined. Taste the dressing and adjust the oil, salt, and maple syrup, if desired. You can also make the dressing in a blender or food processor, if you\u2019d prefer.<\/span><\/li>\r\n \t
  3. When the squash is nearly finished roasting, begin building your salad bowls: Portion 2 to 3 handfuls of the baby romaine\/mixed greens into four large shallow bowls. Drizzle a tablespoon of dressing over each bowl and toss until the greens are fully coated. <\/span><\/li>\r\n \t
  4. Divide the sliced avocado, walnuts, and hemp hearts into four portions, and evenly distribute on top of each bowl. <\/span><\/li>\r\n \t
  5. When the squash is finished roasting, transfer several wedges directly from the pan to the top of each bowl. Finish each salad with a sprinkle of salt, pepper, and garlic powder, as well as a final drizzle of dressing. Serve immediately. <\/span><\/li>\r\n<\/ol>“,”foot_note”:”* Feel free to use toasted walnuts, if you prefer, but rest assured that raw work wonderfully too!\r\n\r\n \r\n\r\nYou can absolutely make this salad for a single portion too! To build just one salad, I suggest portioning each ingredient as follows: approximately 2 handfuls of greens, 1\/4 of a large avocado (sliced), 3\/4 cup\u00a0warm roasted squash, 1 to 2 tablespoons vinaigrette (to taste), 2 heaping tablespoons of chopped walnuts, and 1\/2 tablespoon of hemp hearts.\r\n\r\n \r\n\r\nAny leftover squash can be easily reheated over the next few days. Here is how I like to warm up leftover roasted squash: Coat a large skillet with oil and add your leftover cooked squash with a pinch of salt. Saut\u00e9 over medium-high heat for about 5 minutes, until warmed through.”}

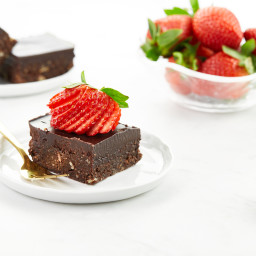
Two-Layer Raw Chocolate Brownies

{“head_note”:”Who knew fudgy, decadent brownies could be so packed with protein, omega-3 fatty acids, fibre, and antioxidants? Don\u2019t let the healthy, wholesome ingredients fool you though; these no-bake brownies will blow your mind with their intense chocolatey flavour and satisfyingly dense, chewy texture.”,”instructions”:”

    \r\n \t

  1. Line a 9×5-inch loaf pan (or an 8-inch square pan for thinner brownies) with a piece of parchment paper, leaving some overhang to remove the brownies in one piece.<\/span><\/li>\r\n \t
  2. Place 1 cup of walnuts into a food processor and process to a fine crumb. Be careful not to overprocess, as too much break-down will turn the walnuts into butter.<\/span><\/li>\r\n \t
  3. To the food processor, add the hemp seeds and pitted dates and process until finely chopped and sticky. <\/span><\/li>\r\n \t
  4. Add the cacao powder (or cocoa powder, if using), vanilla, and salt and process until thoroughly combined. The dough should be slightly sticky; if it\u2019s not, add water one teaspoon at a time and process the mixture again. I often add 1 to 3 teaspoons of water to achieve the right consistency.<\/span><\/li>\r\n \t
  5. Add the 1\/3 cup walnuts and 2 tablespoons raw cacao nibs (or additional chopped walnuts if using), and pulse the batter until just combined. <\/span><\/li>\r\n \t
  6. Spoon the mixture into the prepared pan and spread it out evenly. If you have a pastry roller on hand, you can use it to roll the dough until smooth on top. Otherwise, simply press the dough down with your hands and ensure the edges are even. Place the pan in the freezer for about 10 minutes.<\/span><\/li>\r\n \t
  7. Prepare the homemade chocolate: Melt the coconut oil over low heat in a medium pot. Remove the pot from the heat and whisk in the cacao powder (or cocoa powder, if using), syrup, salt, and vanilla until smooth and thoroughly combined.<\/span><\/li>\r\n \t
  8. Remove the brownies from the freezer and pour on all of the chocolate topping. Carefully transfer the pan back to the freezer and let rest on a flat, even surface. Chill uncovered for at least 20 minutes, or until the topping is firm enough to slice. You might find the homemade chocolate will freeze a bit unevenly, but this is normal! <\/span><\/li>\r\n \t
  9. To remove the brownies, run a knife under hot water for a minute or so and carefully slide it along the ends of your pan to loosen the slab. Using the excess parchment paper, lift the brownie slab out of the pan and place it onto a cutting board. Run the knife under hot water again and wipe off excess water. Pressing the knife down slowly, slice the brownies into squares. Top with strawberries, if using.<\/span><\/li>\r\n \t
  10. Leftovers can be stored in an airtight container in the fridge for several days, or tightly wrapped and frozen for 1 to 2 months. You can enjoy the brownies frozen, chilled from the fridge, or at room temp…your choice! I personally love them semi-frozen.<\/span><\/li>\r\n<\/ol>“,”foot_note”:”* You\u2019ll want to use soft, fresh Medjool dates for this recipe to\u00a0ensure your batter is sticky enough. If your dates are firm, try soaking them in water for 30 to 60 minutes\u2014drain well and use as directed.\r\n\r\n** Instead of the homemade chocolate topping, you can melt 3\/4 cup non-dairy chocolate chips in a small pot over the lowest heat, stirring until smooth.”}

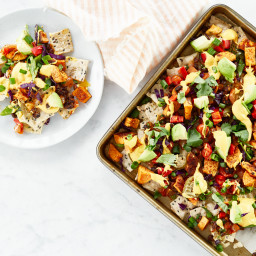
Cheerful Vegan Nachos

{“head_note”:”My family and I were getting a bit tired of our regular weeknight dinners so I came up with this crowd-pleasing nacho plate to freshen things up. It can also make for a cozy date-night-in meal alongside a good movie or game! The beauty of this recipe is that you can make a couple components in advance, and pick and choose which store-bought foods you\u2019d like to include to save time (like salsa or guacamole). I encourage you to customize this nacho plate to your heart\u2019s content! If you\u2019re looking to cut down on prep work, you can make the All-Purpose Vegan Cheese Sauce and Spicy Black Beans in advance (they\u2019ll keep in the fridge for a few days) so there\u2019s less you\u2019ll need to do the day of.”,”instructions”:”

    \r\n \t

  1. Begin preparing the All-Purpose Vegan Cheese Sauce by soaking 1\/4 cup cashews in a small bowl of boiling water for at least 30 to 60 minutes.<\/li>\r\n \t
  2. Prepare the All-Purpose Vegan Cheese Sauce. While you\u2019re making the cheese sauce, preheat the oven to 400\u00b0F (200\u00b0C) and line a medium rimmed baking sheet with parchment paper. Set the cheese sauce aside once prepared.<\/li>\r\n \t
  3. Spread the chopped sweet potato onto the parchment-lined roasting pan and toss with the oil. Sprinkle with a generous amount of salt and chili powder. Roast for 25 to 30 minutes, until the bottoms are lightly charred.<\/li>\r\n \t
  4. While the potatoes are roasting, prepare the Spicy Black Beans found in my DIY Burrito Bowl recipe (linked in ingredient list). After cooking, leave the beans in the skillet so you can reheat them just before layering onto the nachos.<\/li>\r\n \t
  5. Gather and prep any fresh toppings you\u2019d like to use so they\u2019re ready to go.\u00a0Please note my measurements are simply a guide. Feel free to add as much or as little of each as you wish!<\/li>\r\n \t
  6. On a medium rimmed baking sheet or platter (if your sweet potatoes are finished roasting, feel free to set them aside and re-use the same sheet here), spread a layer of chips to cover the base entirely.<\/li>\r\n \t
  7. For warm nachos, reheat the Spicy Black Beans in the skillet and the All-Purpose Vegan Cheese Sauce in your microwave or a small pot on the stovetop.<\/li>\r\n \t
  8. Now it\u2019s time to dress up those nacho chips! Layer the beans first before adding cheese sauce, roasted sweet potatoes, avocado (or guacamole, if using), green onion, pickled jalape\u00f1os, roasted red pepper, cabbage, cilantro, and salsa. Season with salt and serve immediately.<\/li>\r\n<\/ol>“,”foot_note”:”* You may have leftover cheese sauce, but because blending a half-batch can be difficult, I suggest preparing the whole recipe as directed. I love having leftovers on-hand to mix into pasta, top off a bowl of chili, layer on a wrap, etc.\r\n\r\n** You could also switch things up by using my Lentil-Walnut Taco Meat<\/a> in place of the Spicy Black Beans! I\u2019d recommend preparing the taco meat with canned lentils so it comes together quickly.\r\n\r\n*** Looking for a guacamole recipe? Try The Freshest Guacamole in Oh She Glows Every Day<\/i><\/a>, p. 65.\r\n\r\n**** My go-to brand of pickled jalape\u00f1os is Sunshine Farms Organic Pickled Jalape\u00f1os. If you don\u2019t have any on hand, feel free to drizzle Sriracha or hot sauce for a little extra heat.\r\n\r\n***** For a delicious homemade salsa, try my Fresh Cherry Tomato Salsa in Oh She Glows Every Day<\/i>, p. 63. Store-bought works too, though!\r\n\r\n \r\n\r\nIf you prefer a more classic take on cheesy nachos, you can also add a layer of shredded vegan cheese before the avocado (or guacamole), salsa, and cilantro. Pop the nachos in the oven for a few minutes, top with remaining fresh ingredients, and serve.”}

Whole-Grain Carrot Cake Loaf with Lemon Glaze

{“head_note”:”A carrot cake loaf that\u2019s wholesome enough to enjoy for breakfast?! Yes please! Spiced with cinnamon, vanilla, and ginger, this beauty will fill your house with a delicious scent as it bakes. The loaf is naturally sweetened with maple syrup, and a lemon-cashew-coconut glaze gives the whole thing a fresh, zingy kick.”,”instructions”:”

    \r\n \t

  1. Preheat the oven to 350\u00b0F (180\u00b0C) and line a lightly oiled 8×4-inch loaf pan with parchment paper. <\/li>\r\n \t
  2. In a large bowl, mix the grated carrot, ground flax, maple syrup, almond milk, oil, vanilla, and vinegar until thoroughly combined. <\/li>\r\n \t
  3. In that same bowl, one-by-one, stir in the dry ingredients: cinnamon, ginger, baking powder, baking soda, salt, flour, and half of the chopped walnuts. Mix until just combined.<\/li>\r\n \t
  4. Pour the batter into the prepared loaf pan and smooth evenly with a spoon. Sprinkle the remaining walnuts on top of the loaf and press them gently into the surface. <\/li>\r\n \t
  5. Bake for 40 to 50 minutes (I bake for 45 minutes) until the loaf springs back slowly when touched and a toothpick inserted into the middle comes out clean. <\/li>\r\n \t
  6. Meanwhile, prepare the glaze. Combine the cashew butter, coconut cream, maple syrup, lemon zest, and salt in a blender or food processor. Blend or process until smooth. If it’s too thick you can thin it with a bit of almond milk.<\/li>\r\n \t
  7. After baking, place the loaf on a rack to finish cooling. The loaf is delicate so I don’t suggest slicing until completely cooled.<\/li>\r\n \t
  8. Once cool, slice the loaf, drizzling the lemon glaze on individual portions just before serving. <\/li>\r\n<\/ol>“,”foot_note”:”* Please use the finest grate hole on the grater box.\r\n\r\n** You can use any light-tasting oil you prefer. I\u2019ve used light olive oil with success as well. If you use melted coconut oil, be sure that the rest of your wet ingredients are at room temperature to avoid seizing the oil.\r\n\r\n*** I expect all-purpose spelt flour will work just fine here too. Whole wheat pastry flour or sifted whole wheat flour should also work fine, but they may require extra baking time.\r\n\r\n**** Please use the thick, full-fat white cream found at the top of the can.\r\n\r\n \r\n\r\nMake it nut-free: Omit the walnuts to make this loaf nut-free. For a super-fast, nut-free lemon glaze you can whisk 1\/2 cup powdered icing sugar with 1 tablespoon fresh lemon juice (or more to taste).”}

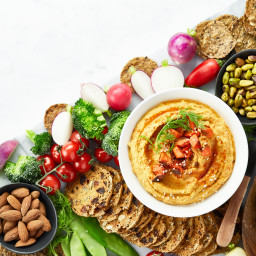
Roasted Carrot and Dill Hummus

{“head_note”:”Roasted carrots and fresh dill lend this creamy hummus a lightly sweet and tangy flavour that\u2019s downright irresistible! This recipe was love at first bite and has since claimed the number 1 spot in my homemade hummus repertoire. Because this version calls for roasted carrots, I sometimes like to make the most of that oven time by roasting a few extra veggies alongside for dipping. This hummus is lovely layered in wraps or sandwiches, paired with crackers and veggies, spread on toast, or served on top of warm veggie bowls or salads\u2014or just eaten with a spoon (you know I do). I encourage you to play around with the amount of dill, lemon, oil, and\/or garlic to find your <\/i>perfect version. I purposely kept the lemon and dill pretty light so that you can tweak to taste.”,”instructions”:”

    \r\n \t

  1. Preheat oven to 400\u00b0F (200\u00b0C) and line a roasting pan with parchment paper. <\/span><\/li>\r\n \t
  2. Spread the diced carrots on the roasting pan. Toss them in the teaspoon of oil and sprinkle with a pinch of salt. Roast for 32 to 37 minutes, until carrots are fork-tender and blackened on the bottom.<\/span><\/li>\r\n \t
  3. About 5 to 10 minutes before your carrots are done roasting, place the garlic and fresh dill into a large food processor. Process until minced. <\/span><\/li>\r\n \t
  4. Drain the chickpeas over a small bowl, reserving the chickpea brine, if using.<\/span><\/li>\r\n \t
  5. Next add the drained chickpeas, tahini, lemon juice, chickpea brine (or filtered water, if using), oil, and salt. Process until smooth, stopping to scrape down the side of the processor as necessary. <\/span><\/li>\r\n \t
  6. When the carrots are ready, carefully transport them to the processor using the parchment paper as a handle to carry. Process the mixture again until smooth. I like to let the machine run for a couple minutes so it gets as smooth as possible. Taste and adjust ingredients as desired. Feel free to add more dill, lemon, salt, oil or water depending on your preferences. <\/span><\/li>\r\n \t
  7. Serve the hummus with a sprinkle of ground cumin, coriander, and fresh minced dill, plus a drizzle of sesame or olive oil, if desired. Leftover hummus will keep in an airtight container in the fridge for about 5 to 7 days.<\/span><\/li>\r\n<\/ol>“,”foot_note”:”* If using freshly cooked chickpeas, please use only 1 cup. For some reason when using freshly cooked chickpeas, this hummus turns out on the thicker side. To keep from throwing off the other flavours, I recommend using just 1 cup of freshly cooked chickpeas in place of the 1 1\/2 cups found in a 14-ounce can. This version will also produce a slightly smaller yield.\r\n\r\n \r\n\r\n** Chickpea brine (or aquafaba) is simply the liquid found in a can of chickpeas. I find using aquafaba yields a creamier hummus, but the difference is slight. Feel free to use regular ol\u2019 water if you wish!”}

New Year Glow Smoothie Bowl

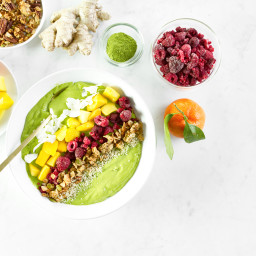
{“head_note”:”This creamy, dreamy, tropical green smoothie bowl is perfect for giving yourself a bright boost during the winter months! Mango and clementine add a tangy burst of flavour, and these nutrient-packed fruits are a great way of sneaking in some extra vitamin C during cold and flu season, too. Anti-inflammatory ginger is great for digestion, and avocado lends this smoothie bowl a thick, creamy texture. If serving to kids, you may want to omit the matcha green tea powder (due to its caffeine content) and ginger (which can be a bit spicy for little ones). If you\u2019d like a portable smoothie on-the-glow<\/i>, feel free to thin it out with more liquid and pour into a thermos for easy drinking. Since there\u2019s no banana in this smoothie, I find that it can be made the night before without impacting overall flavour and texture the next day.”,”instructions”:”

    \r\n \t

  1. Add the water into a high-speed blender followed by the rest of the smoothie bowl ingredients. Blend on high until smooth.<\/span><\/li>\r\n \t
  2. Pour into a bowl and add toppings as desired. Serve and enjoy!<\/li>\r\n<\/ol>“,”foot_note”:”* Feel free to use coconut water if you like a sweeter smoothie.\r\n\r\n** If your blender has a hard time blending dates smooth, you may want to swap the date out for a teaspoon or two of pure maple syrup. It also helps to use a very fresh date as they\u2019re softer and blend easier. You may also be able to omit the date all together and use coconut water as your base for sweetness.\r\n\r\n*** You can find the recipe for this granola in Oh She Glows Every Day<\/i>, p. 33.\r\n\r\n**** If fresh berries are out of season, feel free to use frozen or swap them with banana slices for your topping.”}

Vegan Peppermint Patty Slice

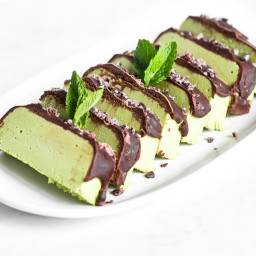
{“head_note”:”This peppermint patty is a showstopping dessert that’s coloured naturally with spinach\u2014though only you and I will know its nutritious secret! As an added bonus it\u2019ll only set you back 15 minutes of prep. The filling calls for at least 4 hours of freezing time, so I like to whip it up before bed to pop in the freezer overnight. This way, all I have to do the next day is add the ganache on top and freeze it for another 10 minutes. If you\u2019re making this dessert around the holidays, it\u2019s delightful served with a crushed candy cane topping. My standby, year-round topping is raw cacao nibs, which also add a lovely (and nutritious!) crunch. The crunchy topping really completes the dessert, so I don\u2019t recommend skimping on it, and be sure to serve additional cacao nibs or crushed candy cane on top of each slice before serving. Lastly, it\u2019s important to use a very small loaf pan so the dessert has height. I use a 4×8-inch loaf pan by Baker\u2019s Secret. You could also try making individual servings by filling a silicone cupcake mold.”,”instructions”:”

    \r\n \t

  1. Line a small (approximately 4×8-inch) loaf pan or 6-inch cake pan with plastic wrap so the slab will be easy to lift out after freezing. <\/li>\r\n \t
  2. Add all of the filling ingredients (cashew butter, maple syrup, melted oil, almond milk, 1 teaspoon peppermint extract, spinach, and salt) into a high-speed blender. Blend on high until smooth. Make sure no chunks of spinach leaves remain. Taste and add more peppermint extract if desired.<\/li>\r\n \t
  3. Pour the filling into the prepared pan. Place the pan on a flat spot in the freezer and freeze for 4 to 5 hours, until the filling is solid. There\u2019s no need to cover it unless you plan on keeping it in the freezer longer than 8 hours.<\/li>\r\n \t
  4. When the filling is solid, prepare the ganache topping. In a medium pot, combine the chocolate chips, coconut cream (make sure water is drained before adding), and salt. Melt the chips over the lowest heat setting, stirring frequently, until smooth.\u00a0<\/li>\r\n \t
  5. Remove the filling from the freezer and, gripping the plastic wrap as a handle, lift it out of the pan. Flip the filling onto a large plate and peel off the plastic wrap. <\/li>\r\n \t
  6. Pour the ganache over top of the solid filling, starting in the centre, and allow it to cascade down the sides a bit. Immediately scatter the crushed candy cane or cacao nibs all over the ganache. Return it to the freezer, uncovered, and freeze for about 10 minutes, until the ganache is firm.<\/li>\r\n \t
  7. Slice and garnish with fresh mint, if you\u2019re fancy! Sprinkle additional cacao nibs or crushed candy cane on top of each slice and enjoy immediately. Return leftovers to the freezer right away as the dessert does soften as it sits. <\/li>\r\n<\/ol>“,”foot_note”:”* Instead of cashew butter, you can use 1 1\/4 cups (180 g) of soaked raw cashews. Soak them in boiled water for 1 hour, rinse, drain, and add them into a high-speed blender (such as a Vitamix) along with the rest of the ingredients. If your blender has a hard time blending nuts smooth, I suggest that you use the raw cashew butter version instead. You can also use homemade raw cashew butter. To make your own, simply process raw cashews in a heavy-duty food processor until smooth. I don\u2019t recommend using roasted cashew butter as it gives the slice a strong nutty flavour.\r\n\r\n** The intensity of peppermint extracts vary by brand, so 1 1\/2 teaspoons is intended as a guide\u2014please add it slowly to taste.\r\n\r\n*** I only recommend using spinach if your blender is good at blending leafy greens smooth. If your blender tends to leave spinach chunks in smoothies, I would suggest omitting the spinach in this recipe just to make sure you aren\u2019t going to find spinach chunks in the slice. Or see my tip about using a food processor below.\r\n\r\n**** Coconut cream is the solid white cream in a can of full-fat coconut milk. Chill the can overnight before using to ensure the coconut cream is solid. I like to open a mini can (160 mL) of full-fat coconut milk for this recipe; this way, there isn\u2019t a lot left over to use up. The remaining amount is just perfect for throwing into your next smoothie!\r\n\r\n \r\n\r\nNo blender? No problem! If you have a heavy-duty food processor you can make the filling in the processor, just be warned that the spinach doesn\u2019t break down fully (my version had some very fine green speckling resembling mint sugar), and you\u2019ll want to run the processor for a good while to help the spinach break down as much as possible.\r\n\r\n \r\n\r\nIf you don\u2019t have cacao nibs or crushed candy cane on hand, feel free to top the ganache with finely chopped dark chocolate.”}

Pumpkin Pie with a Gluten-Free Pecan Crust

{“head_note”:”This pie is\u00a0a bit sweet, buttery, lightly spiced with cinnamon, and enhanced with a bit of salt to bring out the flavours. This crust goes so nicely with the pumpkin pie filling! This crust is very sensitive to changes, so I caution against changing a lot of things in the recipe. Make sure to use certified gluten-free ingredients if you want it to be GF.”,”instructions”:”For the Crust\r\n

    \r\n \t

  • Grease a 9-inch pie dish very well and preheat the oven to 350F. In a blender, process your oats into a very fine flour.<\/li>\r\n \t
  • In a food processor, add 2 cups pecans and process until it starts to clump and oils start to release (about 35 secs), but don\u2019t make pecan butter either. You should be able to make a ball with the pecan dough.<\/li>\r\n \t
  • Melt earth balance with brown rice syrup for about 30 secs in microwave. Stir. Transfer clumpy pecan mixture into a large bowl and mix with the rest of the ingredients. Using your hands, squeeze the dough over and over to combine very well. You should be able to form a ball with it. If it’s too dry add a bit of water.<\/li>\r\n \t
  • Spoon the pecan dough onto pie dish and smooth out evenly. Press down firmly with fingers to form a crust, bringing it up along the sides. Press as firmly as you can. Prick base with fork 12-13 times. Prebake the crust at 350F for 9-12 minutes, watching closely so it doesn’t burn. Remove and cool for 10 mins.<\/li>\r\n<\/ul>\r\nfor filling\r\n
      \r\n \t

    • In a large bowl, whisk together the maple syrup and arrowroot powder (or cornstarch). Now add all ingredients and whisk together, adjusting spices to taste. Add more sweetener if desired.<\/li>\r\n<\/ul>\r\nTo bake\r\n
        \r\n \t

      • Scoop the filling into crust and smooth. Cover crust with crust shield (or tin foil). Bake for 50-55 minutes at 350F. Place on cooling rack for 1 hour. Transfer to fridge to set for a minimum of 3 hours or overnight. (this step is very important!) Do not slice pie until it has set in the fridge for 3 hours minimum.<\/li>\r\n \t
      • Slice with a very sharp knife, very slowly and carefully for best results. A bit of crumbling may occur, but that\u2019s ok because it\u2019s rustic and made from scratch! The main part is it tastes incredible. Yum!<\/li>\r\n<\/ul>“,”foot_note”:””}