Category Archives: New app recipes

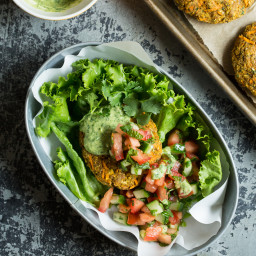
Moroccan Yam Veggie Burgers with Cilantro Lime Tahini Sauce

{“head_note”:”A flavourful\u00a0Moroccan-style veggie burger served with a tangy and fresh cilantro-lime tahini sauce. You can make these burgers soy-free by using coconut aminos and they are naturally gluten-free when using certified gluten-free rolled oats\/oat flour. Burger recipe is inspired by Ryan’s Moroccan Yam veggie burgers from the Whitewater Cooks Cookbook<\/a>.”,”instructions”:”

    \r\n \t

  1. FOR THE BURGERS: Preheat the oven to 350F. Line a large baking sheet with a piece of parchment paper.<\/li>\r\n \t
  2. Peel the yam. Using the regular-sized grate hole, grate the yam until you have 1 1\/2 lightly packed cups. I used the grater attachment disc in my food processor to save time (it takes less than 20 seconds). Place into large bowl.<\/li>\r\n \t
  3. Remove grater attachment from food processor, and add the regular \”s\” blade. Mince the garlic, cilantro, and ginger until finely chopped.<\/li>\r\n \t
  4. Add drained chickpeas and process again until finely chopped, but leave some texture. Scoop this mixture into a large bowl.<\/li>\r\n \t
  5. In a small bowl, stir together the flax and water mixture.<\/li>\r\n \t
  6. Grind the oats into a flour using a blender or a food processor. Or you can use 3\/4 cup + 1 tablespoon pre-ground oat flour. Stir this into the mixture along with the flax mixture.<\/li>\r\n \t
  7. Now stir in the oil, aminos\/tamari, salt\/pepper, and spices until thoroughly combined. Adjust to taste if desired.<\/li>\r\n \t
  8. Shape 6-8 patties, packing the mixture firmly together. Place on baking sheet. Bake for 15 minutes, then carefully flip, and bake for another 18-23 minutes until golden and firm. Cool on pan.<\/li>\r\n \t
  9. FOR THE CILANTRO SAUCE: Mince garlic in a food processor, followed by the cilantro. Add the rest of the sauce ingredients and process until smooth and creamy.<\/li>\r\n \t
  10. Serve the patties with a generous dollop of sauce and optional homemade salsa (from OSG cookbook, p.95) with a bun or lettuce wrap.<\/li>\r\n<\/ol>“,”foot_note”:”Note: I was missing a bit of crunch in these burgers, so next time I think I will add 1\/4 cup sunflower seeds into the mix.”}
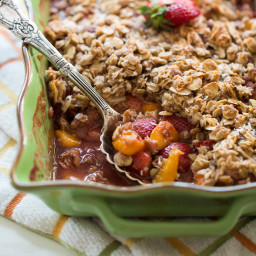
Springtime Strawberry Lime Mango Crisp (Vegan + GF)

{“head_note”:”Fresh strawberries, buttery mango and tangy lime create a naturally sweet, gooey crisp with a crunchy almond-oat-coconut topping. I love making this crisp in the springtime when mangos and strawberries are at their peak. And when I say \”crisp\”, I really like a crisp topping (which is what you’ll find here). Serve it as a healthy weekend breakfast or alongside a brunch. I especially love it after it\u2019s chilled in the fridge overnight \u2013 the syrup thickens and the leftovers are irresistible the next morning. To turn it into dessert, add a scoop of ice cream. This recipe is adapted from the Apple Crisp in The Oh She Glows Cookbook<\/a>.”,”instructions”:”

    \r\n \t

  1. Preheat oven to 375F. Lightly grease an 8-cup (2 litre) casserole dish.<\/li>\r\n \t
  2. For the filling: Place the chopped strawberries and mango in a medium bowl and sprinkle the arrowroot powder on top. Toss until the fruit is coated.<\/li>\r\n \t
  3. Stir in the sugar and zest. Drizzle on the lime juice and lightly toss to combine. Pour the fruit mixture into the prepared dish and spread out evenly.<\/li>\r\n \t
  4. For the topping: In a medium bowl, stir together the oats, almonds, almond meal\/flour, shredded coconut, cinnamon, salt. Pour on the maple syrup and melted coconut oil and stir until combined.<\/li>\r\n \t
  5. Sprinkle the topping all over the fruit mixture in an even layer.<\/li>\r\n \t
  6. Cover the dish with foil and poke a couple holes in the foil. Bake for 20 minutes, until the fruit is tender. Remove the foil and bake for another 15 to 20 minutes until the topping is golden and the filling is bubbling up around the sides.<\/li>\r\n \t
  7. Serve with a scoop of non-dairy vanilla ice cream, coconut whipped cream, or simply on its own. Store in the fridge for 3-4 days.<\/li>\r\n<\/ol>“,”foot_note”:””}

Nut-Free Coconut Maple Granola

{“head_note”:”It’s time for a nut-free (but still delicious) all natural granola recipe! This crunchy granola take less than 10 minutes to throw together and is bursting with good-for-you ingredients. Feel free to change up the seeds or sweeteners as you see fit. Enjoy is sprinkled over granola, oatmeal, smoothie bowls, or just grab it by the handful for a quick pick me up.”,”instructions”:”

    \r\n\t

  1. Preheat oven to 325F and line a large baking sheet with parchment paper.<\/li>\r\n\t
  2. In a large mixing bowl, stir together the dry ingredients.<\/li>\r\n\t
  3. In a small pot, heat the coconut oil over low heat until melted. Remove from the burner and stir in the maple syrup and vanilla.<\/li>\r\n\t
  4. Pour the wet ingredients over the dry and stir well to combine, until the oats are fully coated in the wet mixture.<\/li>\r\n\t
  5. Spread the granola onto the baking sheet in a thin layer. Bake for 15 minutes, remove and stir, and bake for another 8-10 minutes until golden and fragrant. Watch closely during the end of baking to ensure it doesn’t burn.<\/li>\r\n\t
  6. Cool on the pan for 45 minutes to 1 hour. It will harden up as it cools.<\/li>\r\n<\/ol>“,”foot_note”:””}

Thai Sweet Potato Hummus

{“head_note”:”Sweet, creamy, and bursting with Thai flavours, this hummus recipe is a fun spin on a classic. Roasted sweet potato is blended with chickpeas, garlic, lime juice, ground coriander, sea salt, fresh ginger, sesame oil, and peanut butter. Feel free to adjust the ingredients to suit your own taste buds. The roasted sweet potato, cilantro, and roasted salted peanut garnishes really make this hummus shine, so don’t skimp on them. I served the hummus with Coriander Lime Baked Tortilla Chips to compliment the flavours even more. For a spicy version, add a dash or two of cayenne pepper.”,”instructions”:”

    \r\n\t

  1. Preheat oven to 375F and line a large baking sheet with parchment paper.<\/li>\r\n\t
  2. Spread the sweet potato onto the baking sheet and drizzle on the melted coconut oil. Sprinkle with a couple pinches of fine grain sea salt.<\/li>\r\n\t
  3. Roast the sweet potatoes for 25 minutes, flip, and roast for another minutes until fork tender. Set aside 1.5 cups of roasted sweet potato for the hummus and reserve any remaining potato for garnish.<\/li>\r\n\t
  4. In a food processor, mince the garlic. Now add in the chickpeas, 1.5 cups of cooked sweet potato, nut butter, 1 tablespoon of lime juice, sesame oil, and ginger. Process until smooth. Now add in some water, coriander, and salt to taste and process again for a minute or two until smooth. Add another 1\/2 tablespoon of fresh lime juice if desired.<\/li>\r\n\t
  5. Scoop into a bowl and garnish with peanuts, cilantro, and remaining sweet potato.<\/li>\r\n\t
  6. For the tortilla chips<\/span>: Preheat the oven to 400F and line a baking sheet with parchment paper.<\/li>\r\n\t
  7. Cut the tortillas into triangles. Place them in a single layer on the baking sheet. With a pastry brush, spread the oil on top. Sprinkle with a squeeze of fresh lime juice, and a sprinkle of coriander, and salt.<\/li>\r\n\t
  8. Bake tortillas for 7 to 9 minutes, until golden. The chips will firm up as they cool.<\/li>\r\n<\/ol>“,”foot_note”:””}

Flourless Black Bean Hazelnut Brownies

{“head_note”:”You will never believe these soft & fudgy brownies are made without a lick of flour, eggs, or dairy! Pureed black beans replace the need for flour while the toasted hazelnut meal lends a flour-like, nutty texture with a flavour reminiscent of Nutella. If you like a crunchy brownie, be sure to sprinkle some chopped hazelnuts on top before baking. Since the brownies take a while to set, allow them to cool in the pan for at least 30 minutes before removing.”,”instructions”:”

    \r\n\t

  1. Preheat over to 300F and place hazelnuts on a large rimmed baking sheet. Roast nuts in the oven for 13-14 minutes, until fragrant with darkened skins. The skins should be slightly falling off. Remove from oven and set aside for a few minutes to cool. Place the hazelnuts on a damp (old) tea towel and wrap the sides up to cover. Roll the nuts around in the tea towel, pressing firmly so the skins rub off. Discard the skins and add 1\/2 cup of the nuts into a food processor. Process until a flour-like consistency forms, being sure not to process it into a butter. Remove and set aside. Increase the oven heat to 350F and grease a muffin tin.<\/li>\r\n\t
  2. Mix the flax and water together in a small bowl, along with the arrowroot powder until no clumps remain. Let it gel up for a few minutes.<\/li>\r\n\t
  3. Add the black beans into a processor and process until chopped. Add in the flax mixture, melted vegan butter, sugar, cocoa powder, vanilla, salt, and baking soda. Process until smooth, stopping to scrape down the side of the bowl as needed.<\/li>\r\n\t
  4. Finally add in the hazelnut meal and process until incorporated.<\/li>\r\n\t
  5. Spoon the batter into the greased muffin tin. Chop the remaining hazelnuts (if using) and sprinkle on top. Gently, press down to adhere.<\/li>\r\n\t
  6. Bake at 350F for 33-36 minutes, until semi-firm to the touch and a knife comes out mostly clean. Place tin on a cooling rack and allow the brownies to cool for at least 30 minutes before attempting to remove. When ready, slide a knife around each brownie and pop out gently.<\/li>\r\n\t
  7. If you prefer a firmer brownie, store these in the fridge or freezer.<\/li>\r\n<\/ol>“,”foot_note”:””}

Crispy Coconut Almond Chia Granola Bars

{“head_note”:”Crispy baked granola bars made without refined sugar! Be sure to allow the bars to fully cool before slicing.”,”instructions”:”

    \r\n\t

  1. \u00a0Preheat oven to 375F and line a 9 x 12.5-inch baking sheet with tin foil. Lightly spray the tin foil with non-stick spray or grease with coconut oil.<\/li>\r\n\t
  2. Combine the dry ingredients in a large bowl (oats, rice crisp, sliced almonds, sugar, chia, coconut, flax, cinnamon, salt).<\/li>\r\n\t
  3. In a small pot, melt the coconut oil over low heat. In a medium bowl, whisk together the wet ingredients (melted coconut oil, syrup, almond butter, and vanilla).<\/li>\r\n\t
  4. Pour wet ingredients over dry ingredients and stir very well until combined. The mixture will be dry at first, but keep mixing until it’s fully coated in the wet mixture.<\/li>\r\n\t
  5. Spoon the oat mixture into the prepared pan and spread out evenly with a spoon. With lightly wet hands, press the mixture firmly and evenly into the pan. I like to use a party roller to pack it down as firmly as possible.<\/li>\r\n\t
  6. Bake at 375F , uncovered, for 13-15 minutes, until lightly golden.<\/li>\r\n\t
  7. Place pan on a cooling rack and cool for at least 30-45 minutes before lifting out the square. When fully cool, slice into bars (bars may crumble if you slice while warm). Store leftovers in the fridge or freezer.<\/li>\r\n<\/ol>“,”foot_note”:””}

World’s Healthiest Peanut Butter Freezer Fudge

{“head_note”:”Say goodbye to refined sugar-laden fudge and say hello to this healthier freezer version! Made with protein-packed peanut butter and heart-healthy coconut oil, you’ll wonder how you ever did without this refined sugar-free version! Be sure to store this fudge in the freezer for the best texture as it will soften quickly at room temperature. For a crunchy fudge, stir in a couple handfuls of rice crisp cereal.”,”instructions”:”

    \r\n\t

  1. Line an 8-inch square pan with two pieces of tin foil (cut to the size of the pan), one going each direction. Lightly spray the tin foil with non stick spray.<\/li>\r\n\t
  2. Melt 3\/4 cup coconut oil in a small pot over the lowest heat. When melted, remove from heat.<\/li>\r\n\t
  3. Add peanut butter into a large bowl and beat with electric beaters until smooth. Stir in the rest of the fudge ingredients (melted coconut oil, maple syrup, salt, and vanilla) until combined.<\/li>\r\n\t
  4. With a spatula, pour the fudge mixture into the prepared pan and smooth out. Set aside.<\/li>\r\n\t
  5. For the dark chocolate drizzle<\/span>: Melt 1 tbsp coconut oil over low heat in a small pot. Remove from heat and whisk in the cocoa powder and maple syrup until smooth. With a spoon, drizzle the chocolate mixture all over the top of the peanut butter mixture. With a knife \”swirl\” the knife into the chocolate mixture to create a swirl pattern.<\/li>\r\n\t
  6. Transfer the pan to a flat\/level spot in the freezer and freeze, uncovered, for about 45-60 minutes, until completely solid. Cut into small squares and enjoy!<\/li>\r\n\t
  7. Store leftovers in the freezer. The fudge will melt at room temperature so it’s best not to let this sit out for longer than a few minutes.<\/li>\r\n<\/ol>“,”foot_note”:”Note: If your peanut butter is salted, you can reduce the salt accordingly or skip it all together.”}

Banana Bread Muffin Tops

{“head_note”:”Ultra dense and chewy, these banana bread muffin tops make a great running-out-the-door breakfast or snack. Sweetened with banana and dates, there are no added sugars (and the chocolate chips can be easily swapped for walnuts). Try them warm served with a pat of vegan butter, nut butter, or coconut oil.”,”instructions”:”

    \r\n \t

  1. Preheat oven to 350F and line a large baking sheet with parchment paper.<\/li>\r\n \t
  2. Add the peeled bananas, pitted dates, coconut oil, and vanilla into a food processor. Process until smooth. I let it run for a minute or so.<\/li>\r\n \t
  3. Add in the cinnamon, baking powder, and salt and process again until combined.<\/li>\r\n \t
  4. Add in 1.5 cups<\/span> of the rolled oats and process for only 4-5 seconds, just long enough to roughly chop the oats.<\/li>\r\n \t
  5. Remove processor from the base and then remove the blade and set aside. Carefully stir in the remaining 1\/2 cup rolled oats and the chocolate chips.<\/li>\r\n \t
  6. Spoon a large portion of dough (about 3-4 tablespoons or so for each) onto the parchment. Do not press down on the dough to flatten – simply leave it in a mound on the baking sheet.<\/li>\r\n \t
  7. Bake cookies for 10 minutes, rotate the pan, and bake for another 7-9 minutes until golden brown on the bottom.<\/li>\r\n \t
  8. Immediately transfer the baking sheet onto a cooling rack for 10 minutes. Then lift off muffins and place on the rack to cool completely.<\/li>\r\n<\/ol>“,”foot_note”:”Make sure you use very soft Medjool dates. If you are using firm dates, be sure to soak them in water until softened before proceeding with recipe.”}

Sugar-Free Soft Oatmeal Banana Nut Bars

{“head_note”:”These soft oatmeal bars are sweetened only with banana making them a healthy breakfast or snack on the go! Even better, they are thrown together in less than 10 minutes. Just mix a few ingredients together and throw them in the oven for a half hour. I love to enjoy these bars with coconut oil spread on top or nut butter and jam. It’s best to cool them completely before attempting to slice so they don’t break apart.”,”instructions”:”

    \r\n\t

  1. Preheat oven to 350F and line an 8-inch square pan with 2 pieces of parchment paper, one going each way.<\/li>\r\n\t
  2. In a large bowl mash the bananas until completely smooth. Measure 1 and 1\/3 cups, removing any extra banana (you can freeze leftover banana for a smoothie later).<\/li>\r\n\t
  3. Stir in the rest of the ingredients except the chocolate chips.<\/li>\r\n\t
  4. Pour mixture into prepared pan and smooth out with a spoon.<\/li>\r\n\t
  5. Sprinkle on the chocolate chips (if using) and gently press into the batter.<\/li>\r\n\t
  6. Bake, uncovered, for 30-32 minutes, until the edges are golden and the oatmeal is firm to touch.<\/li>\r\n\t
  7. Cool for 15 minutes in the pan and then carefully lift it out and transfer to a cooling rack until completely cool, about 1 hour. Slice and enjoy!<\/li>\r\n\t
  8. Wrap leftover bars individually. Store in the fridge for 1 week or in the freezer for up to 1 month.<\/li>\r\n<\/ol>“,”foot_note”:”Note: If you have the time you can toast the nuts beforehand to add more flavour. It’s not necessary though!”}