Category Archives: New app recipes

Warm and Roasted Winter Quinoa Bowl

{“head_note”:”This is the ultimate bowl of winter comfort food! Yukon Gold potatoes and green beans are roasted until crisp and golden and then tossed with warm quinoa, shredded kale, green onion, and a speedy roasted garlic and red wine vinaigrette. I topped this cozy bowl with crunchy toasted pepita seeds and creamy sliced avocado. Feel free to swap the potatoes with whatever variety you have on hand (yellow or red potatoes work great in a pinch). Spelt berries or millet might be a nice sub for the quinoa if you feel like changing up the grain.”,”instructions”:”

    \r\n \t

  1. Preheat oven to 400\u00b0F (200\u00b0C) and line one extra-large baking sheet (or two large baking sheets) with parchment paper.<\/span><\/li>\r\n \t
  2. Place the chopped potatoes, green beans, and garlic cloves (leaving the peel on) onto the baking sheet. Toss with the oil and season with a generous amount of salt and pepper. Spread into an even layer.<\/span><\/li>\r\n \t
  3. Roast for 15 minutes, then remove from the oven and flip before continuing to roast for about 10 to 20 more minutes until the potatoes and beans are tender and golden brown in some spots. <\/span><\/li>\r\n \t
  4. Meanwhile, cook the quinoa by adding it to a medium pot along with 1 3\/4 cups (430 mL) water. Bring to a low boil before reducing heat to medium-low. Cover and cook for 12 to 14 minutes, until the water is absorbed and the quinoa is fluffy. Remove from heat, fluff with a fork, and leave the lid on to keep warm.<\/span><\/li>\r\n \t
  5. Prepare the dressing: In a small bowl, whisk all of the dressing ingredients together and set aside.<\/span><\/li>\r\n \t
  6. When the vegetables are finished roasting, trim the end off each garlic clove and push the roasted garlic out. Mash the garlic with a fork, then whisk it into the dressing until combined. <\/span><\/li>\r\n \t
  7. Spoon the potatoes and beans into a large serving bowl. Now add the quinoa along with the kale and green onions (if using). Pour all of the dressing onto the vegetables and toss to coat.<\/span><\/li>\r\n \t
  8. Season with salt and pepper (to taste) and top with pepitas and sliced avocado. Serve immediately. The salad will keep in an airtight container in the fridge for a few days. Leftovers can be reheated in an oiled skillet over medium heat until warmed through. It’s great cold, too!\u00a0<\/span><\/li>\r\n<\/ol>“,”foot_note”:”To boost the protein even more, try adding chickpeas (roasted, if desired), adzuki beans, Great Northern beans, or lentils.”}

Gourmet Chia Seed Pudding

{“head_note”:”Creamy, rich, and thick chia seed pudding made from scratch! If you want to make the speedy version using store-bought almond milk and liquid sweetener, see the tip below. This makes a large batch (3 cups or so), but I discovered that chia seed pudding freezes well and it thaws beautifully in the fridge. So there\u2019s never fear of any going to waste. I like to freeze it in individual servings in freezer-safe zip bags or small glass containers, so I always have a healthy snack on hand. If you aren’t down with the tapioca-like texture of chia seed pudding, feel free to blend this pudding in your blender until smooth.”,”instructions”:”

    \r\n \t

  1. Place almonds in a bowl and cover with a couple inches of water. Soak overnight or for 8 hours. If you are in a rush, soaking for 1 to 2 hours works in a pinch. Drain and rinse almonds after soaking.<\/li>\r\n \t
  2. Place almonds in a high-speed blender along with the 3 cups filtered water, chopped vanilla bean (if using), vanilla extract, and salt. Blend on the highest speed, for about 1 minute until the almonds and vanilla bean are pulverized.<\/li>\r\n \t
  3. Place a nut milk bag on top of a large bowl and pour the almond milk into the bag. (You can also use cheesecloth placed over a fine mesh sieve, however a nut milk bag yields the smoothest result and is faster.) Squeeze the bag and press out all the milk. The pulp will remain in the bag\/cloth (you should have about 1 cup of pulp).<\/li>\r\n \t
  4. If using dates as your sweetener: Note: I only recommend using dates if your blender can pulverize them super smooth, otherwise use liquid sweetener. Rinse out the blender. Carefully pour the almond milk back into the blender and add the pitted dates. Blend on the highest speed until the dates are pulverized and the milk is super smooth. Add milk back into the bowl.<\/li>\r\n \t
  5. Whisk in the chia seeds (and the maple syrup, only if not using the dates). Place in the fridge for 2 to 3 hours, until thickened and cold. Give the mixture a good stir every once in awhile to redistribute the chia seeds.<\/li>\r\n \t
  6. Layer the chia pudding with mango, raspberries, and top with Coconut Whipped Cream. Chia seed pudding will keep in the fridge for up to 3 to 4 days. It freezes well too, just thaw in the fridge before ready to enjoy.<\/li>\r\n<\/ol>“,”foot_note”:”
      \r\n \t

    • For a quicker version, simply use 3 cups of store-bought unsweetened almond milk, 1\/2 cup chia seeds, and 2 tablespoons of pure maple syrup. Whisk everything in a mason jar and chill in the fridge for 2 to 3 hours.<\/li>\r\n \t
    • Ideas for using leftover almond pulp: Spread the pulp onto a baking sheet and dry it out by baking it at 300\u00b0F (150\u00b0C) for 25-30 minutes until lightly golden in some spots. Cool completely. Grind it in a food processor until a coarse flour forms. You can use the toasted pulp in granola recipes or any other baked goods you see fit.<\/li>\r\n<\/ul>“}

Ultimate Green Taco Wraps

{“head_note”:”Get ready to pack a ton of veggies into one irresistible, healthy meal! If you haven’t tried my lentil-walnut taco meat, this is a great recipe to do so. It’s high in protein, and the taco seasonings and chewy texture create a realistic-tasting taco base. Feel free to use tortilla wraps or corn shells instead of lettuce wraps to change it up, or you can make this recipe into a big salad, too. You can save time by cooking the lentils and prepping the taco meat in advance (or simply use canned lentils).”,”instructions”:”

    \r\n \t

  1. Cook the lentils: Rinse lentils in a fine mesh sieve. Add to a medium pot along with a few cups of water. Bring to a boil, reduce heat to medium, and simmer for 20 to 25 minutes until tender (cook time will vary depending on the type of lentils you use\u2014see package). Drain off excess water.<\/li>\r\n \t
  2. Toast the walnuts: Preheat oven to 300\u00b0F (150\u00b0C). Add walnuts onto a rimmed baking sheet and toast for 10 to 13 minutes, watching closely, until lightly golden and fragrant. Set aside to cool for a few minutes.<\/li>\r\n \t
  3. Saut\u00e9 the pepper and onion filling: Add 1\/2 to 1 tablespoon of oil into a large skillet or wok. Cook the onion and peppers over medium heat for about 15 to 20 minutes, reducing heat if necessary and stirring frequently, until translucent.<\/li>\r\n \t
  4. Prepare the taco meat: Add 1 3\/4 cups cooked lentils (you’ll have some leftover) and all the toasted walnuts into a food processor and pulse until chopped (make sure to leave texture). Stir or pulse in the oregano, cumin, chili powder, and salt. Stir in the oil and the water until combined.<\/li>\r\n \t
  5. Prepare the rest of your vegetable toppings and wash and dry the lettuce wraps.<\/li>\r\n \t
  6. Assemble: Add a large lettuce leaf onto a plate, top with taco meat, saut\u00e9ed peppers and onion, and the rest of your desired toppings.<\/li>\r\n \t
  7. Leftovers can be stored in the fridge in sealed containers to be enjoyed the next couple days. The cashew cream will keep for at least a week in the fridge. Use sour cream leftovers on sandwiches, wraps, stirred into salad dressings, on vegan nachos, or with chili or soup.<\/li>\r\n<\/ol>“,”foot_note”:”
      \r\n \t

    • * To save time, you can use one (15-ounce) can of lentils (drained and rinsed) instead of cooking the lentils from scratch. When I have time,\u00a0I love to cook French green lentils due to their\u00a0chewy texture, but regular green and brown lentils will work too. Do not use red lentils as they are much too mushy and don’t have the required chewy texture for this recipe.<\/li>\r\n \t
    • Make it nut-free: I haven’t tried this yet, but you could\u00a0try subbing the walnuts for 1\/2-3\/4 cup toasted pepita\u00a0seeds (shelled pumpkin seeds) and swapping the Cashew Sour Cream with vegan mayo (such as Vegenaise).<\/li>\r\n<\/ul>“}

Pumpkin Spice Latte

{“head_note”:”I don’t have an espresso machine, so I find the easiest way to make an authentic-tasting latte at home is to simply buy a few shots of espresso at the local coffee shop. I’ve tried using strong coffee as a substitute for espresso and I find it misses that incredibly rich, deep, and flavorful espresso flavour which I think is key for a latte. That said, feel free to experiment with strong coffee, too (you may want to increase the amount of coffee to at least a half cup or more). Lastly, I discovered that you can create super creamy and frothy almond milk by adding the heated milk into a small French press and pumping the plunger vigorously for 30 to 60 seconds . (Note: Be very careful as it can explode!) This may be an option if you don\u2019t have a milk frother.”,”instructions”:”

    \r\n \t

  1. For the Pumpkin Spice Syrup: Whisk together all syrup ingredients in a medium pot over medium heat. Simmer for about 5 to 6 minutes, stirring frequently, until smooth and slightly thickened. Remove from heat. Once cool, pour leftovers into a jar and secure lid.<\/span><\/li>\r\n \t
  2. Prepare the espresso or pick some up from a local coffee shop.<\/span><\/li>\r\n \t
  3. Add milk into a small pot. Heat over medium and bring to a simmer. Immediately remove from heat. Froth the milk using a milk frother or a French press. Tip: I use my French press to froth the milk. Simply add the heated milk into the press and secure lid (make sure it\u2019s closed and not vented). Pump the plunger vigorously for about 30 to 60 seconds. Be careful, as the hot milk can shoot out.<\/span><\/li>\r\n \t
  4. Pour hot espresso into a mug. Top with all of the frothy milk. Add 3 to 4 teaspoons of the syrup, to taste, and gently stir to combine. Top with a dash of cinnamon or pumpkin pie spice, and Coconut Whipped Cream, if desired. Serve immediately. The syrup will keep in an airtight container in the fridge for at least 2 weeks, most likely longer. You can use it in regular coffee, too, or try stirring it into a bowl of hot oatmeal for a seasonal twist!<\/span><\/li>\r\n<\/ol>“,”foot_note”:”*If your pumpkin puree is on the grainy side (some brands are more than others), it might benefit from a quick blend or puree in the blender or food processor before using.”}

Banoffee Pie

{“head_note”:”This Banoffee Pie is decadent\u00a0while still feeling super light and healthy. The almond-oat crust is layered with\u00a0sticky date caramel, sweet banana coins, luxurious whipped coconut cream, and shaved dark chocolate, for a pie that’s sure to impress.”,”instructions”:”

    \r\n \t

  1. Place 2 cans of full-fat coconut milk in the fridge overnight (or for at least 12 hours) to allow the coconut cream to solidify.<\/span><\/li>\r\n \t
  2. For the crust: Preheat the oven to 375<\/span>\u00b0<\/span>F (190<\/span>\u00b0<\/span>C). Grab an 8- to 10-inch tart pan (I use a 9-inch) and lightly grease the base and sides with coconut oil. Cut a circle of parchment paper to fit on the bottom and place it inside. This will prevent the crust from sticking.<\/span><\/li>\r\n \t
  3. Add the almonds into a food processor and process until they are the texture of coarse sand. Now add in the oats, cinnamon, and salt and process again <\/span>until the coarse, sandy texture returns<\/span>. Add the melted oil, maple syrup, and water, then process until the mixture comes together and no dry flour remains. The dough should stick together when pressed between your fingers; if it’s still too dry, try adding another teaspoon or two of water and processing again.<\/span><\/li>\r\n \t
  4. Crumble the dough all over the base of the tart pan in an even layer. Starting at the center, press the dough flat into the pan with your fingers and work your way outward and up the sides. If the dough starts to stick to your hands, lightly wet your fingers every now and then. With a fork, poke the base of the tart about 15 times to allow the air to escape while baking.<\/span><\/li>\r\n \t
  5. Bake the tart, uncovered, 12 to 14 minutes until lightly golden. Remove from the oven and place the tart pan on a cooling rack for about 15 minutes. If the crust puffed up during baking, you can poke it a few more times with a fork to let the air escape. The crust will firm as it cools.<\/span><\/li>\r\n \t
  6. Meanwhile, make the Raw Caramel Toffee: Add the pitted dates into a bowl and pour boiling water over top. Let sit for 5 to 10 minutes, or longer if your dates are firm. Drain the dates and add them to the food processor along with the almond butter, lemon juice, salt, and vanilla bean seeds (if using). Process until smooth, stopping to scrape the bowl as needed.<\/span><\/li>\r\n \t
  7. Open the chilled cans of coconut milk and carefully scoop off the white cream from the top of the can, discarding the water. Add the coconut cream into a medium bowl. With electric beaters, beat the cream until smooth and fluffy.<\/span><\/li>\r\n \t
  8. When the crust has cooled, gently spread all of the caramel toffee onto the base of the crust\u2014using the back of a lightly wet spoon\u2014until the base is covered. Slice all of the bananas. Place half of the banana slices on top of the caramel, pressing down lightly to adhere.<\/span><\/li>\r\n \t
  9. Spread all of the whipped coconut cream on top of the banana slices in an even layer. Now place the remaining banana slices on top of the pie in a circular pattern, overlapping and stacking them to create height. Garnish with shaved chocolate (I like to shave it with a vegetable peeler) and serve immediately. Leftovers will keep in the fridge in a sealed container for up to 3 to 5 days. I don’t recommend freezing this pie, as the banana slices get mushy after thawing.<\/span><\/li>\r\n<\/ol>“,”foot_note”:”* To save time, you can swap the homemade coconut whipped cream for store-bought coconut whipped cream (such as So Delicious Coco Whip). Be sure to let it thaw before use.\r\n\r\nThe raw caramel works best with soft, fresh dates.”}

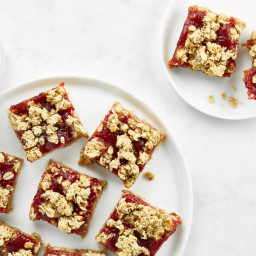
Raspberry Oat Crumble Squares

{“head_note”:”Reminiscent of a Nutri-Grain bar, these squares are vegan, gluten-free, and filled with a delectable raspberry chia seed jam. They require a good period of cooling before they are ready to be sliced\u2014otherwise they may crumble a bit, as they\u2019re very delicate while warm. Feel free to use 1 cup of your favourite store-bought jam in place of the chia seed jam if you are tight on time; this recipe comes together so fast if using store-bought jam (or previously made and cooled chia seed jam)!”,”instructions”:”

    \r\n \t

  1. Preheat oven to 350\u00b0F (180\u00b0C) and line an 8-inch square pan with parchment paper (with overhang so it\u2019s easy to lift the slab out later).<\/span><\/li>\r\n \t
  2. For the jam: In a medium pot, stir together the raspberries, maple syrup, and chia seeds until combined. Bring to a low boil and reduce heat to medium-low. Simmer, uncovered, for about 10 to 15 minutes, stirring frequently, until the raspberries break down and the mixture thickens slightly. Remove from heat and stir in the vanilla. Transfer the mixture to a bowl and into the freezer for about 20 to 30 minutes, to hasten the cooling process.<\/span><\/li>\r\n \t
  3. For the oat squares: In a small mug, mix together the chia seeds and water to make a chia egg. Set aside for a few minutes until thickened.<\/span><\/li>\r\n \t
  4. In a large bowl, stir together the melted oil, maple syrup, brown rice syrup, and vanilla. When the chia egg has thickened, stir that in, too.<\/span><\/li>\r\n \t
  5. One by one, stir in the rolled oats, oat flour, almond flour, baking soda, and salt until the there are no dry patches left. The dough will seem too dry at first, but if you keep mixing, it\u2019ll eventually come together! \u00a0<\/span><\/li>\r\n \t
  6. Set aside 1 packed cup of dough for the crumble topping. <\/span><\/li>\r\n \t
  7. Spoon the remaining dough into the prepared pan. Place a piece of parchment paper on top of the dough and press down to spread the dough out evenly, until it covers the entire base. Or, in lieu of parchment paper, simply use lightly wet hands to press the dough down. <\/span><\/li>\r\n \t
  8. When the chia jam has thickened and cooled, pour all of it (about 1 cup) on top of the oat mixture and spread it out evenly. If using store-bought jam instead, spread on 1 cup.<\/span><\/li>\r\n \t
  9. Crumble the remaining cup of dough over the jam layer. <\/span><\/li>\r\n \t
  10. Bake uncovered for 25 to 30 minutes, until the topping is semi-firm to the touch. <\/span><\/li>\r\n \t
  11. Place the pan directly on a cooling rack for 20 to 30 minutes, and then place it in the fridge until completely cool (about 30 more minutes). Slide a knife around the edges. Carefully lift out the slab and slice into squares.<\/span><\/li>\r\n \t
  12. Store any leftover squares in a sealed container in the fridge for up to 1 week, or in the freezer for up to 6 weeks.<\/span><\/li>\r\n<\/ol>“,”foot_note”:””}

Gazpacho

{“head_note”:”This is the perfect soup to serve on a hot summer day. Bonus points if you\u2019re eating outside! A word to the wise, this recipe makes a lot\u2014almost 8 cups. I find it barely fits in my 64-ounce Vitamix. If you are using a smaller blender, I recommend blending the soup in batches before mixing it all together at the end.”,”instructions”:”

    \r\n \t

  1. Combine the vegetable cocktail or tomato juice, tomatoes, red pepper, cucumber, onion, garlic, lime juice, and parsley (if using) in a blender and blend until smooth.<\/li>\r\n \t
  2. Add in the rest of the seasonings (salt, red pepper flakes, pepper, and vinegar) to taste, and blend again.<\/span><\/li>\r\n \t
  3. Pour into a 2-litre\/8 cup glass jar and secure lid. Chill for 3 to 4 hours, or overnight. <\/span><\/li>\r\n \t
  4. Before serving, shake the jar to combine. Pour into bowls, and garnish with your desired toppings (such as chopped peppers, avocado, green onion, croutons, olive oil, etc.).<\/span> Leftovers will keep in the fridge for up to 3 days.<\/span><\/li>\r\n<\/ol>“,”foot_note”:”* I like to use Lakewood Organic Super Veggie Cocktail.”}

Toffee Cinnamon Oatmeal Cookie Bars

{“head_note”:”These cookie bars are soft, delicate, and chewy in the middle with a crispy outer edge. Coconut sugar lends a wonderful toffee flavour to these bars. Try serving them with\u00a0vegan ice cream for an easy dessert or just enjoy them with some homemade almond milk.”,”instructions”:”

    \r\n \t

  1. Preheat oven to 350\u00b0F (180\u00b0C) and line an 8-inch square pan with parchment paper.<\/li>\r\n \t
  2. Mix the ground flax and water\u00a0in a small bowl or mug and set aside to thicken.<\/li>\r\n \t
  3. In a large mixing bowl, beat the coconut oil, almond butter, and sugar with electric beaters until combined.<\/li>\r\n \t
  4. Pour in the flax mixture\u00a0and vanilla extract and beat until combined.<\/li>\r\n \t
  5. Add the baking soda, salt, and cinnamon and beat again.<\/li>\r\n \t
  6. Finally add in the oat flour, rolled oats, almond flour, and 1\/4 cup of chocolate chips (reserving the 1 tablespoon for later) and beat until combined.<\/li>\r\n \t
  7. Spoon dough into prepared pan and spread out until smooth and even. Sprinkle the remaining chocolate chips on top and press down. I use a pastry roller to roll the dough out even.<\/li>\r\n \t
  8. Bake for 17 to 20 minutes, until lightly golden and firm\u00a0around the edges. (The edges will be high and the middle portion will be sunken a bit. This is all normal!)<\/li>\r\n \t
  9. Gently place the pan on a cooling rack for 15 minutes. Then, carefully lift out the bars and place directly on cooling rack for another 10 minutes or so, until mostly cool. Slice and enjoy! Note: The bars will crumble slightly if sliced warm, but they firm up nicely when cooled.<\/li>\r\n \t
  10. Store leftovers in the fridge in an airtight container for up to 3 days, or in the freezer (tightly wrapped and placed in a freezer bag) for up to 3 to 4 weeks.<\/li>\r\n<\/ol>“,”foot_note”:”
      \r\n \t

    • *\u00a0Instead of coconut sugar, you can try using unpacked light brown sugar.<\/li>\r\n \t
    • ** To make the freshly ground oat flour, add 3\/4 cup rolled oats into a high speed blender. Blend on high until a very fine flour forms.\u00a0This will make 3\/4 cup plus 1 tablespoon of oat flour. Or you can simply use store-bought oat flour.<\/li>\r\n \t
    • This recipe is an updated version as of May 24\/16. The previous version did not contain almond butter, and it had\u00a01\/4 cup plus 2 tablespoons virgin coconut oil. Everything else is the same.<\/li>\r\n<\/ul>“}

Super Thick Coconut “Yogurt”

{“head_note”:”This shortcut coconut yogurt is as simple and fresh as it gets! I occasionally buy coconut yogurt from the grocery store, but when I want something that is super fresh and without any added ingredients I will make this version for a fun treat. Granted, it’s not a true yogurt since there’s no fermentation, but I love how quick this version is. I often take the shortcut by purchasing frozen coconut meat (found in the freezer section of some health food grocers, like Organic Garage or Whole Foods) rather than buying young coconuts. Once the meat is thawed it just takes a minute of blending to create a yogurt with a texture similar to Greek yogurt. If you are well-versed with young coconuts and a cleaver, feel free to scoop out the flesh the old-fashioned way too! See this video<\/a> for a tutorial. I recommend making this recipe in advance so it has time to chill in the fridge.”,”instructions”:”

    \r\n \t

  1. Add all ingredients into a high speed blender and blend on low, gradually increasing the speed to high, until super smooth. Keep blending until it\u2019s not grainy anymore. Adjust sweetness to taste by adding sweetener if desired and blending again. I add a tablespoon of cane sugar and blend on high to pulverize it in my Vitamix.<\/li>\r\n \t
  2. Spoon the yogurt into an air-tight container and chill in the fridge for at least a couple hours.<\/li>\r\n \t
  3. Serve with granola and chia seed jam, parfait-style, if desired. Or simply enjoy alone or with fresh fruit. This yogurt is also great mixed into vegan overnight oats or added to smoothies! I\u2019m not positive on the shelf life because we usually enjoy it within a couple days, but I imagine it lasts at least a few days in the fridge in an air-tight container.<\/li>\r\n<\/ol>“,”foot_note”:””}

Homemade Nutella Hot Chocolate

{“head_note”:”A nutty, plant-based twist on traditional hot cocoa. This recipe features my homemade nutella<\/a> nut butter which makes this drink so creamy and decadent! I also love adding 55-60% dark chocolate into the mix for even more chocolate flavour. For a luxurious twist, try stirring in a bit of full-fat coconut cream into the hot cocoa, or serve it topped with some vegan marshmallows.”,”instructions”:”

    \r\n \t

  1. Prepare the Homemade Mocha Nutella<\/a>.<\/li>\r\n \t
  2. Break up the chocolate into chunks. In a medium pot, add the almond milk and chocolate pieces. Increase heat to medium-low. Whisk occasionally until all of the chocolate is melted.<\/li>\r\n \t
  3. Whisk in the maple syrup, cocoa powder, nutella, and salt until super smooth. Heat over medium-low and remove from heat just before it simmers. If you can’t get the hot cocoa smooth enough by whisking (this will depend in large part by how smooth your homemade nutella is) you can transfer it into a blender (with lid ajar) and blend until smooth.<\/li>\r\n \t
  4. Adjust the sweetness to taste, if necessary. Serve and enjoy! Leftovers will keep in a sealed container in the fridge for 2 days or longer.<\/li>\r\n<\/ol>“,”foot_note”:”