Author Archives: Angela Liddon

The Nourish + Glow Miracle Bowl

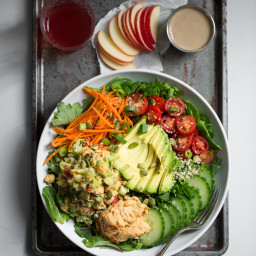
{“head_note”:”This bowl is packed with so many nourishing ingredients, you’ll be glowing in no time! It’s filled with a homemade chickpea \”tuna\” salad, homemade sun-dried tomato hummus, sliced avocado, hemp and pepita seeds, and and creamy lemon-dill dressing to top it all off. When you need a major energy boost, this salad is for you! Feel free to use your own hummus and dressing to save time.”,”instructions”:”

    \r\n \t

  1. Add greens into a large bowl. Layer on your desired toppings and drizzle on the dressing and garnish with hemp\/pepita seeds.<\/li>\r\n<\/ol>“,”foot_note”:”If you need a nut-free dressing, try my Lightened-Up Lemon Tahini Dressing<\/a>.\r\n\r\nFor the Flaked Almond Tuna Salad recipe, see this post<\/a>.\r\n\r\nFor the Sun-dried Tomato Hummus, see this post<\/a>.\r\n\r\nFor the Creamy Lemon-Dill Dressing, see this post<\/a>.”}
Raw Chocolate Hazelnut Breakfast Parfait

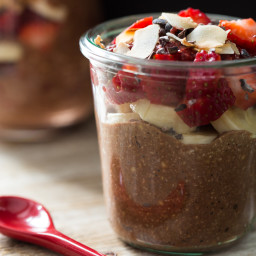
{“head_note”:”This chocolate porridge is light and healthy without being overly sweet, so it’s something you can enjoy in the morning. I added a banana for natural sweetness, a couple tablespoons of cacao powder,\u00a0 and a hint of vanilla and maple syrup. The porridge is great all on its own, but if you want to get fancy, go to town with the toppings. I added toasted hazelnuts, toasted flaked coconut, banana and strawberries, strawberry chia seed jam (from my cookbook<\/a>), and my homemade vegan nutella<\/a>.”,”instructions”:”

    \r\n \t

  1. Place buckwheat groats into a bowl and cover with water. Soak overnight or for at least 2 hours. Rinse and drain the buckwheat thoroughly to remove the gelatinous coating that forms while soaking. Set aside 1\/4 cup of buckwheat groats so you can stir it into the porridge later on (this gives it a slightly crunchy texture).<\/li>\r\n \t
  2. Place all the porridge ingredients (except for the reserved 1\/4 cup groats) into a food processor (or blender) and process (blend) the mixture until combined. I don’t process it super smooth as I like a bit of texture to it, but it’s your call.<\/li>\r\n \t
  3. Adjust sweetness to taste. Stir in the reserved 1\/4 cup of groats. You can chill it for a couple hours (or overnight) or serve immediately.<\/li>\r\n \t
  4. In a glass, layer the porridge along with your desired toppings. Or simply serve it up in a bowl.<\/li>\r\n<\/ol>“,”foot_note”:”

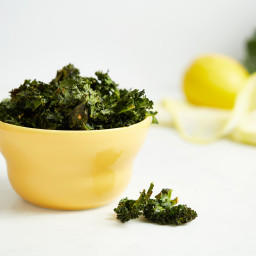
All-Dressed Kale Chips

{“head_note”:”Crispy and chewy kale chips baked in the oven and seasoned to perfection. Enjoy these as a healthy alternative to potato chips.”,”instructions”:”

    \r\n \t

  1. Preheat oven to 300F. Line a large rimmed baking sheet with parchment paper.<\/li>\r\n \t
  2. Remove leaves from the stems of the kale and roughly tear it up into large pieces. Compost the stems (or freeze for smoothies). Wash and spin the leaves until thoroughly dry.<\/li>\r\n \t
  3. Add kale leaves into a large bowl. Massage in the oil until all the nooks and crannies are coated in oil. Now sprinkle on the spices\/seasonings and toss to combine.<\/li>\r\n \t
  4. Spread out the kale onto the prepared baking sheet into a single layer, being sure not to overcrowd the kale.<\/li>\r\n \t
  5. Bake for 10 minutes, rotate the pan, and bake for another 12-15 minutes more until the kale begins to firm up. The kale will look shrunken, but this is normal. I bake for 25 mins. total in my oven.<\/li>\r\n \t
  6. Cool the kale on the sheet for 3 minutes before digging in! This really makes all the difference! Enjoy immediately as they lose their crispiness with time.<\/li>\r\n \t
  7. Repeat this process for the other half of the bunch.<\/li>\r\n<\/ol>“,”foot_note”:”Feel free to make these in a dehydrator if you have one. You can also experiment with the convection or dehydrator setting on your oven (if applicable).”}

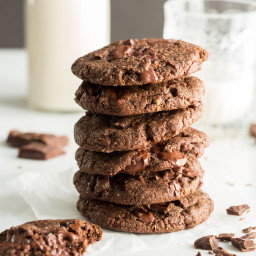
One Bowl Double Chocolate Chunk Cookies

{“head_note”:”Gooey, rich, double chocolate cookies made with whole grain oat flour. These will satisfy your every chocolate craving and then some! This recipe is adapted from my Crispy Peanut Butter Chocolate Chip Cookies<\/a>.”,”instructions”:”

    \r\n \t

  1. Preheat oven to 350\u00b0F and line a large baking sheet with parchment paper. In a large mixing bowl, mix together the flax and water and set aside for a few minutes so it can thicken up. Whisk the flax egg again once thickened.<\/li>\r\n \t
  2. Add the rest of the wet ingredients into the bowl with the flax egg (coconut oil, sunflower seed butter, brown sugar, cane sugar, and vanilla). With a hand-held electric mixer, beat the ingredients until combined and smooth.<\/li>\r\n \t
  3. Now, beat in the dry ingredients, one by one, as you go down the ingredient list (baking soda, baking powder, salt, cocoa powder, oat flour). If your dough is a bit dry, add a teaspoon (or two) of non-dairy milk and beat the mixture again. The dough should be moist enough to form balls without cracking, but not super sticky.<\/li>\r\n \t
  4. Finely chop the chocolate (it should be the size of peas). Beat the chocolate into the batter or simply stir by hand.<\/li>\r\n \t
  5. Shape balls of dough (about the size of a golf ball or 2 heaping tablespoons) and place on the baking sheet 2-3 inches apart. Gently press down on each ball with your hand to form a disc (it should be 1\/2-inch thick or so).<\/li>\r\n \t
  6. Bake for about 12-13 minutes (I baked for 13 mins) until the cookies are spread out nicely.<\/li>\r\n \t
  7. Cool cookies on the baking sheet for 7 minutes or so and then transfer to a cooling rack for another 10-15 minutes.<\/li>\r\n<\/ol>“,”foot_note”:”
      \r\n \t

    • Instead of sunflower seed butter, you can try peanut or almond butter (this means they will no longer be nut-free, of course)<\/li>\r\n \t
    • To bring out the chocolate flavour even more, try sprinkling the cookies with a tiny amount of flaked sea salt before going into the oven.<\/li>\r\n<\/ul>\r\nTo make this recipe soy-free, use a soy-free chocolate such as Enjoy Life brand.”}

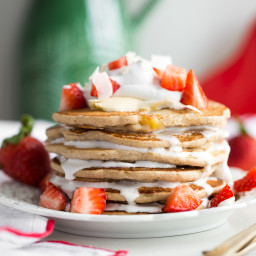
Easy Vegan and Gluten-Free Pancakes (Strawberry Shortcake + Whipped Cream)

{“head_note”:”These vegan pancakes are made with raw buckwheat flour, rice flour, and arrowroot flour – making them naturally gluten-free – and chopped bananas are folded into the batter to provide a fluffy, pillow-like texture. You can enjoy them plain (they are seriously really good without anything added!), or you can get fancy and serve them with some coconut whipped cream<\/a>, fresh berries, vegan butter, and\/or maple syrup. The sky is the limit, pancake lovers. They are also fantastic with some finely chopped chocolate thrown into the batter or blueberries! You can tell I\u2019ve made this recipe a lot! One word of caution: The combination of gluten-free flour is sensitive to changes. I don\u2019t recommend subbing any of the flours with oat flour, for example – it tends to create a pancake that cracks, sticks to the pan, and falls apart. I don\u2019t have any issues with this recipe when I follow it as written and use a non-stick skillet though. This recipe is adapted from my Vanilla Blueberry Buckwheat pancakes<\/a>.”,”instructions”:”

    \r\n \t

  1. Preheat a large non-stick skillet over medium heat. A drop of water should sizzle on the skillet when it\u2019s ready.<\/li>\r\n \t
  2. In a blender, blend the buckwheat groats on high speed until a fine flour forms. Place into a large bowl. Now whisk in the rest of the dry ingredients (rice flour, arrowroot, baking powder, salt, and cinnamon).<\/li>\r\n \t
  3. In a medium bowl, whisk together the almond milk, syrup, and vanilla extract. Pour this onto the dry ingredients and whisk the batter until no clumps remain.<\/li>\r\n \t
  4. Dice the banana until it’s the size of peas or a bit larger. Fold the diced banana into the batter.<\/li>\r\n \t
  5. Lightly grease skillet (I spray olive oil on it). Scoop a heaping 1\/4 cup of batter onto the preheated skillet and quickly spread the batter out into a circle. Cook until some bubbles appear and the edge looks deeper in colour and more firm. Flip and cook for another couple minutes until golden. Adjust heat as needed. Repeat for the other pancakes. I spray the skillet with oil before each pancake is cooked and this seems to work well.<\/li>\r\n \t
  6. Stack and serve with Coconut Whipped Cream<\/a> and fresh chopped strawberries, if desired. Or simply serve with pure maple syrup!<\/li>\r\n<\/ol>“,”foot_note”:”
      \r\n \t

    • If using frozen blueberries, pour batter onto skillet first and then top with blueberries to prevent bleeding.<\/li>\r\n \t
    • I tried subbing the rice flour for oat flour and the pancakes stuck to the pan, so I would advise against that substitution.<\/li>\r\n \t
    • If at any time your batter is too thick or if you want thinner pancakes, simply thin it out with a splash or two of almond milk.<\/li>\r\n<\/ul>“}

Blueberry Banana Muffins

{“head_note”:”Delightful, healthy banana blueberry walnut muffins made with spelt flour so they are naturally wheat-free (but keep in mind that spelt has gluten in it). If blueberries aren’t in season, I suggest using frozen blueberries and saving the fresh ones for summer baking. You can also leave out the walnuts and swap the almond milk for coconut milk if you’d like a nut-free version.”,”instructions”:”

    \r\n \t

  1. Preheat oven to 350\u00b0F (180\u00b0C) and grease a muffin tin.<\/li>\r\n \t
  2. In a medium bowl, mash bananas and measure out 3\/4 cup. If you have any leftover mashed banana you can freeze it for a smoothie.<\/li>\r\n \t
  3. Place mashed banana into medium bowl along with the milk, vinegar, maple syrup, and vanilla. No need to stir it yet.<\/li>\r\n \t
  4. Melt the coconut oil in a small pot over low heat. Set aside.<\/li>\r\n \t
  5. In a large bowl, mix together the dry ingredients (flour, sugar, baking powder, cinnamon, salt, and baking soda).<\/li>\r\n \t
  6. Stir coconut oil into the wet mixture. Pour wet ingredients onto the dry ingredients and stir until just combined. Do not overmix as spelt is a fragile little flour.<\/li>\r\n \t
  7. Gently fold in the walnuts and then the blueberries, being sure not to overmix as this can result in dense muffins.<\/li>\r\n \t
  8. Spoon a heaping 1\/4 cup of batter into each muffin tin, filling each tin about 3\/4 full (they will be almost full, but this is normal). I like to press a few extra blueberries on top of each so they look pretty after baking.<\/li>\r\n \t
  9. Bake at 350\u00b0F (180\u00b0C) for 23 to 27 minutes until a toothpick comes out clean. I baked them for 25 minutes.<\/li>\r\n \t
  10. Cool in pan for 5 to 8 minutes and then transfer muffins to a cooling rack and cool for another 15 minutes.<\/li>\r\n<\/ol>“,”foot_note”:”
      \r\n \t

    • * When using ripe, spotty bananas I find 4 tablespoons of sugar is plenty sweet, however if your bananas aren’t overripe, you might need to use the full 6 tablespoons. Add to your taste.<\/li>\r\n \t
    • ** If using frozen blueberries, be sure to leave them in the freezer (do not thaw) until just before you stir them into the batter. This helps prevent bleeding.<\/li>\r\n<\/ul>“}

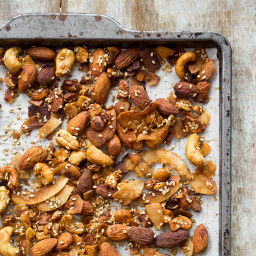
Smoky & Spicy Nut, Sesame, and Coconut ‘Bacon’ Bar Nuts

{“head_note”:”Intensely smoky, spicy, and toasty – this roasted nut mix is a great party appetizer. Sweet almonds and cashews are a lovely contrast to the smoky, savoury flavour of the liquid smoke, coconut aminos, smoked paprika, sea salt, and cayenne pepper. Just a warning: the smoked flavour is very strong while cooking (and after) – I suggest opening a window before beginning and putting on the range fan, if desired.”,”instructions”:”

    \r\n \t

  1. Line a large baking sheet with parchment paper. Preheat oven to 325F.<\/li>\r\n \t
  2. In a large bowl, combine the cashews, almonds, coconut, and sesame seeds.<\/li>\r\n \t
  3. In a small bowl, stir together the coconut aminos (or tamari), maple syrup, liquid smoke, salt, paprika, and cayenne until combined.<\/li>\r\n \t
  4. Pour wet ingredients on top of the nuts and stir well with a spatula until thoroughly coated.<\/li>\r\n \t
  5. With the spatula, scoop the mixture onto the prepared sheet. Use the spatula to get all the liquid and seeds off the side of the bowl and spoon it onto the nut mixture.<\/li>\r\n \t
  6. Spread nuts out into a thin layer.<\/li>\r\n \t
  7. Bake at 325F for 10 minutes, stir, and bake another 10 minutes, or until the coconut flakes are golden. Turn on the range fan and open a window while it bakes as the smoked aroma is powerful.<\/li>\r\n \t
  8. Cool for 10 minutes on the pan. Store in a glass jar.<\/li>\r\n<\/ol>“,”foot_note”:”Note: To make this recipe soy-free, use coconut aminos.”}

My Favourite Vegan Chili

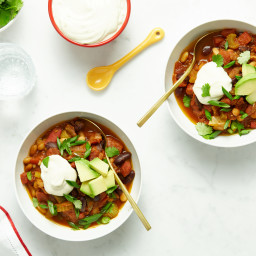
{“head_note”:”Hearty, satisfying, and veggie-packed, this vegan chili will leave you feeling full for hours. I recommend pairing it with a big scoop of my Cashew Sour Cream<\/a>\u00a0for the ultimate chili experience.”,”instructions”:”

    \r\n \t

  1. In a large pot, saut\u00e9 the onion and the garlic in the oil over medium heat until soft and translucent, about 5 minutes. Season with a pinch of salt and stir.<\/li>\r\n \t
  2. Add the jalape\u00f1os, celery, and bell pepper and saut\u00e9 for another 5 to 7 minutes or so, until softened.<\/li>\r\n \t
  3. Now add the can of diced tomatoes (with the juice), broth, and tomato paste. Stir to combine. Increase heat to medium-high.<\/li>\r\n \t
  4. Add the drained and rinsed beans, along with the chili powder, cumin, oregano, and salt. Simmer the mixture, uncovered, until thickened, about 10 to 15 minutes.<\/li>\r\n \t
  5. Add the cayenne and hot sauce to taste, if using. Taste and season with additional salt if desired.<\/li>\r\n \t
  6. Serve with Cashew Sour Cream, chopped green onion, and cilantro leaves, if desired.<\/li>\r\n<\/ol>“,”foot_note”:”
      \r\n \t

    • * I recommend finely chopping the celery so it cooks faster.<\/li>\r\n \t
    • ** Try swapping the raw red pepper for jarred roasted red pepper. It makes the flavour simply out of this world!<\/li>\r\n \t
    • A few of my go-to jarred or canned bean and tomato products are as follows:\u00a0For canned beans I buy Eden Organics, for canned diced tomatoes I buy Ontario Natural Food Co-op, and for tomato paste I try to buy it in a glass jar whenever possible (Bioitalia is one brand I use). I try to buy glass jars for tomato sauces and pure\u00e9s\u00a0too.<\/li>\r\n<\/ul>“}

3-Layer Chocolate Chip Cookie Fudge Squares

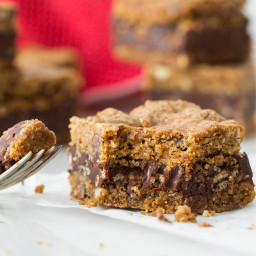
{“head_note”:”Rich\u00a0chocolate fudge is sandwiched between two crispy chocolate chip cookie layers to create these irresistible 3-layer cookie squares. Try them straight out of the fridge!”,”instructions”:”

    \r\n\t

  1. Chill the can of full-fat coconut milk overnight, or for at least 7-8 hours.<\/li>\r\n\t
  2. Preheat oven to 350F and line two 8-inch square pans with two pieces of parchment paper, one going each way. If you just have one 8-inch pan, you can just line one.<\/li>\r\n\t
  3. In a medium pot, add the chocolate chips, coconut cream, and salt. Stir to combine and heat over medium-low until all the chips are melted. Remove from the heat and set aside.<\/li>\r\n\t
  4. Prepare the cookie layers: Stir the ground flax and water together in a small bowl and set aside to thicken.<\/li>\r\n\t
  5. In a large bowl, beat together the butter or coconut oil and the nut or seed butter until smooth. Beat in the sugar and then the flax mixture, until smooth.<\/li>\r\n\t
  6. Now beat in the vanilla, baking soda and baking powder, salt, oat flour, and almond flour (or meal) one at a time. Add the 1\/2 tablespoon of milk to moisten the dough if necessary and beat again. Finally, stir or beat in the chocolate chips.<\/li>\r\n\t
  7. Roll the dough into a ball with your hands and then divide it into 2 equal halves. I like to weigh each half on my scale to ensure they are even. Add one half of the dough into the prepared pan and press down evenly with your fingers, until the dough evenly covers the entire square base. I like to use a pastry roller to push it out smooth. This process takes so time, so be patient! use your fingers to press down the edges of the dough so it’s all even. Repeat this step for the other half of dough in the other pan. Or if you just have one pan, bake one at a time.<\/li>\r\n\t
  8. Bake for about 13-14 minutes at 350F. Remove from the oven and cool pan on a cooling rack for 10 minutes. Then gently lift out the cookie layer and place on the cooling rack until completely cool.<\/li>\r\n\t
  9. When you cookie layers are both cool, place one back inside the square pan (be sure to line it with parchment paper on both sides). Stir the 1\/2 cup of cereal into the melted chocolate and then pour the melted chocolate filling on top of the cookie layer in the pan.<\/li>\r\n\t
  10. Place the pan in the freezer, uncovered, just until the chocolate layer begins to firms up a little (but is not completely solid), about 30 minutes. Now place the second cookie layer gently on top and gently press down on it to stick. Place it back in the freezer for a couple hours until the chocolate layer is completely firm. Slice into small squares and enjoy.<\/li>\r\n\t
  11. Store leftovers in the fridge.<\/li>\r\n<\/ol>\r\n \r\n\r\n \r\n\r\nBake in two 8-inch square pans at 350F for 13-14 minutes (I did 14) . Cool in pan on a cooling rack for 10 minutes, then lift out and cool for another 10 minutes.\r\n\r\ntruffles: Spoon the truffle mixture into a bowl and place in the freezer, uncovered, for 90 minutes, stirring every half hour. After 90 mins, stir again and transfer bowl to the fridge for another 20 minutes until chocolate is firm and workable.”,”foot_note”:””}