Author Archives: Angela Liddon

Rice Thins: 3 Ways

{“head_note”:”Rice thins (like rice cakes, only much thinner!) with my favourite toppings loaded on are one of my favourite snacks! It’s a great way to sneak in some healthy fats (think, nut butter or avocado), and it tastes incredibly flavourful. My favourite brands of rice thins are Lundberg or Smart Bite \”Fit Figure\”. Not to worry if you don’t have any rice thins; this recipe works amazing on regular toast too!”,”instructions”:”

    \r\n\t

  1. For the Avocado \”toast\”: Gently, mash the avocado onto the rice thin. Add a small squeeze of lime juice, red pepper flakes, coarse sea salt, and cilantro.<\/li>\r\n\t
  2. For the\u00a0Peanut Butter, Banana, Cinnamon: Spread on a layer of peanut butter. Top with sliced banana \”coins\”. Add another drizzle of peanut butter, if desired. Sprinkle on cinnamon.<\/li>\r\n\t
  3. For the\u00a0Almond butter and Berry Chia Jam: Spread on a layer of almond butter. Top with chia seed jam. Sprinkle on fresh chopped strawberries and some shredded coconut, if desired.<\/li>\r\n<\/ol>“,”foot_note”:””}

Cilantro-Lime Garlic Cashew Sauce

{“head_note”:”This creamy cashew sauce doesn’t contain a lick of dairy cream, but you won’t miss it one bit. Pour it all over my Next Level Enchiladas for a real treat! I recommend using a high-speed blender, such as a Vitamix, for the smoothest sauce. This sauce is adapted from my Cilantro-Avocado Cream Sauce<\/a>.”,”instructions”:”

    \r\n \t

  1. Add the cashews into a small bowl and cover with boiling water. Soak for 1 hour. Alternatively, you can soak the cashews in room temperature water for 8 hours or overnight.<\/li>\r\n \t
  2. Drain and rinse the soaked cashews.<\/li>\r\n \t
  3. Add all of the cashew cream ingredients into a high-speed blender. Blend on high until a super smooth sauce forms. If using a Vitamix, use the tamper to get things moving. If your blender is having a hard time blending, you can add a splash more water to help things along.<\/li>\r\n<\/ol>“,”foot_note”:””}

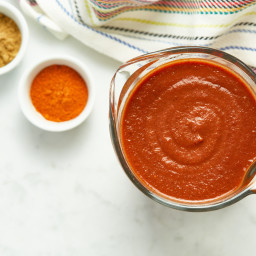
Enchilada Sauce

{“head_note”:”With a homemade enchilada sauce so easy and tasty, you\u2019ll never buy store bought again! Use this sauce in my Next Level\u00a0Enchiladas.”,”instructions”:”

    \r\n \t

  1. In a medium pot, melt the vegan butter over medium heat or simply add the oil and increase heat to medium.<\/li>\r\n \t
  2. Stir in the flour until a thin paste forms.<\/li>\r\n \t
  3. Stir in the chili powder, garlic powder, cumin, onion powder, and cayenne pepper until combined. Cook for a couple minutes over medium heat until fragrant.<\/li>\r\n \t
  4. Stir in the tomato paste followed by the broth. Whisk until smooth.<\/li>\r\n \t
  5. Bring to a simmer over low-medium heat. Stir in salt to taste and continue simmering until thickened for about 5 minutes, or longer if desired.<\/li>\r\n<\/ol>“,”foot_note”:””}
Pink Heart Smoothie Bowl

{“head_note”:”This smoothie bowl is a feast for the eyes\u2014and the stomach! Its thick and creamy texture is thanks to coconut milk and heart-healthy avocado. The decadent-tasting smoothie has the perfect texture for adding all kinds of toppings to \”float\” on top and eat with a spoon!”,”instructions”:”

    \r\n \t

  1. Add all smoothie ingredients into a high-speed blender and blend on high until super smooth. Adjust sweetness if desired. Likewise, add more ice if a colder smoothie is desired, and blend again.<\/li>\r\n \t
  2. Pour into 2 bowls, and top with your desired toppings. Serve immediately and enjoy with a spoon!<\/li>\r\n<\/ol>“,”foot_note”:””}

Coconut Whipped Cream

{“head_note”:”You can easily create a decadent, fluffy whipped cream by using a can of full-fat coconut milk. Not only is the technique simple, but it\u2019s easily the best-tasting whipped cream I\u2019ve tried. You can use this whipped cream just like regular dairy whipped cream. I like to use it in a bowl of fruit, on top of a fruit crisp, or stirred into Banana Soft Serve. The options are really endless! One important tip: you\u2019ll want to chill the can of coconut milk for at least 24 hours before you begin to ensure the white coconut cream solidifies (be sure to read all my tips below on how to buy the right coconut milk for this recipe).”,”instructions”:”

    \r\n \t

  1. Chill the can of coconut milk in the fridge for at least 24 hours. I like to keep a few cans in the fridge at all times so I don\u2019t have to wait. <\/span><\/li>\r\n \t
  2. About 1 hour before making the coconut whip, chill a mixing bowl in the freezer. <\/span><\/li>\r\n \t
  3. After chilling the can, open the can and scoop the solid white coconut cream into the bowl. Discard the coconut water or save it for another use (such as coconut water ice cubes). <\/span><\/li>\r\n \t
  4. Using an electric hand mixer or a stand mixer with the whisk attachment, beat the cream until fluffy and smooth. Add in sweetener to taste and vanilla.<\/span><\/li>\r\n \t
  5. Return whipped cream to fridge until ready to use. It will firm when chilled and soften at room temperature. This will keep in the fridge in a sealed container for up to 1 week or you can freeze it in an airtight freezer-safe bag for up to 1 month. After chilling in the fridge, allow it to sit at room temperature until it softens slightly and then you can re-whip it as needed.<\/li>\r\n<\/ol>“,”foot_note”:”
      \r\n \t

    • * Some brands of canned coconut milk will be better than others for making whipped cream, and even some cans within the same brand can vary quite a bit. For whatever reason, the cream and water in some brands or cans do not separate. A few of the most consistent brands for making coconut whipped cream are: Thai Kitchen full-fat coconut milk, Trader Joe\u2019s Coconut Cream (just the cream\u2014no water in the can!), and Native Forest. I always keep at least a few cans of full-fat coconut milk in my fridge at all times just in case I get a \u201cdud\u201d\u2014then I know I have more on hand. If you happen to get a dud don\u2019t be discouraged. Try out one of the brands above, and be sure to chill it for at least 24 hours. Odds are you will find your perfect brand after some trial and error!!<\/li>\r\n<\/ul>“}

Healthy Potato Soup for the Soul

{“head_note”:”This soup is perfect for when you’re craving a comforting bowl of potato soup, but does without all the cream and heaviness of traditional versions. I added baby spinach to lend this soup its gorgeous green colour, not to mention a nice boost of nutrition! Since the soup is blended smooth, I topped it with roasted garlic potato \”croutons\” for some chewy texture, and I enhanced the flavours with green onion and fresh dill. A small amount of raw cashews gives this soup a lovely creaminess, but if you are allergic to nuts you’ll be happy to know that the soup still works without them. Be sure to serve this with a hunk of hearty bread for dipping. Who doesn’t love carbs on carbs on carbs?”,”instructions”:”

    \r\n \t

  1. Preheat the oven to 425\u00b0F (220\u00b0C) and line a large baking sheet with parchment paper.<\/span><\/li>\r\n \t
  2. Prepare the \u201ccroutons\u201d: Add the chopped potatoes into a large bowl and toss with the oil. Sprinkle on the garlic powder and salt and toss until combined. Spread out onto the baking sheet in an even layer. Add another sprinkle of salt. Roast for 18 minutes, flip the potatoes, and continue roasting for another 25 minutes, until browned and crispy along the edges.<\/li>\r\n \t
  3. Meanwhile, prepare the soup: In a large pot, add the oil, onion, and garlic. Add a pinch of salt and some freshly ground pepper. Stir to combine. Saut\u00e9 the onion and garlic over medium heat until the onion is softened, about 4 to 5 minutes.<\/li>\r\n \t
  4. Stir in the potato. Saut\u00e9 for a couple minutes more.<\/li>\r\n \t
  5. Add the broth, half the salt, and a generous amount of freshly ground black pepper.<\/li>\r\n \t
  6. Increase heat and bring the soup to a low boil. Reduce the heat to medium and simmer the soup, uncovered, for about 13 to 20 minutes until the potatoes are fork tender. Turn off heat and let the soup sit for a couple minutes to gently cool.<\/li>\r\n \t
  7. With a ladle, carefully transfer the soup into a heavy-duty blender. Add the spinach and rinsed and drained cashews. (You might have to blend the soup in a couple batches.) With the lid ajar, blend the soup on low and slowly increase the speed until the soup is smooth. Transfer the blended soup back into the pot. Repeat for any remaining soup.<\/li>\r\n \t
  8. Taste the soup and add the remaining salt to taste, the lemon juice, and cayenne pepper. Stir to combine.<\/li>\r\n \t
  9. Ladle into bowls and serve with some fresh minced dill, green onions, and potato croutons on top.<\/li>\r\n<\/ol>“,”foot_note”:””}

Almond Butter Fudge Swirl Overnight Oats

{“head_note”:”Meet your new favourite bowl of overnight oats! Luxurious, nutty almond butter and creamy almond milk form the base of these decadent overnight oats. Swirling a homemade chocolate fudge sauce into these heavenly oats takes them over the top. Nope, you aren\u2019t dreaming\u2014but you may dream of this irresistible breakfast while you sleep! Be sure to prepare these oats the night before you want to enjoy them (or at least 1 1\/2 hours before) as they\u2019ll need to soak in the fridge. For a portable option, try layering the overnight oats, fudge swirl, and toppings in a small mason jar.”,”instructions”:”

    \r\n \t

  1. For the oats: Add the almond milk, almond butter, maple syrup, and cinnamon to a high-speed blender. Blend until smooth.<\/span><\/li>\r\n \t
  2. Transfer the blended mixture to a large bowl or container. Stir in the oats, diced banana, and chia seeds until combined.<\/span><\/li>\r\n \t
  3. Cover and refrigerate for at least 1 1\/2 hours, or overnight, until the mixture thickens and the oats and chia seeds have absorbed the milk.<\/span><\/li>\r\n \t
  4. For the fudge swirl: In a small bowl, whisk together the cocoa powder, 2 1\/2 tablespoons maple syrup, and almond butter until smooth. Add salt to taste and whisk again. If the mixture is too thick for swirling, add the remaining 1\/2 tablespoon of maple syrup and whisk again to thin.<\/span><\/li>\r\n \t
  5. Once chilled, stir the oats and portion into bowls for serving. <\/span><\/li>\r\n \t
  6. Top each bowl with a spoonful of fudge. Use a spoon or knife to swirl the chocolate into the top of the oats. Sprinkle on your desired toppings\u2014I suggest chopped strawberries, toasted sliced almonds, granola, or coconut flakes, but feel free to play around. I also love adding a drizzle of maple syrup to make the flavours pop. Serve and enjoy! Leftovers will keep in an airtight container in the fridge for a few days. <\/span><\/li>\r\n<\/ol>“,”foot_note”:””}

Lemon-Tahini Avocado Toast

{“head_note”:”This new spin on avocado toast packs a creamy, tangy punch! It’s a great way to use up leftover Lemon-Tahini Dressing. Simply drizzle some on top to take avocado toast to a whole new level.”,”instructions”:”

    \r\n \t

  1. Gather all of the ingredients so they are ready when your toast pops.<\/li>\r\n \t
  2. Toast the bread until golden brown.<\/li>\r\n \t
  3. Layer on the sliced avocado.<\/li>\r\n \t
  4. Top with a generous drizzle of dressing, and a pinch of red pepper flakes, salt, and pepper, to taste. Serve immediately.<\/li>\r\n<\/ol>“,”foot_note”:””}

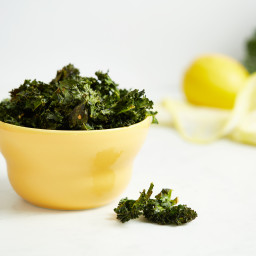
Garlic-Lemon Kale Chips

{“head_note”:”These easy kale chips never fail to satisfy my craving! The lemon and garlic add a lot of flavour without overpowering, and a pinch of salt brings it all together.”,”instructions”:”

    \r\n \t

  1. Preheat oven to 300\u00b0F (150\u00b0C). Line two large rimmed baking sheets with parchment paper. <\/span><\/li>\r\n \t
  2. Remove leaves from the stems of the kale and roughly tear up the kale leaves into large pieces. Compost the stems (or freeze for smoothies). Wash and spin the leaves until thoroughly dry. <\/span><\/li>\r\n \t
  3. Add kale leaves into a large bowl. Massage in the oil until all the nooks and crannies are coated in oil. <\/span><\/li>\r\n \t
  4. Add the garlic, salt, and lemon zest and massage it into the kale until combined. <\/span><\/li>\r\n \t
  5. Spread the kale onto the prepared baking sheets into a single layer, being sure not to overcrowd the kale leaves. <\/span><\/li>\r\n \t
  6. Bake for 10 minutes, rotate the pans, and bake for another 12 to 16 minutes until the kale shrinks in size quite a bit. (The kale should not be turning brown\u2014if it is, remove it from the oven.)<\/span><\/li>\r\n \t
  7. Cool the kale on the sheet for a few minutes before digging in. Sprinkle with more sea salt, if desired. Enjoy immediately as the chips lose their crispiness with time.<\/li>\r\n<\/ol>“,”foot_note”:””}
Hearty Rice, Black Bean, and Kale Soup

{“head_note”:”This hearty soup is a cozy and filling dish to whip up during the cold winter months. Serve it with crusty, toasted bread for dipping.”,”instructions”:”

    \r\n\t

  1. In a large pot, saut\u00e9 the onion and garlic in oil for about 5-6 minutes over medium heat. Add in the celery and saut\u00e9 for a few minutes more.<\/span><\/li>\r\n\t
  2. Stir in the bay leaf and the spices (cumin, chili powder, coriander, paprika, cayenne). You can add half the spices and add more later if you prefer.<\/span><\/li>\r\n\t
  3. Stir in the can of tomatoes (including juice), broth, and lentils. Bring to a boil, reduce heat, and then simmer, uncovered, for about 20-25 minutes, until lentils are tender and fluffy.<\/span><\/li>\r\n\t
  4. Stir in kale or spinach and season to taste adding more spices if you wish.<\/span><\/li>\r\n<\/ol>“,”foot_note”:””}