Author Archives: Angela Liddon

Flaked Almond “Tuna” Salad

{“head_note”:”Rather than using tuna fish to create this salad, my plant-based version uses\u00a0raw almonds which are soaked until plump and then\u00a0processed until flaked in texture. Once the flaked almonds are mixed\u00a0with some vegan mayo, Dijon, celery, green onion, lemon, garlic, salt, and pepper, it turns into a creamy, fresh, and crunchy topping for a salad, crackers, sandwich, or wrap.”,”instructions”:”

    \r\n \t

  1. Soak almonds in a bowl of water for 3-9 hours until plump. Drain and rinse well.<\/li>\r\n \t
  2. Add drained almonds into a food processor (there’s no need to peel the almond skins unless you want to) and process until finely chopped. It should look a bit like flaked tuna. Place into a medium mixing bowl.<\/li>\r\n \t
  3. Add the chopped celery, green onion, garlic, mayo, mustard, and lemon into the bowl. Stir well to combine. Season to taste with salt and pepper. Add a pinch of kelp granules if desired.<\/li>\r\n \t
  4. Serve on top of a salad or lettuce wrap, or in a sandwich or wrap. Refrigerate leftover salad for up to 3 days.<\/li>\r\n<\/ol>“,”foot_note”:”
      \r\n \t

    • Make it soy-free: Use soy-free vegan mayonnaise, such as Vegenaise brand.<\/li>\r\n<\/ul>“}

Pink Power Detox Smoothie

{“head_note”:”Beet, strawberries, avocado, and lemon unite to create one kick-butt, surprisingly delicious, bright pink smoothie! This smoothie is lightly sweet and creamy, while packing in the detoxifying power of beet and lemon. If you’re not a beet fan you might be wondering if you can taste the beet. The answer is yes you can definitely taste the beet! However, I\u00a0think the beet flavour is balanced quite nicely in this smoothie (keep in mind this is coming from a beet fan).”,”instructions”:”

    \r\n \t

  1. Add all ingredients into a high-speed blender and blend on high until smooth. Taste and add liquid sweetener, if desired.<\/li>\r\n<\/ol>“,”foot_note”:”
      \r\n \t

    • * For a sweeter smoothie, try using coconut water instead of water.<\/li>\r\n \t
    • ** You might want to steam the beet until tender before blending if you don’t have a Vitamix or other capable blender. \u00a0I just blend it raw because I know my Vitamix\u00a0can handle it.<\/li>\r\n<\/ul>“}

Broccoli, Portobello, and Rice Gravy Bowl

{“head_note”:”testing notes: Made the gravy with the tamari the second time and think I liked it less. Next time, use salt only in the gravy. Try adding a bit of lemon juice at the end to brighten the dish. Red pepper flakes?”,”instructions”:”

    \r\n\t

  1. Add the rice into a medium pot along with the broth. Bring to a low boil over high heat. Immediately reduce the heat to medium and cover with a tight-fitting lid. Simmer, reducing heat if necessary, for 12 to 15 minutes, until the broth is absorbed and the rice is fluffy. Remove from heat and keep the lid on until ready to use.<\/li>\r\n\t
  2. Meanwhile, stir-fry the veggies. Add the oil and broth into a very large dutch oven or skillet. Chop the broccoli into small, bite-sized florets. Compost the stem. Rub the portobello mushrooms clean with an old damp cloth and then chop into 1 inch pieces. Add the broccoli and mushrooms into the skillet with a pinch of salt and stir. Saut\u00e9 the veggies over medium heat, covered, for about 10 to 15 minutes, until tender.<\/li>\r\n\t
  3. Prepare the Homemade Vegan Gravy.<\/li>\r\n\t
  4. When everything is ready\u00a0add the entire batch of gravy and cooked rice into the skillet with the veggies. Stir well until combined. Now stir in all of the baby spinach.\u00a0Cover with lid for a few minutes until the spinach wilts, then stir again.<\/li>\r\n\t
  5. Portion into bowls and add your desired accompaniments.<\/li>\r\n<\/ol>“,”foot_note”:”
      \r\n\t

    • * To save time, I like to purchase pre-sliced cremini mushrooms.<\/li>\r\n<\/ul>“}

Iced Vanilla Bean Matcha Latte

{“head_note”:”This is a fun\u00a0way to get a healthy matcha fix when the temperature starts to rise! Rather than using regular ice cubes (which tend to water down lattes), I like to keep a stock of almond milk ice cubes on hand. Blending a couple almond milk cubes into this latte ensures it gets cold without the flavour being compromised! Vanilla bean adds a gourmet feel to an already luxurious cold drink.”,”instructions”:”

    \r\n \t

  1. Pour almond milk into an ice cube tray and freeze until solid. I recommend using a silicone mold if possible, a<\/span>s they\u2019re easy to pop the cubes out<\/span> of<\/span>. I also try to keep a stash on hand in the freezer so the cubes are ready to go at all times.<\/li>\r\n \t
  2. To make the latte: Add the cup of almond milk into a blender along with 2 almond milk ice cubes, matcha powder, vanilla, maple syrup, and the optional frozen wheatgrass cube(s). Blend on high for around 20 seconds to ensure it gets nice and frothy.<\/li>\r\n \t
  3. Pour into a glass, along with more almond milk ice cubes. You can also add a spoonful of coconut whipped cream and a sprinkle of Matcha on top to make it ultra fancy-pants!<\/li>\r\n<\/ol>“,”foot_note”:”
      \r\n \t

    • *\u00a0I like\u00a0to keep pure vanilla bean powder on hand, so it’s super quick\u00a0to add a quarter teaspoon into the blender for a decadent vanilla flavour. If you don’t have any vanilla beans or powder on hand, not to worry! You can use vanilla almond milk and\/or a half teaspoon\u00a0of pure vanilla extract in a pinch.<\/li>\r\n \t
    • ** I love the Evergreen brand of frozen wheatgrass cubes. You can find them in the freezer section of some grocers like Whole Foods and Organic Garage.<\/li>\r\n<\/ul>“}

Deconstructed Key Lime Pie

{“head_note”:”This easy warm weather dessert is the perfect treat \”for two\”! I whip avocado, melted coconut oil, fresh lime juice, maple syrup, and a dash of pink salt into a creamy, luxurious \”key lime\” flavoured mousse. After chilling, simply layer it into a parfait or add to a bowl and top with crushed graham crackers, Coconut Whipped Cream<\/a>, and more lime.”,”instructions”:”

    \r\n \t

  1. Melt the coconut oil in a small pot over low heat. <\/li>\r\n \t
  2. Add the melted oil into the food processor along with\u00a0the avocado, lime zest, lime juice, maple syrup, and salt into the processor. Process until smooth, stopping to scrape down the bowl as needed.<\/li>\r\n \t
  3. Chill the avocado mousse, covered, for about 2 hours. The pudding will thicken\u00a0a bit while chilling.<\/li>\r\n \t
  4. After chilling, use an electric mixer (with the whisk attachment) and whip the mousse until creamy.<\/li>\r\n \t
  5. Grab some parfait glasses (or bowls) and layer the mousse, graham cracker crumbs, coconut whipped cream, and a lime slice on top, if desired.<\/li>\r\n<\/ol>“,”foot_note”:”
      \r\n \t

    • * For gluten-free and vegan graham crackers, try Mary’s Mini Grahams.<\/li>\r\n<\/ul>“}

High Protein Green Shake

{“head_note”:”This smoothie (I actually call it a shake<\/em> because the texture is so thick) clocks in at around 20 grams of protein. Not too shabby, not too shabby indeed. Frozen banana and mango provide a lightly sweet flavour and creamy texture, while spinach, wheatgrass, fresh mint, and chia seeds provide green power and healthy fats.”,”instructions”:”

    \r\n \t

  1. Add all ingredients into a high-speed blender. Blend until smooth, adding more milk if necessary.<\/li>\r\n<\/ol>“,”foot_note”:”
      \r\n \t

    • * I use Omega Nutrition pumpkin seed protein powder. Feel free to use your preferred protein powder.<\/li>\r\n \t
    • ** I use Evergreen brand of frozen wheatgrass juice.<\/li>\r\n<\/ul>“}

Glowing Spiced Lentil Soup

{“head_note”:”This soup is so quick and easy because there aren\u2019t many vegetables to chop (just garlic and onion\u2014that\u2019s it!) and it relies mostly on pantry staples. It takes 15 minutes prep time (that includes getting the ingredients out), and then it\u2019s hands off while it cooks. Talk about easy! While this soup contains a lot of spices, it’s not what I would call \”spicy\” or \”hot\”. If you do want a kick of heat feel free to add some cayenne pepper or red pepper flakes. Also, feel free to change up the baby spinach for other greens like stemmed kale or chard.”,”instructions”:”

    \r\n \t

  1. In a large pot, add the oil, onion, and garlic. Add a pinch of salt, stir, and saut\u00e9 over medium heat for 4 to 5 minutes until the onion softens.<\/span><\/li>\r\n \t
  2. Stir in the turmeric, cumin, cinnamon, and cardamom until combined. Continue cooking for about 1 minute, until fragrant.<\/span><\/li>\r\n \t
  3. Add the diced tomatoes (with juices), entire can of coconut milk, red lentils, broth, salt, and plenty of pepper. Add red pepper flakes or cayenne, if desired, to taste. Stir to combine. Increase heat to high and bring to a low boil.<\/span><\/li>\r\n \t
  4. Once it boils, reduce the heat to medium-high, and simmer, uncovered, for about 18 to 22 minutes, until the lentils are fluffy and tender.<\/span><\/li>\r\n \t
  5. Turn off the heat and stir in the spinach until wilted. Add the lime juice to taste. Taste and add\u00a0more salt and pepper, if desired. Ladle into bowls and serve with toasted bread and lime wedges.<\/span><\/li>\r\n<\/ol>“,”foot_note”:”
      \r\n \t

    • *\u00a0I tried a version using light canned coconut milk and one using full-fat canned coconut milk, and I greatly prefer the full-fat coconut milk version (shocker, I know). I recommend following suit, but if all you have on hand is light canned coconut milk that\u2019ll work in a pinch\u2014it just won’t be as rich and creamy.<\/li>\r\n<\/ul>“}

The Perfect Granola

{“head_note”:”This granola will rock your world!\u00a0I love granola, but I don\u2019t always love its typical\u00a0oil and sugar heavy profile. This crunchy granola\u00a0is lightly sweetened and lower in oil than most, resulting in a light-tasting granola perfect for every day use.”,”instructions”:”

    \r\n \t

  1. Preheat the oven to 325\u00b0F (160\u00b0C) and line a large baking sheet with parchment paper.<\/li>\r\n \t
  2. In a large bowl, stir together the oats, almonds, sugar, ground flax, cinnamon, vanilla, and salt until combined.<\/li>\r\n \t
  3. In a small saucepan, melt the coconut oil over low heat. Remove from heat and stir in the maple syrup, almond butter, and vanilla until smooth.<\/li>\r\n \t
  4. Add the wet mixture to dry mixture and stir well until everything is thoroughly\u00a0combined. The mixture will be a bit dry at first but keep mixing as it will eventually come together.<\/li>\r\n \t
  5. Scoop the granola onto the baking sheet and spread it out into a thin layer.<\/li>\r\n \t
  6. Bake for around 15 to 25 minutes, or until lightly golden, rotating the pan once half-way through baking. Be careful not to burn. Allow the granola to cool for about 30 minutes on the baking sheet, or until completely cool, and then break it apart into clusters. Store the granola in an air-tight container for a few weeks, or it can be frozen for 1 to 2 months.<\/li>\r\n<\/ol>“,”foot_note”:””}

Addictive Granola Chips

{“head_note”:”I love granola, but I don\u2019t always love its usual oil and sugar heavy profile. This crunchy lightened up version is lightly sweetened and very low in oil, resulting in a light tasting granola perfect for every day use.”,”instructions”:”

    \r\n\t

  1. Preheat oven to 325F and line a baking sheet with parchment paper or non-stick mat.<\/li>\r\n\t
  2. In a large bowl, stir together dry ingredients.In a medium sized bowl, mix together the wet ingredients (except for the vanilla beans and extracts). Microwave for about 60 seconds on high. Now stir in the extracts and scraped vanilla beans until combined.<\/li>\r\n\t
  3. Add wet mixture to dry mixture and stir well until everything is coated. The mixture will be a bit dry at first but keep mixing as it will eventually come together! If it is still too dry, add some applesauce, a tablespoon at a time, and stir until combined. Scoop onto baking sheet and spread it out into a thin layer.<\/li>\r\n\t
  4. Bake for 10-15 minutes, rotating the pan once half-way through baking. Allow to cool for about 10-15 minutes on the baking sheet before breaking it apart into clusters. Makes about 5 cups. Store in an air-tight container for 1-2 months.<\/li>\r\n<\/ol>“,”foot_note”:””}

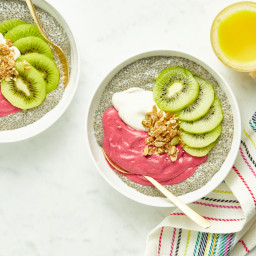
Raspberry Mousse Chia Bowl

{“head_note”:”These raspberry mousse bowls make the perfect snack, dessert, or special breakfast! I got the idea to make a raspberry mousse from one of my recipe testers who was testing my chocolate avocado mousse. She said, \”A chocolate raspberry mousse would be amazing, or just leave out the cocoa and create a bright pink raspberry mousse!\” I knew I had to try it, and I’m so happy with the outcome! The chia pudding and toppings are optional, so you can enjoy the mousse\u00a0all on its own if desired.”,”instructions”:”

    \r\n \t

  1. For the chia seed pudding: In a medium bowl, whisk together the milk, chia seeds, maple syrup, and vanilla until combined. Cover and chill in the fridge for an hour, or until thickened. Whisk the mixture a few times during the chill time if you can.<\/li>\r\n \t
  2. For the raspberry mousse: In a food processor, add the frozen raspberries, coconut cream, avocado, maple syrup, and vanilla. Process until super smooth, stopping to scrape down the bowl as needed. Spoon into a bowl, cover, and chill in the fridge while the chia seed pudding thickens.<\/li>\r\n \t
  3. To assemble: In a small bowl, add your desired amount of chia pudding, mousse, fruit, granola, and coconut whipped cream (if using). You can also serve this small parfait jars. Serve immediately.<\/li>\r\n<\/ol>“,”foot_note”:”
      \r\n \t

    • * Be sure to chill the can of coconut milk for at least 24 hours prior to making this recipe. This allows the white cream to solidify, making it easier to scoop it out of the can.<\/li>\r\n<\/ul>“}