Author Archives: Angela Liddon

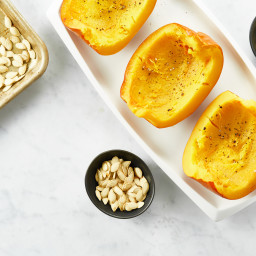
How to Roast Pumpkin and Seeds

{“head_note”:”This is my go-to method for roasting a sugar pumpkin and its seeds at the same time! Most recipes tend to provide instructions on roasting them separately, but I wanted to come up with directions on how to roast them both simultaneously. And, luckily, I’ve discovered it couldn’t be easier.”,”instructions”:”

    \r\n \t

  1. Preheat the oven to 325\u00b0F (160\u00b0C) and place two racks near the centre of the oven. Grab two rimmed medium-sized baking sheets and line one of them with parchment paper.<\/li>\r\n \t
  2. Fill a medium-sized bowl with water and set aside. Lie an absorbent towel onto the counter next to the bowl.<\/li>\r\n \t
  3. Slice off the pumpkin stem and discard.<\/li>\r\n \t
  4. Place the pumpkin, cut side down, onto a cutting board. Carefully slice the pumpkin in half.<\/li>\r\n \t
  5. Scoop out the pumpkin seeds and flesh\/strings and place it all into the bowl of water. The seeds will float to the top (like magic!). Using your hands, grab the big chunks of flesh and pick off any attached seeds. Place the seeds back into the bowl of water. Discard\/compost the chunks of flesh.<\/li>\r\n \t
  6. Use a slotted spoon to remove the seeds. Let excess water drip off and then place the seeds onto the towel. Blot dry (the seeds don\u2019t have to be bone dry and it\u2019s okay if there are some strands attached\u2014they add flavour!).<\/li>\r\n \t
  7. Spread the seeds onto the baking sheet without the parchment and toss with 1 teaspoon of oil. Spread the seeds out into a single layer and sprinkle with salt.<\/li>\r\n \t
  8. Mist or spread oil all over the inside of each pumpkin half and then sprinkle with salt and pepper. Place each half cut-side down onto the lined baking sheet.<\/li>\r\n \t
  9. Place both sheets into the oven with the seeds on the lower rack. Roast at 325\u00b0F (160\u00b0C) for 20 minutes then remove the seeds and taste test a couple. As long as the inner seeds aren’t tasting burned, you can keep roasting them. I usually return the seeds to the oven for another 3 to 4 minutes. Remove the seeds and cool.<\/li>\r\n \t
  10. Leave the pumpkin in the oven and increase the oven temp to 350\u00b0F (180\u00b0C). Continue roasting the pumpkin for another 12 minutes or so, until fork-tender. (The timing may vary based on how large and fresh your pumpkin is.) At this point you can slice it up and serve it as a side vegetable with your meal, or process\/blend the flesh to make homemade pumpkin pur\u00e9e.<\/li>\r\n<\/ol>“,”foot_note”:”
      \r\n \t

    • * One sugar pumpkin (roughly 2 3\/4 pounds) yields\u00a0about 4 cups (720 g) of roasted pumpkin flesh and 3\/4 cup (75 g) seeds.<\/li>\r\n<\/ul>“}
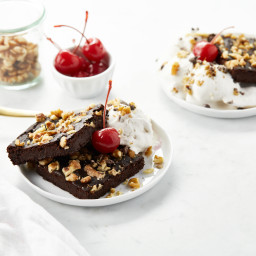
Fudgy Black Bean Brownies

{“head_note”:”Meet my all-time favourite black bean brownies! When you have an intense chocolate craving, there’s nothing better than these dense, rich, and fudgy\u00a0brownies. We\u2019ve made them countless times and they’re always a hit with everyone. Enjoy them on their own, or serve with vanilla ice cream and cherries for a sundae-like twist. Or, if you’d like to spread the brownies with a chocolate buttercream frosting, be sure to see my frosting recipe in the Tips section!”,”instructions”:”

    \r\n \t

  1. Preheat the oven to 350\u00b0F (180\u00b0C) and line an 8-inch square pan with two pieces of parchment paper, one going each way.<\/li>\r\n \t
  2. In a small bowl, whisk together the water, ground flax, and arrowroot powder until no clumps remain. Set aside for a few minutes to thicken.<\/li>\r\n \t
  3. Drain and rinse the black beans very well. Into a food processor, add all of the ingredients except the walnuts (drained beans, sugar, cocoa powder, melted oil\/butter, baking powder, vanilla, sea salt, and flax mixture). Process until smooth, scraping down the side of the bowl as needed. I like to let the processor run for a couple minutes to make sure it blends all the beans smooth. No one wants a bean chunk in a brownie, trust me!<\/li>\r\n \t
  4. Spoon the batter into the prepared pan. Spread out until smooth. Evenly scatter the walnuts on top, and gently press down.<\/li>\r\n \t
  5. Bake for 26\u00a0to 30\u00a0minutes, until firm to the touch.<\/li>\r\n \t
  6. Place the\u00a0pan on a cooling rack for 30 minutes.\u00a0Then place the pan in the freezer for around 20 minutes to expedite the cooling process (yes, I’m impatient!).<\/li>\r\n \t
  7. Remove the brownie slab from the pan and place it on a cutting board. Slice into 9 to 12 squares. The brownies can be wrapped and stored in the fridge for a few days, or in the freezer for 2 to 4 weeks.<\/li>\r\n<\/ol>“,”foot_note”:”
      \r\n \t

    • * To toast the walnuts, preheat the oven to 300\u00b0F (150\u00b0C) and spread the chopped walnuts onto a baking sheet. Toast for 9\u201312 minutes, until golden and fragrant.<\/li>\r\n \t
    • For the chocolate \u201cbuttercream\u201d recipe: In a medium bowl, add 2 tablespoons (30 g) vegan butter or coconut oil, 1\/2 cup + 2 tablespoons (80 g)\u00a0confectioner’s\u00a0sugar, 1\/4 cup (20 g) unsweetened cocoa powder, 3 to 5 teaspoons (15 to 25 mL) non-dairy milk, 1\/2 teaspoon pure vanilla extract, and a pinch of fine sea salt. Beat with an electric mixer until smooth. This recipe makes enough to thinly cover one batch of brownies.<\/li>\r\n \t
    • Make it nut-free: Omit the walnut topping.<\/li>\r\n<\/ul>“}

New Mama Glo Bars

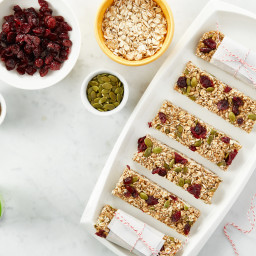
{“head_note”:”I created these Glo Bars with new mamas in mind, but rest assured that they can be enjoyed by all! These nut-free Glo Bars contain oats, ground flax, sesame seeds, and coconut oil, all of which are thought to help boost milk supply in breastfeeding women. They are a great no-bake bar to store in the freezer before baby arrives, too; I love to keep a stash in my freezer so I always have some on hand. I purposely made these bars nut- and chocolate-free because, in some cases, these foods can contribute to fussy breastfed babies (of course, every baby is different\u2014tweak as you see fit!). But it also makes them a great nut-free option for after-school snacks, too!”,”instructions”:”

    \r\n \t

  1. Line a 9-inch square pan with a piece of parchment paper. I like to leave some overhang so the bars are easy to lift out after freezing.<\/span><\/li>\r\n \t
  2. In a large bowl, stir together the dry ingredients (oats, cereal, sesame seeds, pepita seeds, ground flaxseed, dried fruit, coconut, cinnamon, and salt).<\/span><\/li>\r\n \t
  3. Add the brown rice syrup into a small pot over low heat. Stir in the maple syrup, sunflower seed butter, and coconut oil until combined. When the mixture is warm and runny\u00a0remove from heat. Stir in the vanilla.<\/span><\/li>\r\n \t
  4. Immediately pour the brown rice syrup mixture over the dry ingredients (I use a spatula to scoop every last drop!) and with a large metal spoon, stir until the oats are fully coated in the syrup mixture. This can take some elbow grease, but we don\u2019t want any dry patches, so mix well. <\/span><\/li>\r\n \t
  5. Scoop the mixture into the prepared pan and spread out evenly. I like to lightly wet my hands and use them to spread the mixture out. Grab a small pastry roller if you have one, and roll the mixture until even and smooth. Or, simply press down firmly with your hands\u2014the more you pack down the mixture the better the bars hold together. Using your fingertips, press the mixture downward along the edges to create straight edges.<\/span><\/li>\r\n \t
  6. Place the pan in the freezer, uncovered, for about 10 to 15 minutes until the bars firm up enough to slice. Remove the slab and place on a cutting board. With a pizza slicer, slice the bars into 12 equal bars. <\/span><\/li>\r\n \t
  7. Wrap each bar separately in plastic wrap. Store in the fridge for up to 1 week, or freeze\u00a0the wrapped bars in a freezer-safe zip bag for 4 to 6 weeks.\u00a0The bars will firm up when chilled. You can let them sit at room temperature for 5\u201310 minutes before enjoying, if desired.<\/span><\/li>\r\n<\/ol>“,”foot_note”:”
      \r\n \t

    • * These bars are great with toasted sesame and pepita seeds, as well as raw.<\/li>\r\n \t
    • ** To make the bars look extra colourful, like in the photo, I like to scatter the dried cranberries on top (along with a handful of pepitas) before pressing the mixture into the pan.<\/li>\r\n \t
    • *** There are no substitutes for brown rice syrup unfortunately. I’ve tested all different liquid sweeteners and nothing else binds the bars enough.<\/li>\r\n \t
    • **** Organic Sunbutter (smooth) is my go-to store-bought brand. Make sure it’s silky smooth and not dry and hard.<\/li>\r\n<\/ul>“}

Oh Em Gee Veggie Burgers

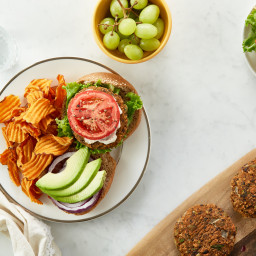
{“head_note”:”Packed with sweet potato (or butternut squash\u2014your choice!), black beans, barbecue sauce, garlic, and an array of flavorful spices, this veggie burger bakes up perfectly and holds together well. I\u2019ll admit these burgers are a bit involved to prepare, but I think the work\u00a0is worth it, because this recipe makes a big batch, enough for 12 patties, which you can freeze for later. To save time, I recommend roasting the sweet potato, toasting the walnuts, and making the 9-Spice Mix in advance. Also, be sure to chop all the ingredients very finely and evenly, as this will help the patties hold together. I always recommend that you read the entire recipe before you begin, but this is especially true here since there are quite a few\u00a0steps.”,”instructions”:”

    \r\n \t

  1. Preheat the oven to 375\u00b0F (190\u00b0C). Line an extra-large baking sheet with parchment paper.<\/li>\r\n \t
  2. Peel the sweet potato and cut it into 1\/2-inch cubes. You should have about 4 cups. Spread the cubes over the baking sheet and toss with 1 tablespoon of oil. Season with salt. Roast for 15 minutes, then flip and roast for 15 to 20 minutes more, until fork-tender. <\/li>\r\n \t
  3. In a large skillet, toast the chopped walnuts over medium heat for 5 to 6 minutes, until fragrant and lightly golden. Transfer the walnuts to an extra-large bowl (trust me when I say extra-large<\/em> as there is a lot of dough to mix).<\/li>\r\n \t
  4. In the skillet, heat the remaining 2 teaspoons oil over medium heat. Add the onion and garlic, stir to combine, and saut\u00e9 for 3 to 5 minutes, until softened. Transfer to the bowl with the walnuts.<\/li>\r\n \t
  5. In a food processor, pulse the beans until you have a mixture of bean paste, chopped beans, and fully intact beans. Be careful not to overprocess them, as you still want a bit of texture. Transfer the beans to the bowl. (You can also mash by hand if necessary.)<\/li>\r\n \t
  6. Measure out 2 lightly packed cups of the roasted sweet potato and transfer to the large bowl. With a fork, mash the potato into the other ingredients in the bowl until the potato is almost smooth.<\/li>\r\n \t
  7. Add the 9-Spice Mix, salt, parsley, barbecue sauce, bread crumbs, and oat flour to the bowl. Stir until thoroughly combined. You can knead the dough together with your hands if that\u2019s easier, or just keep stirring (it\u2019s a great arm workout!). Taste and adjust the seasonings, if desired.<\/li>\r\n \t
  8. Scoop a heaping 1\/3 cup of the dough and shape it into a round, uniform patty, packing it tightly as you rotate the patty in your hands. Place the patty on the lined baking sheet. Repeat to make 11 or 12 patties total, setting them at least an inch apart.<\/li>\r\n \t
  9. Bake for 15 minutes at 375\u00b0F (190\u00b0C), gently flip with a spatula, and bake for 10 to 20 minutes more, until firm and lightly golden. Cool on a cooling rack for about 10 minutes before serving (this helps them firm up). Serve the patty in a bun along with your desired toppings. We love the combo of vegan mayo<\/a>, BBQ sauce, avocado, lettuce, and tomato!\u00a0<\/li>\r\n \t
  10. Let any leftover patties cool completely before storing in an airtight container in the fridge for up to 3 days. You can also wrap the patties individually in aluminum foil, place in a freezer bag with the air sucked out, and freeze for 3 to 4 weeks. Thaw completely on the counter or in\u00a0the fridge before reheating in a greased skillet over medium-high heat for a few minutes on each side.<\/li>\r\n<\/ol>“,”foot_note”:”
      \r\n \t

    • Tip<\/b> You will need 2 cups of roasted sweet potato (or butternut squash) for this burger recipe. Any leftover roasted potato or squash can be served alongside the burgers, so feel free to make extra.<\/li>\r\n \t
    • Make it gluten-free <\/b>Use gluten-free bread crumbs instead of spelt bread crumbs.<\/li>\r\n \t
    • Make it nut-free<\/b> Use hulled sunflower seeds or pepita seeds instead of walnuts.<\/li>\r\n \t
    • Make it kid-friendly<\/b> Shape small patties and serve them on slider buns. They are the perfect size for precious hands! You may also consider reducing the spice mix slightly depending on how much your kids enjoy spice.<\/li>\r\n<\/ul>“}

Grain-Free Pumpkin Spice Granola Clusters

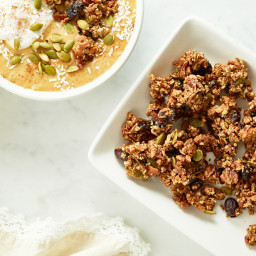
{“head_note”:”Get ready for a fall-inspired granola that is going to rock your world! Pecans, almonds, dried cranberries, coconut, and pepita and sunflower seeds are combined with a delicious pumpkin pie spice mix, pure maple syrup, coconut oil, and vanilla for a granola that\u2019s naturally grain-free and incredibly tasty. Your fall and winter breakfasts will never be the same again! Since nuts can burn so easily, I love to slow bake this granola at a low temperature (275\u00b0F\/135\u00b0C) to ensure that it doesn\u2019t brown too quickly.”,”instructions”:”

    \r\n \t

  1. Preheat the oven to 275\u00b0F (135\u00b0C) and line an extra-large (or two standard-sized) baking sheet(s) with parchment paper.<\/span><\/li>\r\n \t
  2. Add the almonds into a food processor. Process for about 5 seconds, until the almonds are chopped. There will be quite a bit of \u201calmond powder\u201d but this is normal.<\/li>\r\n \t
  3. Add the pecans into the food processor along with the almonds. Process for just a few seconds more, until the pecans are chopped. Spoon the almond-pecan mixture into a large mixing bowl. You\u2019ll have a mix of chopped nuts and powder; add it all into the bowl.<\/li>\r\n \t
  4. To the bowl with the almonds and pecans, add the rest of the dry ingredients (cranberries, coconut, pepitas, sunflower seeds, cinnamon, ginger, nutmeg, allspice, and salt). Stir well to combine.<\/li>\r\n \t
  5. To the dry ingredients, add the maple syrup, melted oil, and vanilla. Stir very well, until the nut mixture is thoroughly coated and \u201cwet looking\u201d. Keep stirring until there are no dry patches at the bottom of the bowl.<\/li>\r\n \t
  6. Spoon the granola onto the prepared baking sheet(s) and spread it out into a thin layer (no more than 1\/4-inch width).<\/li>\r\n \t
  7. Bake the granola for 20 minutes. Remove from the oven and rotate the baking sheet. Return the granola to the oven to bake for another 14 to 18 minutes, until it\u2019s lightly firm and golden (be careful not to brown it).<\/li>\r\n \t
  8. Place the baking sheet on a cooling rack for 20 minutes then break it apart into clusters. Allow it to cool completely on the baking sheet before storing it. Store the granola in a glass jar in the fridge for 2 to 3 weeks, or freeze it in an airtight freezer bag for 4 to 5 weeks.<\/li>\r\n<\/ol>“,”foot_note”:”
      \r\n \t

    • *\u00a0I like Patience Fruit & Co brand of organic, naturally sweetened (with apple juice) dried cranberries. Feel free to use any kind you enjoy! For a fun twist, try swapping the dried cranberries for chopped pitted dates. (To make dates easier to chop, chill them in the fridge until firm.)<\/li>\r\n<\/ul>“}

Pumpkin Pie Smoothie Bowl

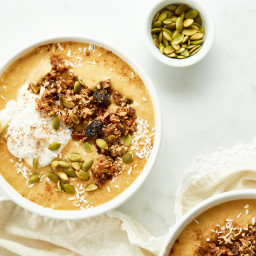
{“head_note”:”This is my favourite fall-inspired smoothie bowl! Packed with pumpkin, cinnamon, ginger, coconut milk, and more, it\u2019ll have you in festive fall spirits in no time. Be sure to chill a can of light coconut milk before making this to ensure that your smoothie ends up nice and cold. I love topping this with Coconut Whipped Cream<\/a> and Grain-Free Pumpkin Spice Granola Clusters<\/a> for a smoothie bowl that feels decadent and healthy all at once.”,”instructions”:”

    \r\n \t

  1. Soak the pitted dates for 30 minutes in boiled water. This step simply softens the dates and helps the blender blend them smooth. (If you have a Vitamix, you can skip this soaking step as the machine is powerful enough on its own to blend the dates smooth.)<\/li>\r\n \t
  2. Place all ingredients into blender and blend until smooth. Feel free to adjust the sweetness and spices to taste and blend again.<\/li>\r\n \t
  3. Pour the smoothie into 2 shallow bowls. Add your desired toppings and serve immediately.<\/li>\r\n<\/ol>“,”foot_note”:”
      \r\n \t

    • To keep this smoothie bowl nut-free, simply omit the\u00a0Grain-Free Pumpkin Spice Granola Clusters, or use a nut-free granola.<\/li>\r\n<\/ul>“}

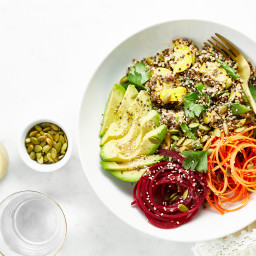
Summer Glow Buddha Bowl with House Vinaigrette

{“head_note”:”Like most plant-based bowl recipes there are a few different components that need to be prepped for this Buddha Bowl, but I’m happy to say they’re all incredibly easy to whip up. I like to prepare the House Vinaigrette and quinoa in advance, maybe the day before or the morning of. This way, the bowls come together incredibly fast. While I created this bowl with summer in mind, rest assured that you can swap out the summer veggies for seasonal veggies all year long. You can also boost the protein by adding your favourite beans\/legumes. This bowl is inspired by Kerr Street Cafe’s Buddha Bowl.”,”instructions”:”

    \r\n \t

  1. For the House Vinaigrette: In a small (1-cup\/250 mL) mason jar, add the vinegar, lemon juice, Dijon, garlic, maple syrup, salt, and pepper. Secure lid and shake vigorously to combine. Remove the lid and add in the olive oil. Secure the lid once again and shake vigorously until the oil is emulsified. Taste, and add additional maple syrup or oil if desired.<\/li>\r\n \t
  2. Cook the quinoa: In a medium saucepan, add the quinoa along with 2 1\/4 cups (560 mL) water. Stir to combine. Increase heat to high and bring to a low boil. Immediately reduce the heat to medium-low, and cover with a tight-fitting lid. Cook for 13 to 16 minutes, until the water is absorbed and the quinoa is fluffy. Remove the lid and season the quinoa with salt and pepper.<\/li>\r\n \t
  3. Saut\u00e9 the vegetables: Meanwhile, in a large skillet or wok, add the olive oil, green beans, snap peas, and zucchini. Stir to combine and season with salt. Saut\u00e9 the veggies over medium-high heat for about 10 minutes, until tender but not overcooked. You still want the veggies to have a light crispness to them. At the end of cooking, stir in the spinach and cook for a couple minutes until it wilts. Turn off the heat.<\/li>\r\n \t
  4. Peel and spiralize the carrot and beet, and slice the avocado.<\/li>\r\n \t
  5. To assemble: Stir all of the cooked quinoa into the skillet veggie mixture. Increase heat to medium, and cook until warmed throughout. Taste and add more salt and pepper if desired. Portion the quinoa-veggie mixture into large shallow bowls. Top the bowls with the carrot, beet, avocado, and a generous amount of toasted pepita seeds. Lastly, shake the House Vinaigrette and drizzle about 3 to 4 tablespoons all over the top of each bowl. Any leftover Buddha Bowl mixture will keep in the fridge for up to 3 days, and the leftover House Vinaigrette will keep for at least two weeks. The olive oil in the dressing tends to solidify when chilled, so be sure to allow it to sit on the counter for a bit (or warm the sealed jar\u00a0in a bowl of hot water), and shake well before using.\u00a0A great way to serve leftovers is to toss some baby mixed greens with House Vinaigrette and stir in some warmed quinoa-veggie mixture. Top it with sliced avocado and toasted pepitas for a quick meal.<\/li>\r\n<\/ol>“,”foot_note”:”
      \r\n \t

    • * If you own a spiralizer, be sure to use a very thick carrot for spiralizing (the smaller ones won’t work). Or you can simply julienne the carrot with a julienne peeler, which is what I usually do.<\/li>\r\n \t
    • ** To avoid staining your hands, try wearing kitchen gloves while handling the beet.<\/li>\r\n \t
    • *** To toast the pepita seeds: Spread the seeds onto a baking sheet and toast them for 8 to 12 minutes at 325\u00b0F (160\u00b0C), until golden.<\/li>\r\n<\/ul>“}

Mighty Matcha Wheatgrass Protein Smoothie

{“head_note”:”This protein-packed smoothie is incredibly fast to throw together, and it’s super energizing thanks to the matcha green tea powder and wheatgrass juice! I like to think of it as my early morning \”jump-start\” during the hot summer months. The matcha powder provides a small amount of caffeine (jitter-free!) to power you through the morning. It’s filling, too, packing more than 25 grams of protein into just one glass (depending on the protein powder that you use). If you can’t get your hands on wheatgrass juice, feel free to swap it with fresh green juice (see my tips below).”,”instructions”:”

    \r\n \t

  1. Add all the smoothie ingredients into a high-speed blender, and blend on high until smooth. Serve and enjoy!<\/li>\r\n<\/ol>“,”foot_note”:”
      \r\n \t

    • * I\u00a0use Evergreen frozen wheatgrass juice. You can find it in the freezer section of grocers like Whole Foods or other natural food stores. Each cube contains about 1 1\/2 tablespoons of juice.<\/li>\r\n \t
    • ** I use Sunwarrior Warrior Blend Natural Protein Powder in this smoothie. Feel free to use your favourite protein powder!<\/li>\r\n \t
    • Try freezing fresh green juice into ice cubes, as a fun swap for the frozen wheatgrass!<\/li>\r\n<\/ul>“}

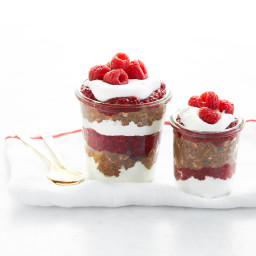
Chocolate Raspberry Dreams Breakfast Parfait

{“head_note”:”This summer-friendly breakfast can be made the night before and assembled so it’s ready to go in the morning! (And trust me when I say that you’ll be dreaming of this while you sleep!) The batch\u00a0makes enough for about 4 servings so you can enjoy it on several occasions. The chocolate overnight oats are mild-tasting and slightly bitter (depending on how much sweetener you use), so the zingy raspberry jam and lightly sweet coconut whip are essential when serving to boost the flavours. To highlight a contrast of textures, add some fresh or frozen raspberries and toasted nuts, too.”,”instructions”:”

    \r\n \t

  1. For the Raspberry Chia Seed Jam: Add the frozen raspberries, chia seeds, and maple syrup into a medium pot. Stir to combine. Cook uncovered over medium heat, stirring frequently, for about 7 to 9 minutes, until the raspberries break down. (It will still look a bit runny, but it will thicken as it cools.) Remove from heat and stir in the vanilla, if using, and additional maple syrup, if desired. Allow the jam to cool on the counter, uncovered, for about a half hour before covering\u00a0and chilling in the fridge.<\/li>\r\n \t
  2. For the Chocolate Overnight Oats: In a large container with a lid, whisk together\u00a0the oats, chia seeds, maple syrup, and cocoa powder until combined. Add the milk, and whisk until no clumps of cocoa powder remain. Secure lid and let it sit on the counter for 2 to 3\u00a0minutes. After sitting briefly, shake the mixture (or stir) again to combine. This just helps prevent the chia seeds from clumping up. Chill in the fridge for a couple hours, or overnight.<\/li>\r\n \t
  3. Prepare the Coconut Whipped Cream, or if using, thaw the store-bought coconut whipped cream in the fridge or on the counter. Store in the fridge until ready to use.<\/li>\r\n \t
  4. When the chia jam and oats are ready, layer them into jars or bowls along with the coconut whipped cream. Add your desired toppings, and enjoy! The parfaits can be made in advance and enjoyed for a few days.<\/li>\r\n<\/ol>“,”foot_note”:”
      \r\n \t

    • * To change up this recipe, feel free to swap the Coconut Whipped Cream for Banana Soft Serve.<\/li>\r\n \t
    • Make it nut-free: Swap the almond milk for a nut-free non-dairy milk, and omit the nut topping.<\/li>\r\n<\/ul>“}

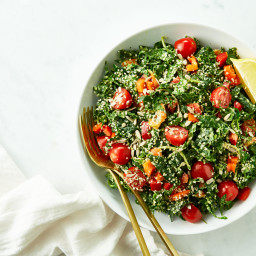
Avocado, Lemon, and Dill Kale Salad

{“head_note”:”This is a satisfying\u00a0summertime salad\u00a0that’s so good it’ll have you craving kale.\u00a0Lacinato (or dinosaur)\u00a0kale is stemmed and finely chopped before adding a rich and creamy avocado-lemon-dill dressing. The best thing about this salad (aside from the amazing flavour) is that you can customize it with whichever toppings you have on hand (cucumber and croutons are also a great addition). I love adding a generous amount of hemp hearts and\/or toasted nuts and seeds for a boost of protein and healthy fats.”,”instructions”:”

    \r\n \t

  1. Remove the stems from the kale. Compost or discard the stems. Finely chop the leaves into tiny 1-inch pieces. Wash the kale and spin it dry. Add it to a large bowl.<\/li>\r\n \t
  2. To the kale, add the sprouts, bell pepper, dill, and tomatoes (if using). Toss with your hands to combine.<\/li>\r\n \t
  3. For the dressing: In a small bowl, mash the avocado until almost smooth. Stir in the lemon juice, nutritional yeast, oil, cayenne pepper (if using), salt, and pepper, to taste.<\/li>\r\n \t
  4. Spoon all of the dressing on top of the salad.\u00a0Massage or rub the dressing into the kale with your hands until the kale is thoroughly coated in the dressing. Rinse your hands, and then taste the salad. Add more salt, pepper, and cayenne, if desired.<\/li>\r\n \t
  5. Top the salad with hemp hearts or toasted nuts and seeds of your choice. You can serve the salad with a lemon wedge if you want even more lemon drizzled on top for a zesty kick. This salad tastes\u00a0best served fresh due to the avocado, but you can store leftovers in an airtight container in the fridge for up to 12 hours.<\/li>\r\n<\/ol>“,”foot_note”:”
      \r\n \t

    • *\u00a0Lacinato kale (also known as dinosaur kale) is a flat-leaf kale which is less bitter and more tender than traditional curly kale. I always buy\u00a0Lacinato kale for salads as I prefer its softer texture. If you can’t find\u00a0Lacinato kale, feel free to use curly kale, but be sure to chop it very finely.<\/li>\r\n<\/ul>“}