Author Archives: Angela Liddon

Quinoa Salad with Garlic-Dijon Vinaigrette

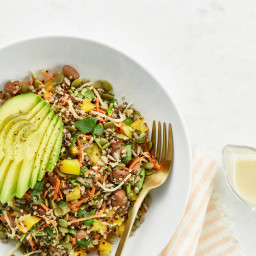
{“head_note”:”This summery quinoa salad incorporates raw carrot, zucchini, and yellow bell pepper for a satisfying crunch, while a homemade Garlic-Dijon vinaigrette gives it a tangy punch. I\u2019ve used grapeseed oil in the vinaigrette as it has a very neutral (virtually undetectable) flavour, but feel free to use another light-tasting oil if need be. I love to add toasted and salted pepita and sunflower seeds for a delicious roasted, nutty flavour, but raw seeds work well, too. This salad was inspired by a prepared salad I picked up from a local grocery store; I knew immediately that I wanted to make my own wallet-friendly version at home. Feel free to change up the vegetables as you see fit.”,”instructions”:”

    \r\n \t

  1. For the vinaigrette: Add all of the vinaigrette ingredients into a small food processor or blender and process (or blend) until smooth. Adjust to taste, if desired. Set aside.<\/span><\/li>\r\n \t
  2. For the quinoa salad: In a medium pot, add the quinoa along with 1 1\/2 cups of water. Increase heat to high, and bring to a low boil. Immediately reduce the heat to low-medium, and cover with a tight-fitting lid. Cook, covered, for 12 to 15 minutes, until all of the water is absorbed. Remove from heat, stir, and cover with the lid again. Let \u201csteam\u201d for a few more minutes and then remove the lid to cool.<\/span><\/li>\r\n \t
  3. Meanwhile, prepare the veggies. <\/span>Roughly chop the julienned carrot and zucchini into 1- to 2-inch pieces.<\/span> Place into a large bowl along with the bell pepper, kale (or spinach), beans, and seeds.<\/span><\/li>\r\n \t
  4. Stir a few tablespoons of vinaigrette and a pinch of salt into the cooked quinoa until evenly distributed. Add the quinoa into the large bowl with the other ingredients. Toss to combine. Taste, and season with more salt, as well as a generous amount of pepper and garlic powder, adding a little bit at a time.<\/span><\/li>\r\n \t
  5. Spoon the salad into bowls, and top with sliced avocado and more Garlic-Dijon Vinaigrette. Leftovers will keep in an airtight container in the fridge for a few days. The dressing should keep in an airtight container in the fridge for up to 1 week.<\/span><\/li>\r\n<\/ol>“,”foot_note”:”* You can spiralize the carrot and zucchini instead of using a julienne peeler.\r\n\r\n \r\n\r\nThe vinaigrette recipe makes 2\/3 cup (160 mL).\r\n\r\n \r\n\r\nQuinoa Salad Nutritional info (per serving, based on 6 servings, without dressing): 480 cals, 17.7 g fat, 20.8 g protein, 14.7 g fibre, 4.8 g sugar, 62 g carbs, 188 g sodium. These values may vary based on the nutritional software used and they were calculated using 1\/2 teaspoon salt. To reduce the overall calories, you can reduce the amount of seeds or avocado called for.\r\n\r\n \r\n\r\nGarlic-Dijon Vinaigrette Nutritional Info (per serving, based on 6 servings): 95 cals, 9.5 g fat, 0.3 g protein, 0.2 g fibre, 1.2 g sugar, 1.9 g carbs, 17 g sodium. These values may vary based on the nutritional software used and they were calculated using 1\/4 teaspoon salt and 1 1\/2 teaspoons maple syrup.”}

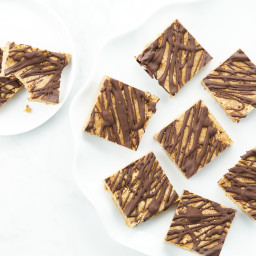
Peanut Butter Protein Power Squares

{“head_note”:”These date-sweetened, no-bake protein squares are easily\u00a0thrown together in a food processor and make the perfect snack to store in the freezer for when you need a quick energy boost. I use protein powder in this recipe to amp up the protein\u2014one small square contains over 6 grams (based on 16 servings). I recommend using a protein powder that\u2019s good-tasting, unflavoured, and unsweetened to avoid it overpowering the other flavours. Also, if you don\u2019t want to make squares, you can roll the dough into balls as an alternative option! These squares are adapted from my Quick and Easy No-Bake Protein Bars<\/a>.”,”instructions”:”

    \r\n \t

  1. Line an 8-inch square pan with parchment paper (with overhang) and set aside.<\/li>\r\n \t
  2. For the squares: In a large food processor, process the oats and almonds to a fine crumb.<\/li>\r\n \t
  3. Add the pitted dates and process again, until they\u2019re finely chopped. The mixture may come together in a big ball, but this is normal.<\/li>\r\n \t
  4. Now add the rest of the ingredients (protein powder, peanut butter, vanilla, melted oil, water, salt, and cinnamon) and process until you have a smooth, dense dough that easily sticks together when pressed between your fingers. It shouldn\u2019t be dry or crumbly at all; if it is, add a bit more water and process again.<\/li>\r\n \t
  5. Spoon the mixture into the prepared pan and spread it out evenly with your hands. Press the dough firmly and evenly into the pan, using your fingertips to level out the edges. If you have one, use a small pastry roller to roll it out smooth. Set aside.<\/li>\r\n \t
  6. For the chocolate topping: In a small pot, melt the chocolate and coconut oil over low heat, stirring frequently. When most of the chips have melted, remove from heat and stir until smooth.<\/li>\r\n \t
  7. Pour the chocolate on top of the dough slab. Spread it out evenly with a spoon until the entire top is coated. (If you\u2019d like it to look like my photo, remove the slab from the pan and drizzle the chocolate over top using a fork or spoon.)<\/li>\r\n \t
  8. Place the pan in the freezer until the chocolate hardens, about 15 minutes. I like to enjoy these squares semi-frozen, so I tend to leave them in the freezer for a half hour.<\/li>\r\n \t
  9. Slice the slab into squares and enjoy! Leftover squares can be wrapped tightly and stored in the fridge for 3 to 5 days, or in the freezer for 1 to 2 months.<\/li>\r\n<\/ol>“,”foot_note”:”* Fresh, soft Medjool dates work best in this recipe. If yours are a bit on the dry side, soak the pitted dates in hot water for 30 minutes and then drain before beginning.\r\n\r\n \r\n\r\n** Be sure to use a protein powder that has a neutral taste you enjoy. I use Sunwarrior Warrior Blend Protein Powder in Natural.\r\n\r\n \r\n\r\n*** Before use, stir the peanut butter well \u00a0to help distribute the oils. Avoid using the really dry peanut butter at the bottom of the jar, too.\r\n\r\n \r\n\r\nNutritional info (per serving, based on 16 servings): 166 cals, 8 g fat, 6.4 g protein, 2.8 g fibre, 12.5 g sugar, 20.5 g carbs.\u00a0These values may vary based on the type of protein powder used and variations in the number of medjool dates used.”}

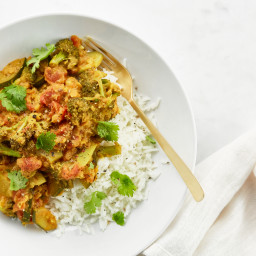
8-Minute Pantry Dal

{“head_note”:”This satisfying pantry dal is lightning fast and will only set you back around 8 minutes of prep time. While not an authentic dal, I created this version out of a desperate need to come up with more speedy pantry dinner options. You can change it up so many ways by simply varying the veggies you use, and in my tips I’ve provided an alternative spice option, too\u2014I still can’t decide which one I like better! Before you begin, I recommend setting out all the spices on the counter so they\u2019re ready to go when you\u2019re cooking. Also, if you have some on hand, this dish is great with baby spinach stirred in during the last couple minutes of cooking. In the photographed dish, I used 2 cups each of chopped zucchini and broccoli florets, but of course, feel free to use any veggies you prefer.”,”instructions”:”

    \r\n \t

  1. In a large pot, melt the coconut oil over low-medium heat.<\/span><\/li>\r\n \t
  2. Peel (if necessary) and dice the veggies into 1\/2-inch pieces. Add them into the pot and stir until combined. Increase heat to medium.<\/span><\/li>\r\n \t
  3. Add in the rest of the ingredients (lentils, water, diced tomatoes [with juices], coconut milk, all the spices, salt, and pepper). Stir until combined.<\/span><\/li>\r\n \t
  4. Increase heat to high and bring to a low boil. Reduce heat to medium and cook, uncovered, for 18 to 30 minutes, until the veggies and lentils are tender; the cook time will depend on the types of veggies you use, and their size. Stir the dal frequently while cooking, and reduce the heat if necessary to prevent it from sticking to the pot. (If you\u2019re using potatoes, I suggest covering the pot while cooking since they don\u2019t contain as much water to \u201ccook off\u201d. You may need to add more water to thin the mixture.)<\/span><\/li>\r\n \t
  5. If desired, serve over rice, and garnish with cilantro and lime (it\u2019s still great without these additions, though!). <\/span><\/li>\r\n<\/ol>“,”foot_note”:”* You can use any veggies you like here! Whatever is lurking in your kitchen, feel free to try it out. A few ideas for combos include the following: carrot and zucchini, potato and peas, sweet potato and red pepper, broccoli and zucchini, cauliflower and\/or broccoli.\r\n\r\n \r\n\r\n** Minced (or flaked) onion is less concentrated than onion powder. Onion powder will work as a substitute if that’s what you have on hand, but I would suggest starting with a small amount and adding it to taste in \u00bc-teaspoon increments to avoid it overpowering the dish.\r\n\r\n \r\n\r\n*** I use Simply Organic brand of curry powder. If you don\u2019t have a favourite curry powder blend on hand, you can substitute the following: 1 1\/2 teaspoons ground turmeric, 1 1\/2 teaspoons ground coriander, 1 teaspoon ground cumin, 1\/2 teaspoon ground ginger (or more to taste), and 1\/4 teaspoon cayenne pepper (optional). Don\u2019t forget to use the 1 1\/2 teaspoons of both garlic powder and minced onion, as well.”}

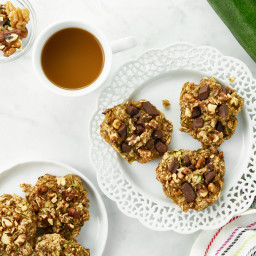
Zucchini Bread Muffin Tops

{“head_note”:”These chewy zucchini bread muffin tops make a great running-out-the-door breakfast or snack, and kids adore them, too! Naturally-sweetened with applesauce and dates, they have no added sugars (the optional chocolate chunks can easily be swapped for walnuts), and they pack in 1 1\/2 cups of grated zucchini. One of my favourite things about these muffin tops\u2014aside from the great taste, of course\u2014is that they aren\u2019t crumbly once cooled, so they\u2019re virtually mess-free (a huge bonus if feeding young kids) and pack well for outings, picnics, and road trips. #winning”,”instructions”:”

    \r\n \t

  1. Preheat oven to 350\u00b0F (180\u00b0C) and line a large baking sheet with parchment paper.<\/span><\/li>\r\n \t
  2. Grate the zucchini. With paper towel or an absorbent tea towel, gently press out some of the water in the zucchini (just a bit…it doesn\u2019t have to be bone dry). Set aside.<\/span><\/li>\r\n \t
  3. Add the pitted dates, applesauce, melted oil, cinnamon, baking powder, vanilla, and salt into a heavy-duty food processor. Process until smooth, stopping to scrape down the bowl as needed. Let the processor run for at least a minute to ensure the mixture gets as smooth as possible.<\/span><\/li>\r\n \t
  4. Add in 1 1\/2 cups of rolled oats and process for only 4 to 5 seconds, just long enough to roughly chop the oats.<\/span><\/li>\r\n \t
  5. Remove the processor bowl from the base, remove the blade, and spoon the dough into a large bowl. Stir in the remaining 1\/2 cup rolled oats, all the zucchini, and the chocolate or walnuts (if using) until thoroughly combined.<\/span><\/li>\r\n \t
  6. Spoon a mound of dough, about 2 to 3 tablespoons worth, onto the baking sheet.<\/span> Do not press down on the dough to flatten\u2014simply leave it in a small mound. <\/span>Repeat until all the dough is used up.<\/span><\/li>\r\n \t
  7. Bake the muffin tops for around 18 to 22 minutes, until semi-firm to the touch and golden brown on the bottom.<\/span><\/li>\r\n \t
  8. Transfer the baking sheet onto a cooling rack for 10 minutes. <\/span><\/li>\r\n \t
  9. Using a spatula, carefully slide each muffin top directly onto a plate and chill in the fridge until completely cool. (The muffin tops will be delicate and doughy in the middle until they are cooled and chilled in the fridge. I find they taste best chilled, too!) Leftovers will keep in an airtight container in the fridge for 4 to 5 days, or you can freeze them (tightly wrapped and sealed in an airtight container) for 2 to 4 weeks.<\/span><\/li>\r\n<\/ol>“,”foot_note”:”* I use the regular-size grate hole on the grater box. This produces muffins with visible strands of zucchini. If you\u2019d like the zucchini completely undetectable, you can try using the finest grate hole. Just keep in mind that zucchini that’s grated more finely will pack more densely when measuring, so you may want to use only 1 cup as opposed to 1 1\/2 cups.\r\n\r\n** Make sure you use very soft Medjool dates. If your dates are firm, soak them in hot water until softened (and then drain) before proceeding with recipe.\r\n\r\n \r\n\r\nWant in on a little secret? I save dirtying a mixing bowl and carefully stir the 1\/2 cup of oats, zucchini, and mix-ins directly into the processor bowl. It\u2019s not an easy feat (which is why I provided the mixing bowl option), but because my processor is fairly large, with some finesse I can make it work. Feel free to use whichever method you prefer!”}

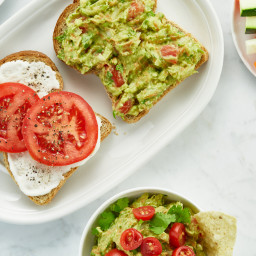
Nutrient-packed Guacamole

{“head_note”:”This guacamole is hiding a nutritious secret\u2014finely grated zucchini and carrots that take this already-healthy dip to the next level! It\u2019s a great way to sneak in more veggies, especially for kids. (Of course, the recipe works without the carrots and zucchini, too.) Serve this hearty guacamole with corn chips or sliced veggies, on top of a big salad, or spread on toast (guacamole toast, anyone?!).”,”instructions”:”

    \r\n \t

  1. Place the avocado flesh into a medium bowl and mash it with a fork until your desired texture is achieved. <\/span><\/li>\r\n \t
  2. Stir in the rest of the ingredients until combined. Taste, and adjust lime juice and salt, if desired. Serve immediately. Guacamole is best served fresh, but leftovers can be stored in an airtight container in the fridge for up to 24 hours. To help keep it fresh, I like to press plastic wrap directly onto the guacamole before sealing the container with a lid. Stir the leftover dip before serving.<\/span><\/li>\r\n<\/ol>“,”foot_note”:”* Use the finest grate hole on the grater box so the zucchini and carrots are less noticeable.\r\n\r\n \r\n\r\n** If you aren\u2019t a big fan of raw onions, you can rinse the onion in a colander and drain it well before stirring it into the guacamole. This helps cut the sharpness a bit. Or, you can simply reduce the amount of onion called for, adding it to taste.”}

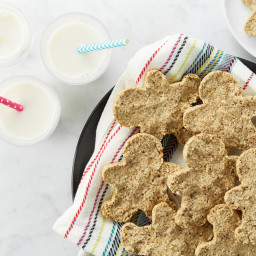
Healthy Kiddo Cookies

{“head_note”:”These crispy, chewy cookies are reminiscent of Scottish oatcakes, with an almond flare and a hint of maple. I made them so I\u2019d have a healthy go-to treat for my toddler and baby. Despite being incredibly wholesome and low in sugar, kids adore these cookies (and adults do, too!). They\u2019re really easy to make, and fun to shape with different cookie cutters. Smaller cookies will cook faster, so keep an eye on them and start at the low end of the bake-time range. If feeding a baby, be sure to consult with your pediatrician before introducing solids, including the (potentially allergenic) ingredients listed below, and always supervise little ones during feeding.”,”instructions”:”

    \r\n \t

  1. Preheat the oven to 350\u00b0F (180\u00b0C) and line a large baking sheet with parchment paper. <\/span><\/li>\r\n \t
  2. Add the almonds to a food processor and process until they\u2019re the texture of sand. Be careful not to overprocess them, or the almonds will break down into butter.<\/span><\/li>\r\n \t
  3. To the almonds in the food processor, add the melted oil, rolled oats, oat flour, salt, cinnamon, and maple syrup. Process until the mixture comes together into a uniform dough.<\/span><\/li>\r\n \t
  4. Add the water to help the dough get a tiny bit stickier, and process again. The dough should easily stick together when pressed between your fingers. <\/span><\/li>\r\n \t
  5. Place a cookie cutter onto the baking sheet. Press a spoonful or two of dough into the cookie cutter until it\u2019s flat and even (aim for 1\/4 to \u00bd inch thickness). Gently pop out the shaped cookie onto the parchment paper. Repeat this process until you have used up all of the dough.<\/span><\/li>\r\n \t
  6. Bake the cookies for 12 to 15 minutes, until the cookies are semi-firm to the touch. (They <\/span>won\u2019t<\/span><\/i> be golden around the edges when you take them out, but they\u2019ll be golden on the bottoms.) <\/span><\/li>\r\n \t
  7. Place the baking sheet on a cooling rack for 5 minutes, and then with a spatula, carefully transfer each cookie to the cooling rack until completely cool. Leftovers can be stored in an airtight container in the fridge for 5 to 7 days. You can\u00a0also freeze them for 2 to 4 weeks, wrapped up tightly, and placed\u00a0in an airtight container.\u00a0<\/span><\/li>\r\n<\/ol>“,”foot_note”:”* I have yet to land on a nut-free version worth sharing, but when I do I will share it in this tip section!\r\n\r\n \r\n\r\n**Store-bought oat flour can taste bitter depending on the brand, so I recommend making your own oat flour at home if you can (it\u2019s so fast and fresh!). To make your own oat flour, add a slightly heaping 1\/2 cup of rolled oats into a high-speed blender. Blend on high until a fine flour forms.\r\n\r\n \r\n\r\nFor a decadent version of these cookies, try dipping half of each cookie into melted dark chocolate. Chill the cookies until the chocolate hardens.”}

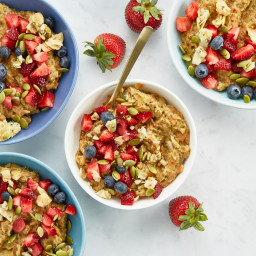
Superfood Porridge

{“head_note”:”I developed this recipe so I\u2019d have a super-nutritious, go-to porridge for my baby and toddler (and the adults too!). This thick and hearty porridge is naturally sweetened with mashed banana and finely shredded carrot, and it\u2019s packed with superfoods like chia seeds and hemp hearts. I love to stir in some finely grated zucchini, as well, upping the veggie goodness even more. If I\u2019m thinking ahead, I\u2019ll mix the oatmeal together before bed so it can soften and thicken in the fridge overnight. Soaking cuts down the cook time drastically\u2014all you have to do in the morning is throw it into a pot and heat it until creamy. Of course, you can prepare it from scratch in the morning, too. And my kids also enjoy this porridge chilled, so that\u2019s a good option if it\u2019s summer or if you just don\u2019t have time to heat it up. If serving this to a baby who\u2019s still on pur\u00e9es, you can throw this oatmeal into a blender or food processor (adding a splash of water or milk, if necessary) and process it for a smoother texture.”,”instructions”:”

    \r\n \t

  1. In a medium bowl, mash the banana until almost smooth. Place it into a medium pot.<\/span><\/li>\r\n \t
  2. Peel the carrots. Using the fine grate hole on a box grater, grate the carrots and measure \u00be to 1 lightly packed cup. Place the carrot into the pot with the banana. If using, grate the zucchini (again using the smallest grate hole) and place it into the pot, too.<\/span><\/li>\r\n \t
  3. Add the rolled oats, milk or water, chia seeds, and optional dash of salt into the pot. Stir well until combined.<\/span><\/li>\r\n \t
  4. Set over medium heat and cook the oats uncovered, stirring frequently and reducing heat if the oats stick to the bottom, for about 10 to 15 minutes, until the oats are softened and the mixture thickens. (If you soaked the oatmeal overnight, simply heat it and serve.)<\/span><\/li>\r\n \t
  5. At the end of cooking, stir in the cinnamon to taste and all the hemp hearts.\u00a0<\/span><\/li>\r\n \t
  6. Serve and enjoy with your desired toppings. Leftovers will keep in the fridge in an airtight container for a couple days. To reheat, transfer oatmeal into a pot on the stovetop and heat over medium heat, stirring in a splash of water or milk to thin if necessary.<\/span><\/li>\r\n<\/ol>“,”foot_note”:”To save on cooking time, combine the ingredients in a bowl and let the porridge soak in the fridge (covered) overnight. In the morning, simply stir and heat on the stovetop, adding more water or milk if desired.\r\n\r\nThis recipe yields a very thick oatmeal (and it thickens even more when chilled). Feel free to use more liquid if you prefer a thinner consistency.”}

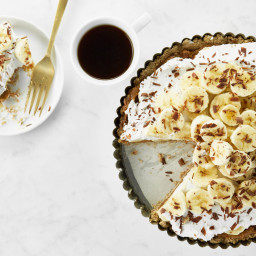
Banoffee Pie

{“head_note”:”This Banoffee Pie is decadent\u00a0while still feeling super light and healthy. The almond-oat crust is layered with\u00a0sticky date caramel, sweet banana coins, luxurious whipped coconut cream, and shaved dark chocolate, for a pie that’s sure to impress.”,”instructions”:”

    \r\n \t

  1. Place 2 cans of full-fat coconut milk in the fridge overnight (or for at least 12 hours) to allow the coconut cream to solidify.<\/span><\/li>\r\n \t
  2. For the crust: Preheat the oven to 375<\/span>\u00b0<\/span>F (190<\/span>\u00b0<\/span>C). Grab an 8- to 10-inch tart pan (I use a 9-inch) and lightly grease the base and sides with coconut oil. Cut a circle of parchment paper to fit on the bottom and place it inside. This will prevent the crust from sticking.<\/span><\/li>\r\n \t
  3. Add the almonds into a food processor and process until they are the texture of coarse sand. Now add in the oats, cinnamon, and salt and process again <\/span>until the coarse, sandy texture returns<\/span>. Add the melted oil, maple syrup, and water, then process until the mixture comes together and no dry flour remains. The dough should stick together when pressed between your fingers; if it’s still too dry, try adding another teaspoon or two of water and processing again.<\/span><\/li>\r\n \t
  4. Crumble the dough all over the base of the tart pan in an even layer. Starting at the center, press the dough flat into the pan with your fingers and work your way outward and up the sides. If the dough starts to stick to your hands, lightly wet your fingers every now and then. With a fork, poke the base of the tart about 15 times to allow the air to escape while baking.<\/span><\/li>\r\n \t
  5. Bake the tart, uncovered, 12 to 14 minutes until lightly golden. Remove from the oven and place the tart pan on a cooling rack for about 15 minutes. If the crust puffed up during baking, you can poke it a few more times with a fork to let the air escape. The crust will firm as it cools.<\/span><\/li>\r\n \t
  6. Meanwhile, make the Raw Caramel Toffee: Add the pitted dates into a bowl and pour boiling water over top. Let sit for 5 to 10 minutes, or longer if your dates are firm. Drain the dates and add them to the food processor along with the almond butter, lemon juice, salt, and vanilla bean seeds (if using). Process until smooth, stopping to scrape the bowl as needed.<\/span><\/li>\r\n \t
  7. Open the chilled cans of coconut milk and carefully scoop off the white cream from the top of the can, discarding the water. Add the coconut cream into a medium bowl. With electric beaters, beat the cream until smooth and fluffy.<\/span><\/li>\r\n \t
  8. When the crust has cooled, gently spread all of the caramel toffee onto the base of the crust\u2014using the back of a lightly wet spoon\u2014until the base is covered. Slice all of the bananas. Place half of the banana slices on top of the caramel, pressing down lightly to adhere.<\/span><\/li>\r\n \t
  9. Spread all of the whipped coconut cream on top of the banana slices in an even layer. Now place the remaining banana slices on top of the pie in a circular pattern, overlapping and stacking them to create height. Garnish with shaved chocolate (I like to shave it with a vegetable peeler) and serve immediately. Leftovers will keep in the fridge in a sealed container for up to 3 to 5 days. I don’t recommend freezing this pie, as the banana slices get mushy after thawing.<\/span><\/li>\r\n<\/ol>“,”foot_note”:”* To save time, you can swap the homemade coconut whipped cream for store-bought coconut whipped cream (such as So Delicious Coco Whip). Be sure to let it thaw before use.\r\n\r\nThe raw caramel works best with soft, fresh dates.”}

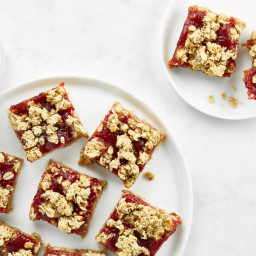
Raspberry Oat Crumble Squares

{“head_note”:”Reminiscent of a Nutri-Grain bar, these squares are vegan, gluten-free, and filled with a delectable raspberry chia seed jam. They require a good period of cooling before they are ready to be sliced\u2014otherwise they may crumble a bit, as they\u2019re very delicate while warm. Feel free to use 1 cup of your favourite store-bought jam in place of the chia seed jam if you are tight on time; this recipe comes together so fast if using store-bought jam (or previously made and cooled chia seed jam)!”,”instructions”:”

    \r\n \t

  1. Preheat oven to 350\u00b0F (180\u00b0C) and line an 8-inch square pan with parchment paper (with overhang so it\u2019s easy to lift the slab out later).<\/span><\/li>\r\n \t
  2. For the jam: In a medium pot, stir together the raspberries, maple syrup, and chia seeds until combined. Bring to a low boil and reduce heat to medium-low. Simmer, uncovered, for about 10 to 15 minutes, stirring frequently, until the raspberries break down and the mixture thickens slightly. Remove from heat and stir in the vanilla. Transfer the mixture to a bowl and into the freezer for about 20 to 30 minutes, to hasten the cooling process.<\/span><\/li>\r\n \t
  3. For the oat squares: In a small mug, mix together the chia seeds and water to make a chia egg. Set aside for a few minutes until thickened.<\/span><\/li>\r\n \t
  4. In a large bowl, stir together the melted oil, maple syrup, brown rice syrup, and vanilla. When the chia egg has thickened, stir that in, too.<\/span><\/li>\r\n \t
  5. One by one, stir in the rolled oats, oat flour, almond flour, baking soda, and salt until the there are no dry patches left. The dough will seem too dry at first, but if you keep mixing, it\u2019ll eventually come together! \u00a0<\/span><\/li>\r\n \t
  6. Set aside 1 packed cup of dough for the crumble topping. <\/span><\/li>\r\n \t
  7. Spoon the remaining dough into the prepared pan. Place a piece of parchment paper on top of the dough and press down to spread the dough out evenly, until it covers the entire base. Or, in lieu of parchment paper, simply use lightly wet hands to press the dough down. <\/span><\/li>\r\n \t
  8. When the chia jam has thickened and cooled, pour all of it (about 1 cup) on top of the oat mixture and spread it out evenly. If using store-bought jam instead, spread on 1 cup.<\/span><\/li>\r\n \t
  9. Crumble the remaining cup of dough over the jam layer. <\/span><\/li>\r\n \t
  10. Bake uncovered for 25 to 30 minutes, until the topping is semi-firm to the touch. <\/span><\/li>\r\n \t
  11. Place the pan directly on a cooling rack for 20 to 30 minutes, and then place it in the fridge until completely cool (about 30 more minutes). Slide a knife around the edges. Carefully lift out the slab and slice into squares.<\/span><\/li>\r\n \t
  12. Store any leftover squares in a sealed container in the fridge for up to 1 week, or in the freezer for up to 6 weeks.<\/span><\/li>\r\n<\/ol>“,”foot_note”:””}

Roasted Buddha Bowl

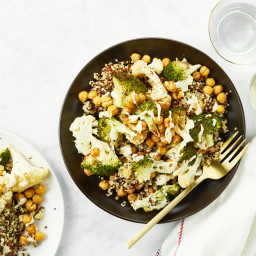
{“head_note”:”If you think you\u2019re not a fan of cauliflower or broccoli, this might just be the recipe that changes your mind. Roasted to perfection and served with an addictive (seriously, addictive<\/i>) cashew-based garlic lemon tahini sauce, these veggies get downright dreamy. The addition of roasted chickpeas boosts the dish to a full-blown meal, and lends it a delightful crunch, too. I love serving it on a bed of warm quinoa. Pro tip: The dressing recipe makes only half a cup (125 mL), so if you\u2019re someone who likes a lot of dressing with your bowls (or even a versatile dressing for workweek lunches!), I recommend doubling it.”,”instructions”:”

    \r\n \t

  1. Soak cashews in a bowl of water overnight or for at least 8 hours. For a quick-soak method, pour boiling water over the cashews and let sit in the bowl for at least 45 minutes. Drain.<\/li>\r\n \t
  2. Preheat the oven to 400\u00b0F (200\u00b0C) and line two large baking sheets with parchment paper.<\/li>\r\n \t
  3. Place the chopped broccoli and cauliflower onto one baking sheet. (If it doesn\u2019t all fit on one, you can add some onto the second sheet.) Drizzle with 1 tablespoon oil and toss until coated. Sprinkle with a generous amount of salt and pepper. Place into the oven.<\/li>\r\n \t
  4. Place a tea towel on the counter and spread out the drained chickpeas. Fold the sides of the towel over the chickpeas to cover, and roll the chickpeas around until dry. Transfer chickpeas onto the parchment-lined baking sheet. Drizzle with 1 teaspoon oil and roll around the chickpeas with your hands until they are fully coated. Sprinkle with salt and place into the oven.<\/li>\r\n \t
  5. Roast the broccoli, cauliflower, and chickpeas for 25 to 30 minutes, until the broccoli and cauliflower are lightly browned and the chickpeas are golden. (At the halfway mark you can give the chickpea pan a gentle shake to roll them around in the pan.)<\/li>\r\n \t
  6. Meanwhile, add all of the dressing ingredients into a blender and blend on high speed until smooth. If you are cooking grains, such as quinoa, cook them now, too.<\/li>\r\n \t
  7. Plate the cooked grains (if using), and top with the roasted broccoli, cauliflower, and chickpeas. Drizzle on a generous amount of dressing. Season with salt and pepper, and any desired spices (I like to add smoked paprika and\/or cayenne pepper, too).<\/li>\r\n \t
  8. If you have leftover dressing, it will keep for up to 5 days in the fridge in a sealed container. The dressing will thicken as it sits (especially when chilled), so you can add more water to thin out as necessary, or simply allow it to come to room temperature before serving. Any leftover grains, chickpeas, and veggies will keep in a sealed container in the fridge for up to a few days. I tend to reheat them in a skillet with some oil over medium heat.<\/li>\r\n<\/ol>“,”foot_note”:”Need a nut-free dressing? Try this Lemon Tahini dressing<\/a> on for size.”}